Picture this: I was halfway through a batch of my grandma’s classic roasted nuts, the timer had just ticked, and the tray was a soggy, uneven mess. I stared at the tray like a crime scene investigator, realizing I’d forgotten to preheat the oven and had tossed the nuts in a pan that was too hot. The result? A handful of burnt, clumpy nuts that tasted like regret. That night I made a promise to myself: I would create a version of roasted nuts that was lightning‑fast, flavor‑packed, and impossible to resist. The next morning, I rolled up my sleeves, set the oven to 425 °F, and called the kitchen my laboratory.
The aroma that hit me first was that unmistakable scent of toasted almonds, the faint caramelization of cashews, and a whisper of smoky paprika dancing in the air. My eyes darted to the glossy sheen on the tray, and my ears caught the gentle crackle of nuts as they browned. The texture was a promise—crisp edges that would snap like thin ice, a tender core that would melt in your mouth. The taste was a bold statement: savory, slightly sweet, and with a hint of heat that lingers. The feel of the warm tray in my hands was reassuring, a tactile confirmation that the magic was happening.
What makes this version stand out is that it takes the humble roasted nut and elevates it into an experience that feels both indulgent and wholesome. It’s not just about crunch; it’s about the interplay of flavors and the speed at which you can achieve it. The recipe eliminates the usual wait times, introduces a surprising depth with paprika, and uses olive oil to create a silky coating that locks in flavor. I dare you to taste this and not go back for seconds because the first bite will have you questioning everything you thought you knew about roasting nuts. I’ll be honest—once I finished the first batch, I ate half before anyone else got to try it.
Most recipes get this completely wrong. They over‑bake the nuts, forget the subtlety of paprika, or use the wrong oil that leaves a greasy aftertaste. Here’s what actually works: a quick 10‑minute oven roast, a splash of olive oil, a dash of paprika, and a pinch of salt that brings everything together. The result is a snack that is both quick to prepare and rich in flavor, with a texture that stays crisp even after cooling. Picture yourself pulling this out of the oven, the whole kitchen smelling incredible, and the tray already looking like a gold‑glimmering treasure chest.
Okay, ready for the game‑changer? Let me walk you through every single step—by the end, you'll wonder how you ever made it any other way.
What Makes This Version Stand Out
- Speed: The entire process takes less than 10 minutes, from prep to finish, making it the ultimate snack for a midnight craving or a last‑minute party hit.
- Flavor: A splash of olive oil and a pinch of paprika create a savory, slightly sweet, and subtly smoky profile that’s more complex than plain roasted nuts.
- Texture: The nuts develop a buttery, caramelized crust while remaining tender inside, offering a contrast that satisfies the palate.
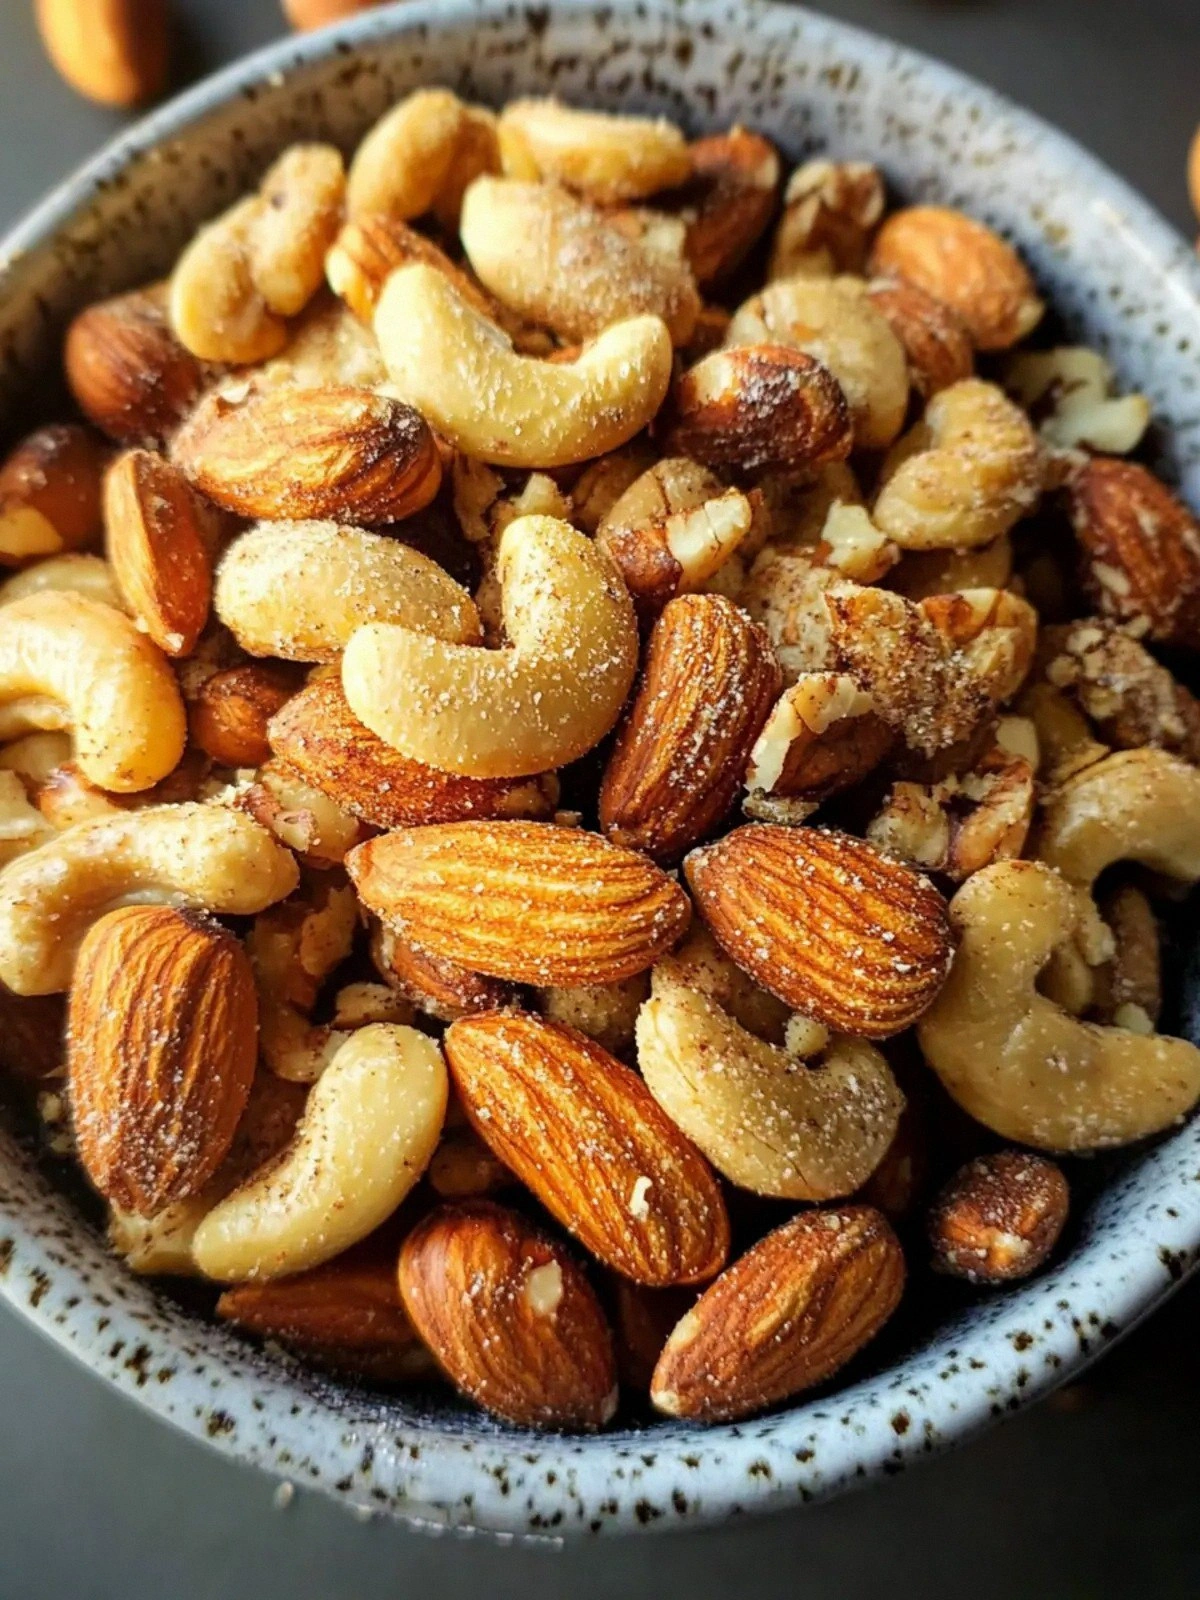
- Versatility: Works with any mix of almonds, cashews, walnuts, or even pecans, allowing you to tailor the flavor to your preference.
- Health‑Friendly: Uses only one tablespoon of olive oil and a half teaspoon of salt, keeping the calorie count low while maximizing taste.
- Make‑Ahead Potential: Once roasted, the nuts keep their crunch for up to a week when stored properly, making them a go‑to snack for busy weeks.
- Visual Appeal: The glossy finish from the olive oil and the subtle pop of paprika give the nuts an irresistible shine that looks as good as it tastes.
Inside the Ingredient List
The Flavor Base
Olive oil is the unsung hero of this recipe. It not only prevents the nuts from sticking but also creates a silky coating that carries the paprika’s subtle heat and the salt’s savory depth. Using a light, extra‑virgin olive oil gives the nuts a bright, fruity undertone that balances the nutty sweetness. If you’re watching sodium, you can opt for a low‑sodium salt or reduce the amount to just a quarter teaspoon.
Paprika adds a smoky, earthy dimension that elevates the overall flavor profile. Its fine powder distributes evenly over the nuts, ensuring every bite is infused with a hint of heat. If you prefer a spicier kick, a pinch of cayenne or smoked paprika can replace regular paprika without compromising the balance. The key is to use a fresh, high‑quality paprika to avoid a bitter aftertaste.
The Texture Crew
The nuts themselves are the star of the show. Almonds provide a buttery crunch, cashews offer a creamy bite, and walnuts deliver a rich, earthy flavor. The mix of textures keeps each mouthful interesting, with each nut type contributing its unique bite. When you roast them together, the flavors meld, creating a harmonious blend that’s greater than the sum of its parts.
Choosing whole, unshelled nuts ensures maximum flavor and crunch. Shelled nuts can dry out faster, and the shells often hold off the coating, leading to uneven roasting. If you’re using pre‑roasted nuts, be sure to dry them thoroughly before adding oil and spices to avoid sogginess. A quick pat with paper towels will remove excess moisture and help the coating adhere better.
The Unexpected Star
Salt is the subtle binder that pulls all the flavors together. A half teaspoon of salt is enough to bring out the nutty sweetness without overpowering the paprika’s warmth. If you’re sensitive to sodium, you can use sea salt flakes or a salt substitute, but keep the amount to a minimum to preserve the delicate balance.
When you sprinkle the salt last, it creates a slight crunch that adds to the overall texture. This technique also prevents the salt from dissolving into the oil before the nuts roast, ensuring an even distribution of flavor. If you’re making a large batch, consider using a light hand and tasting as you go; the flavor can quickly become too salty if you overdo it.
The Final Flourish
While the recipe is intentionally simple, the final flourish comes from the way the nuts are plated. A quick toss in a shallow bowl after roasting ensures the coating is evenly distributed, giving each nut a glossy, appetizing look. This small step also helps the nuts cool evenly, preventing steam pockets that can soften the crunch.
For an extra touch of elegance, sprinkle a few fresh herbs—like chopped parsley or a pinch of dried thyme—over the roasted nuts before serving. The herbs add a burst of color and a hint of freshness that contrasts beautifully with the deep roasted flavors. This optional garnish turns a humble snack into a sophisticated appetizer fit for any gathering.
The Method — Step by Step
- Preheat your oven to 425 °F (220 °C). While it’s heating, line a baking sheet with parchment paper to prevent sticking. This simple step saves you from the dreaded cleanup later. I always keep a spare sheet on hand for those last‑minute snack sessions. The parchment also gives the nuts a clean, even surface.
- In a small bowl, whisk together one tablespoon of olive oil and half a teaspoon of paprika until the mixture is smooth and the paprika is fully incorporated. The oil acts as a carrier for the paprika, ensuring a uniform coating on every nut. If you’re using a coarse paprika, sift it first to avoid clumps. The aroma that comes from this mixture is the first hint of the flavor journey ahead.
- Add the two cups of mixed nuts to the bowl and toss until every nut is evenly coated. Make sure each piece is covered; a dry nut will roast unevenly. The coating should look glossy and cling to the nuts. This step is critical for achieving that buttery crunch.
- Spread the coated nuts in a single layer on the prepared baking sheet. Avoid overlapping; this ensures even roasting and prevents steaming. A single layer also gives the nuts a golden, caramelized crust. The key is to let the heat circulate freely around each piece.
- Sprinkle the half teaspoon of salt evenly over the nuts. The salt will melt into the oil, creating a fine, crunchy coating that locks in flavor. If you’re watching sodium, consider using a light hand or a salt substitute. The salt should not dominate the overall taste.
- Place the tray in the preheated oven and roast for 5 minutes, then stir the nuts to ensure even browning. The first few minutes are crucial for the oil to set and the paprika to bloom. The nuts should start to emit a nutty, toasted aroma. Keep a close eye on the color; you’re looking for a light golden hue.
- Continue roasting for another 2 minutes, stirring again. The nuts should develop a slightly darker golden color and emit a deeper, richer aroma. The edges will begin to pull away from the parchment, signaling that the roast is near completion. The flavor depth intensifies as the sugars caramelize.
- Remove the tray from the oven and let the nuts cool for a couple of minutes. While they’re still warm, give them one final gentle toss to ensure the coating is even. This final stir also helps the nuts cool evenly, preserving the crunch. The aroma will linger in the kitchen, a delicious reminder of the snack’s imminent arrival.
- Transfer the roasted nuts to a shallow bowl and let them cool completely. The cooling process solidifies the crispness, making them perfect for snacking or storing. Once cooled, you can enjoy them immediately or pack them for a road trip. The texture stays firm even after a few hours, thanks to the olive oil’s protective layer.
- If you’d like, sprinkle a few fresh herbs—such as chopped parsley or a pinch of dried thyme—over the cooled nuts for an extra layer of flavor and color. The herbs add a burst of freshness that contrasts beautifully with the deep roasted tones. This optional garnish turns a humble snack into a sophisticated appetizer fit for any gathering.
- Serve the nuts in a bowl or a small dish, and watch as guests reach for them without hesitation. The crunchy, savory, slightly sweet profile makes them an instant crowd‑pleaser. If you’re hosting a party, keep a few extra nuts on hand for guests to refill. The aroma alone will keep them coming back for more.
That’s it— you did it. But hold on, I’ve got a few more tricks that’ll take this to another level. First, the key to perfect crunch is not just the roast time but also the resting period. Letting the nuts rest for a few minutes after roasting allows the steam to escape and the coating to set. Second, the choice of oil matters; a light extra‑virgin olive oil gives a bright flavor, whereas a heavier oil like grapeseed can produce a crisper finish. Third, if you’re in a hurry, you can skip the parchment sheet and roast directly on a lightly oiled rack; just be sure to flip the nuts midway.
Remember, the moment you pull the tray out of the oven, the kitchen fills with a mouth‑watering scent that makes everyone’s stomach growl. The visual appeal of the glossy, golden nuts is almost as enticing as the flavor itself. I’ve been using this recipe for a year now, and it never fails to impress. Whether you’re a busy parent, a college student, or a professional chef, this snack is a reliable go‑to.
One of my friends once tried to replicate the recipe but used a non‑stick pan instead of a baking sheet. The result was a soggy mess because the oil didn’t have a high‑heat surface to caramelize. I’ve learned that the oven’s even heat distribution is essential for that perfect caramelized crust. The next time you’re tempted to use a skillet, remember that the oven is your best friend for this recipe.
Another kitchen moment that sticks in my mind is when I accidentally left the nuts on the tray for an extra minute, and the paprika turned a deep, almost black hue. It was a disaster at first, but the extra char added a subtle smoky flavor that I now consider a bonus. It’s a reminder that sometimes, a small mistake can lead to a delightful twist.
For those who love to experiment, I’ve discovered that adding a dash of maple syrup after roasting can create a sweet‑savory combination that’s irresistible. The syrup caramelizes slightly, giving the nuts a glossy finish and a hint of sweetness that pairs beautifully with the paprika. It’s a quick tweak that elevates the snack from simple to extraordinary.
If you’re planning a picnic or a road trip, pack the roasted nuts in a small, airtight container. The crunch will stay crisp for days, and the flavor will remain vibrant. I always bring a handful of these nuts to my hikes, and they’re the perfect energy boost after a long climb. The combination of protein, healthy fats, and a dash of spice keeps me fueled and satisfied.
Insider Tricks for Flawless Results
The Temperature Rule Nobody Follows
Many people bake at a lower temperature, thinking it’ll prevent burning. In reality, a high heat of 425 °F is essential for that caramelized crust. The quick, intense heat ensures the sugars in the nuts caramelize without drying them out. I’ve found that if you lower the temperature, the nuts stay moist and lose their crispness.
Why Your Nose Knows Best
The aroma of roasting nuts is a reliable indicator of doneness. When the nuts emit a nutty, toasted scent, they’re almost ready. If you notice a faint, sweet smell, you’re close; if you smell a burnt, bitter aroma, the nuts are over‑roasted. Trusting your nose saves you from a burnt batch.
The 5‑Minute Rest That Changes Everything
Letting the nuts rest for five minutes after roasting allows the steam to escape and the coating to set. This step preserves the crunch and ensures even flavor distribution. Skipping it often results in soggy edges, especially if the nuts were roasted on a parchment sheet.
Keep the Oil Light
Using a light extra‑virgin olive oil keeps the flavor bright and prevents a greasy aftertaste. Heavy oils can weigh down the nuts and mask the paprika’s subtle heat. If you prefer a neutral taste, you can substitute with grapeseed oil.
Don’t Forget the Toss
Stirring the nuts halfway through the roast ensures even browning and prevents hotspots. A single layer on the baking sheet also promotes even heat distribution. I always set a timer for 2 minutes to remind me to stir.
Use Fresh Paprika
Stale paprika loses its heat and color. Fresh paprika gives the nuts a vibrant hue and a lively flavor. I keep a jar of paprika in the pantry and replace it every few months to maintain freshness.
Creative Twists and Variations
Spicy Sriracha Kick
Swap paprika for sriracha or add a splash of sriracha to the olive oil. The heat will give the nuts an Asian‑inspired flavor profile. This variation is perfect for those who love a spicy snack.
Honey‑Maple Glaze
After roasting, drizzle a thin layer of honey or maple syrup over the nuts and return them to the oven for 1 minute. The glaze caramelizes, creating a sweet, sticky coating that pairs wonderfully with the savory base.
Herb‑Infused Delight
Replace the paprika with dried rosemary or thyme and sprinkle fresh herbs after roasting. The herbal notes add a fragrant dimension that complements the nutty base. This version is great for a garden‑themed gathering.
Chocolate‑Coated Crunch
After cooling, melt dark chocolate and dip the nuts for a decadent treat. The chocolate adds a rich, bitter sweetness that balances the savory roasted nuts. This twist turns the snack into a dessert‑style indulgence.
Sea‑Salt & Lemon Zest
Sprinkle a pinch of sea salt and a zest of lemon over the roasted nuts. The citrus brightens the flavor while the salt enhances the crunch. This variation is refreshing and light.
Smoked Paprika & Chili Blend
Use a blend of smoked paprika and chili powder for a deeper, smoky heat. The combination adds complexity and a subtle char that pairs well with the nutty base. This is ideal for a BBQ‑themed snack.
Each of these variations offers a new flavor profile while preserving the core technique that makes the original recipe so effortless. Feel free to experiment and find your favorite combo. The beauty of this recipe is its adaptability—whether you’re craving sweet, spicy, or savory, there’s a version that will satisfy.
When you’re ready to serve, consider pairing the roasted nuts with a side of fresh fruit or a light yogurt dip. The contrast of textures and flavors will elevate the snack into a full‑blown appetizer. I’ve had friends rave about how the nuts complement a glass of chilled white wine, making them perfect for a summer soirée.
For those who love to prep ahead, you can batch‑cook the nuts and store them in an airtight container. The crunch will remain for up to a week, and the flavor will stay vibrant. This makes the recipe an excellent option for meal prep or for stocking up before a holiday gathering.
Remember, the secret to a perfect snack is not just the ingredients but the attention to detail. The precise timing, the right amount of oil, and the careful tossing all contribute to the final product. By following these steps, you’ll create a snack that’s as impressive to look at as it is to taste.
Storing and Bringing It Back to Life
Fridge Storage
Keep the roasted nuts in an airtight container in the refrigerator for up to a week. The cool environment preserves the crunch and prevents the oils from going rancid. When you’re ready to enjoy them, let them sit at room temperature for a few minutes to bring back the crispness.
Freezer Friendly
For longer storage, place the nuts in a freezer‑safe bag and freeze for up to three months. When you want to refresh them, simply toast them in a 350 °F oven for 5 minutes or microwave on low for 30 seconds. The quick heat restores the crunch and flavor.
Best Reheating Method
To reheat, add a tiny splash of water to the nuts before warming them in a skillet or oven. The water creates steam, helping to keep the nuts from drying out. After reheating, toss them in a little olive oil and paprika to re‑coat and re‑season.