I was standing in the kitchen, staring at a bagel that had spent a lifetime on the counter, its crust still soft, its center a stubbornly chewy mess. I thought, “This bagel could use a rewrite.” That thought turned into a dare: “I dare you to taste this and not go back for seconds.” The moment I tossed the dough into the air, the air fryer’s hum filled the room, promising a crunch that would make even the most seasoned bagel lover swoon.
Imagine the scent of warm dough rising, a golden crust forming like a sunrise over a sleepy town. The sound of the air fryer’s fan whirring is a steady heartbeat, while the subtle hiss of steam whispers that transformation is underway. When you slice through the first bagel, the interior feels light, airy, almost like a cloud, while the outside shatters like thin ice when you bite. The taste is a symphony: a subtle tang from Greek yogurt, a hint of baking powder’s lift, and the comforting salt that anchors everything. You’ll feel the texture shift from chewy to crisp in seconds, a satisfying contrast that makes each bite a revelation.
What makes this version stand out is not just the simplicity of ingredients but the sheer audacity of the method. By leveraging the air fryer’s even heat and the yogurt’s moisture, we skip the oven, the long prep, and the guesswork. The result is a bagel that is as quick to make as it is delicious, and the best part? It tastes like a bakery staple without the need for a dough mixer or a professional oven. This is hands down the best version you'll ever make at home, and the confidence it brings to your kitchen is palpable. Picture yourself pulling this out of the air fryer, the whole kitchen smelling incredible, and knowing that you’ve just reinvented a breakfast classic.
If you’ve ever struggled with bagels that come out too dense or too dry, you’re not alone. I’ve seen the frustration of watching a bagel shrink like a pancake in the middle of a crowded kitchen. This recipe is a game-changer that eliminates those pitfalls with a single, foolproof technique. Stay with me here—this is worth it. I’ll walk you through every single step, from the first whisk to the final golden crisp, and by the end, you’ll wonder how you ever made bagels any other way.
What Makes This Version Stand Out
- Speed: No long rising times or preheating an oven—just 15 minutes of prep and 30 minutes in the air fryer.
- Texture: A chewy center wrapped in a crust that cracks like a brittle shell, delivering the classic bagel bite.
- Flavor: The tang of Greek yogurt balances the mild sweetness of the dough, while baking powder adds a subtle lift.
- Ease: 3 ingredients, no kneading, no mixing bowl, just a whisk and a bowl.
- Versatility: Works great for breakfast, brunch, or a snack—pair it with cream cheese or avocado for a quick bite.
- Make‑ahead: The dough can be assembled and frozen before cooking, turning this into a weekend batch that’s ready to pop into the air fryer.
- Nutrition: High protein from Greek yogurt, moderate carbs, and a small amount of fat for a balanced breakfast.
- Ingredient Quality: Using plain Greek yogurt instead of sour cream gives a cleaner flavor and better structure.
Alright, let’s break down exactly what goes into this masterpiece…
Inside the Ingredient List
The Flavor Base
The 1 cup of all‑purpose flour is the backbone of this recipe. It provides the structure that holds the bagel together while still allowing it to expand slightly during cooking. If you skip the flour, the dough will collapse and become a mushy pancake. For a slightly gluten‑free option, you can use a 1:1 blend of all‑purpose and oat flour, though the texture will be a bit softer.
The Texture Crew
The 1 teaspoon of baking powder is the secret lift that gives these bagels their characteristic bite. Baking powder reacts with the yogurt’s acidity, creating tiny bubbles that keep the dough light. Without it, the bagels would be flat and dense. If you’re allergic to baking powder, a pinch of baking soda plus a dash of vinegar can mimic the same effect.
The Unexpected Star
1/2 teaspoon of kosher salt is more than just seasoning. Salt enhances flavor, balances the tang of the yogurt, and controls yeast activity—though there’s no yeast here, it still tightens the dough’s proteins for a better bite. If you prefer a low‑sodium version, use 1/4 teaspoon, but be prepared for a slightly muted flavor profile.
The Final Flourish
Plain Greek yogurt is the heart of the dough, adding moisture, protein, and a subtle tang that elevates the overall flavor. Its thick consistency keeps the dough cohesive without the need for an additional binding agent. If you don’t have Greek yogurt on hand, plain low‑fat yogurt works, but the bagels will be a touch less dense.
1 large egg ties everything together, providing structure and a slight richness. It also adds a glossy finish to the crust. If you’re vegan, you can substitute a flaxseed egg or a commercial egg replacer; the bagels will still hold together but the flavor will shift slightly.
Everything’s prepped? Good. Let’s get into the real action…
The Method — Step by Step
- Start by whisking the egg in a medium bowl until the whites and yolk are fully blended. This creates a uniform base that will distribute the yogurt evenly throughout the dough. As you whisk, you’ll hear that satisfying click of the beaters, a small promise that the bagels will come out flawless. Keep whisking until the mixture is slightly frothy, about 30 seconds.
- Add the Greek yogurt to the whisked egg, stirring until you achieve a smooth, lump‑free mixture. The yogurt’s acidity begins to activate the baking powder, setting the stage for a light rise. The mixture should feel thick yet pourable—like a thick pancake batter. Don’t rush this step; the more time you give the ingredients to marry, the better the final texture.
- In a separate bowl, combine the all‑purpose flour, baking powder, and kosher salt. Stir them together so the baking powder is evenly distributed, preventing any pockets of unreacted powder that could cause uneven browning. This dry blend is the structural skeleton of the bagel, so give it a gentle shake to make sure everything is well mixed.
- Gradually fold the dry mixture into the wet yogurt mixture. Use a spatula to fold, not stir, to avoid overworking the dough. The dough should come together into a soft, slightly sticky ball. If it feels too dry, add a tablespoon of water; if too wet, sprinkle a little more flour. The goal is a dough that’s firm enough to hold its shape but still pliable.
- Let the dough rest for 5 minutes. This short rest allows the gluten to relax and the baking powder to begin its reaction. Think of it as a quick nap for the dough, ensuring the bagels will expand evenly during cooking. If you’re short on time, you can skip this step, but the texture will be a bit denser.
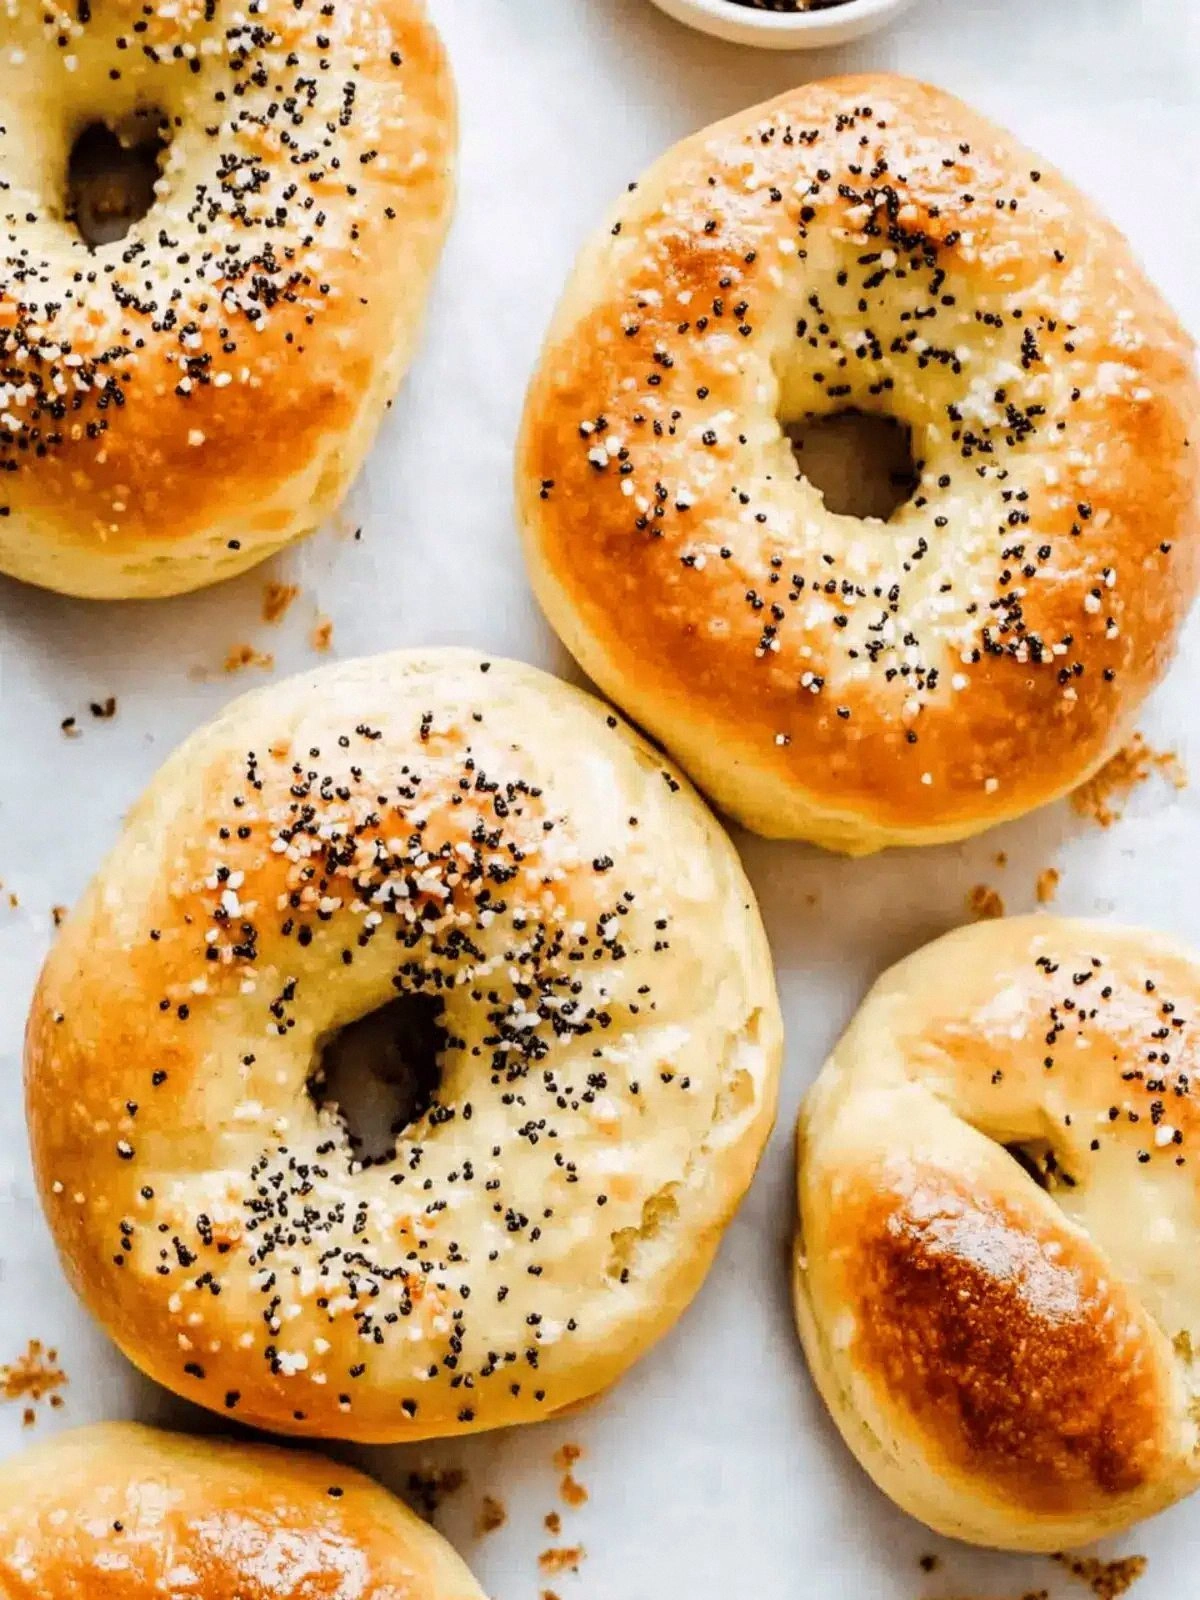
- Divide the dough into four equal portions. Roll each portion into a ball, then press your thumb through the center to create a hole. The hole should be about 2 inches in diameter; too small and it will close up, too large and it will look like a donut. This step is pure visual fun—watch the dough transform into a miniature bagel.
- Preheat your air fryer to 360°F (182°C) for 3 minutes. This ensures the air fryer is at the optimal temperature before the bagels go in. While the air fryer is heating, lightly spray the basket with non‑stick spray to prevent sticking. The bagels should be placed in the basket in a single layer, not touching each other, to allow air circulation.
- Cook the bagels for 12 minutes, then flip them over and cook for an additional 10 minutes. The first 12 minutes should give the bagels a golden brown crust. When you flip, you’ll hear a subtle hiss—this is the bagel’s internal steam escaping. After the second 10 minutes, the bagels should feel firm to the touch and have a crisp, slightly crunchy exterior.
- Remove the bagels from the air fryer and let them cool on a wire rack for 5 minutes. This brief rest allows the steam inside to settle, preventing a soggy center. The bagels should still be warm and fragrant, the scent of toasted flour lingering in the air.
- Slice each bagel in half, spread your favorite topping, and enjoy while they’re still warm. The crunch will give way to a chewy center that’s perfect for a quick breakfast or a comforting snack. Remember, I dare you to taste this and not go back for seconds.
That’s it—you did it. But hold on, I’ve got a few more tricks that will take this to another level…
Insider Tricks for Flawless Results
The Temperature Rule Nobody Follows
Many people set their air fryer to a high temperature, thinking it will give a crisper crust. In reality, 360°F is the sweet spot that allows the inside to bake while the outside crisps without burning. If you’re using a different model, start with 350°F and adjust by 5°F increments based on your observations. This small tweak can make the difference between a bagel that’s perfectly golden and one that’s charred.
Why Your Nose Knows Best
The aroma that wafts from the air fryer is a reliable indicator of doneness. When the bagels are halfway through, you’ll notice a nutty, toasted scent that signals the crust is forming. If you’re still uncertain, give them an extra minute or two; the smell will intensify as the bagels finish baking.
The 5‑Minute Rest That Changes Everything
Letting the bagels rest on a wire rack for exactly five minutes is a simple step that can elevate the texture. During this rest, the steam inside the bagel continues to cook, creating a moist interior while the crust sets. Skipping this step can leave the bagels slightly soggy or unevenly cooked.
Use a Non‑Stick Spray on the Basket
Even though the bagel dough is fairly low in oil, it can still stick to the air fryer basket if not properly prepared. A light spray of non‑stick cooking spray on the basket before cooking prevents sticking and makes cleanup a breeze.
Add a Splash of Water Before Reheating
If you have leftovers, sprinkle a tiny splash of water over the bagels before reheating in the air fryer. The water turns to steam, reintroducing moisture into the center while the crust stays crisp. This trick is especially useful if the bagels have been stored in the fridge.
Keep the Dough in the Refrigerator Overnight
If you plan to make bagels ahead of time, store the assembled dough in the refrigerator overnight. The cold temperature slows the yeast’s activity (even though there’s no yeast, the dough still benefits from a slower rise). The next day, simply bring the dough to room temperature for a few minutes before cooking.
Creative Twists and Variations
This recipe is a playground. Here are some of my favorite ways to switch things up:
Everything Bagel Flavor
Add 1 teaspoon of poppy seeds, 1 teaspoon of sesame seeds, and a pinch of everything bagel seasoning to the dough before cooking. The seeds give a nutty crunch while the seasoning adds a savory kick that’s reminiscent of your favorite deli bagel.
Herb‑Infused Delight
Stir in 1 tablespoon of chopped fresh rosemary or thyme into the dough. The herbs infuse the bagels with a fragrant aroma and a subtle earthy flavor that pairs wonderfully with a dollop of goat cheese.
Chocolate Chip Bagels
Fold in 1/4 cup of mini chocolate chips before cooking. The chips melt slightly, creating pockets of sweet chocolate that contrast with the savory dough. Ideal for a quick dessert or a sweet breakfast treat.
Spicy Jalapeño Bagels
Add 1 minced jalapeño pepper and 1 teaspoon of cayenne pepper to the dough. The heat balances the richness of the yogurt, giving the bagels a fiery kick that’s perfect for brunch.
Cheesy Bagels
Fold in 1/4 cup of grated cheddar or mozzarella before cooking. The cheese melts into the dough, creating a gooey center that’s irresistible to cheese lovers.
Gluten‑Free Option
Replace all‑purpose flour with a gluten‑free blend that contains xanthan gum. The dough will be a bit stickier, so handle it with a floured surface. The end result is a bagel that’s still chewy and flavorful, but free from gluten.
Storing and Bringing It Back to Life
Fridge Storage
Store cooked bagels in an airtight container at room temperature for up to 3 days. If you’re storing them in the fridge, wrap them in parchment paper before placing them in a zip‑lock bag. The parchment keeps them from drying out.
Freezer Friendly
Wrap each bagel individually in plastic wrap and place them in a freezer bag. They’ll keep for up to 2 months. When you’re ready to enjoy, simply thaw at room temperature for 30 minutes before reheating.
Best Reheating Method
Preheat the air fryer to 350°F and reheat bagels for 3–5 minutes. For a crispier crust, brush a small amount of water over the bagels before placing them in the fryer. The steam will help restore the original moisture level without drying out the exterior.