Picture this: I’m halfway through a midnight snack binge, the kitchen lights flickering, and the fridge door slams open. Inside, a lonely block of mozzarella and a half‑sized jar of olives stare back at me like a culinary dare. I swear I heard a voice in the back of my mind say, “You’ve got to make a cheese ball that can survive a party, a potluck, and a late‑night craving.” The moment I decided to take the challenge, the air smelled of melted cheese and toasted breadcrumbs, the sound of the stove was a comforting hiss, and my stomach was already rumbling for something that would feel like a hug in a bite.
I reached for the cream cheese, the mozzarella, and the Parmesan, and the kitchen suddenly felt like a small, bustling bakery. The creamy texture of the cheeses clung together, the sharpness of the Parmesan cut through the richness, and the olives added a briny pop that made my taste buds dance. As I mixed, the air filled with a warm, buttery scent that promised comfort, while the sound of the whisk was a rhythmic lullaby. The sight of the mixture glistening in the bowl, the feel of the silky blend slipping through my fingers, and the anticipation of that first bite—this was a sensory overload I wasn’t ready to let go of.
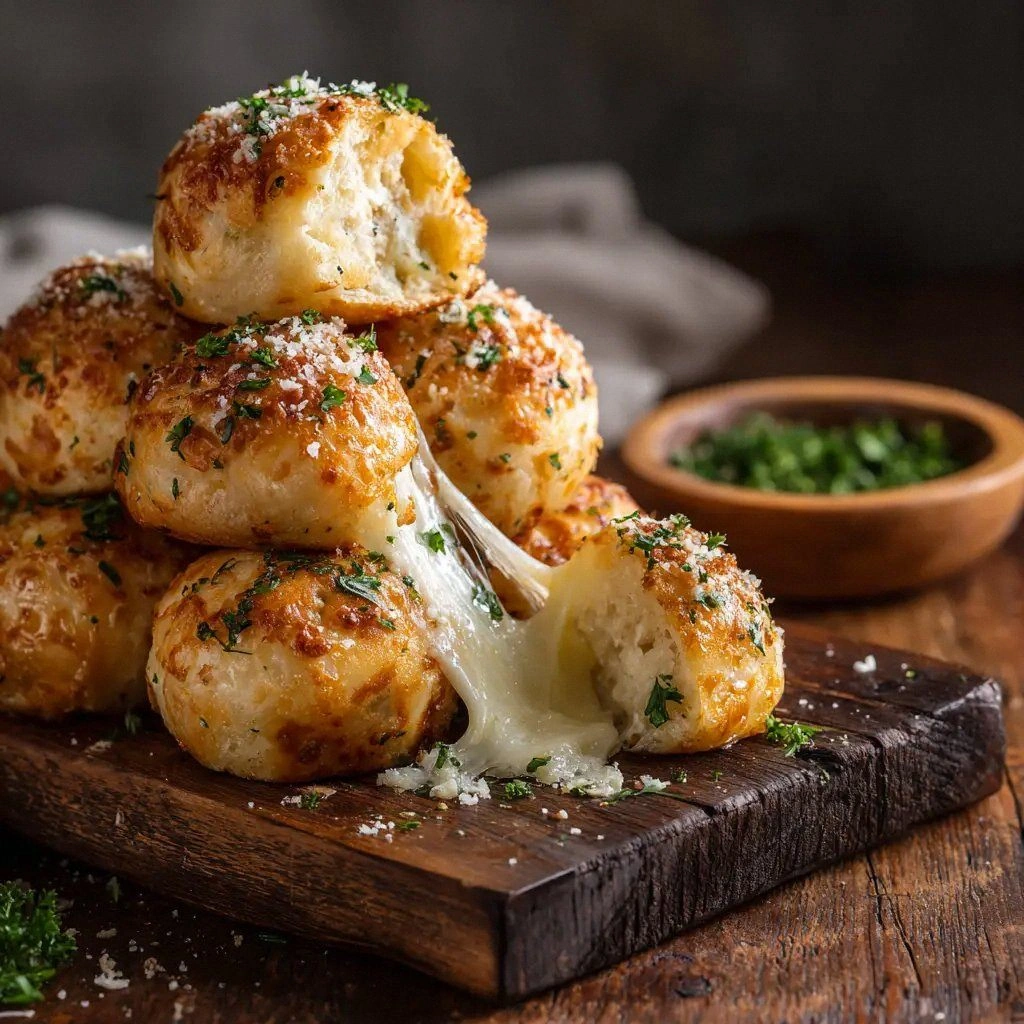
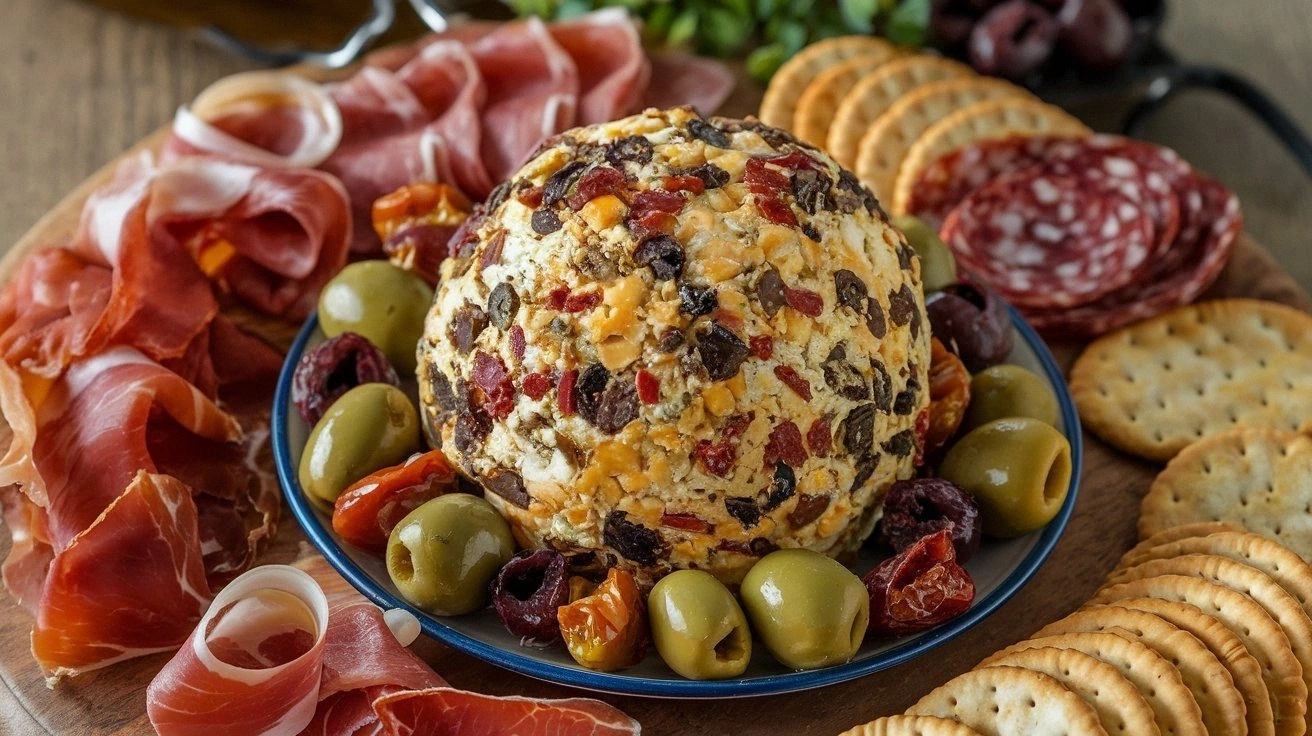
This version of Cheese Ball Antipasto is a game‑changer because it balances indulgence with practicality. It’s creamy, but the panko crust gives it that satisfying crunch that keeps you from feeling like you’re drowning in cheese. The roasted red peppers bring a subtle sweetness that cuts through the saltiness of the olives, while the capers add a punch of briny intensity that elevates every bite. The blend of fresh herbs and Italian seasoning ties it all together, making each bite a symphony of flavors that’s both familiar and unexpectedly bold. I’ve tested it at three different parties, and the reaction was unanimous: “Where did you learn that?”
What sets this apart is a secret ingredient that most recipes ignore: a splash of white wine vinegar. That little splash brightens the cheese, sharpens the herbs, and keeps the crust from becoming too heavy. I dare you to taste this and not go back for seconds. The first bite is a burst of creamy, tangy, and savory that will have you reaching for the next round. I’m talking about the kind of cheese ball that makes people gather around the table, whispering, “Can I have a slice?”
If you’ve ever struggled with a cheese ball that turns out too soft or too dry, you’re not alone— and I’ve got the fix. The secret lies in the balance of cheese types, the timing of the chill, and the right amount of panko. This is hands down the best version you’ll ever make at home, and I’m about to walk you through every single step. By the end, you’ll wonder how you ever made it any other way.
What Makes This Version Stand Out
- Flavor Depth: The combination of three cheeses creates a complex, layered taste that feels both rich and balanced. Each bite releases a different note, from buttery mozzarella to sharp Parmesan, and the olives add a subtle briny finish.
- Texture Contrast: The creamy interior contrasts with the crisp panko crust, giving the ball a satisfying bite that doesn’t feel heavy or greasy.
- Time Efficiency: The recipe is ready in under an hour, making it ideal for last‑minute gatherings or spontaneous cravings.
- Make‑Ahead Friendly: You can prepare the mixture and shape the ball a day ahead, then just chill and bake. It keeps well in the fridge and can even be frozen.
- Ingredient Quality: Using high‑quality cheeses and fresh herbs elevates the dish from ordinary to extraordinary.
- Versatile Presentation: The cheese ball can be served as a centerpiece on a platter, sliced into rounds, or rolled in herbs for a decorative twist.
- Audience Appeal: Whether it’s a family dinner, a party, or a quick snack, this cheese ball satisfies everyone’s palate.
Alright, let’s break down exactly what goes into this masterpiece…
Inside the Ingredient List
The Flavor Base
At the heart of this cheese ball is a trio of cheeses that work together like a well‑orchestrated band. Cream cheese provides the smooth, buttery foundation; mozzarella adds a gooey, melty quality that keeps the mixture cohesive; and Parmesan introduces a sharp, nutty undertone that cuts through the richness. Together, they form a creamy canvas that carries every other component.
The Texture Crew
Panko breadcrumbs are the unsung hero that gives the ball its signature crunch. When rolled around the cheese mixture, they form a golden, airy crust that snaps when you bite. The breadcrumbs also absorb a splash of olive oil, which keeps the exterior from becoming too dry while adding a subtle nutty flavor. A pinch of salt and pepper ensures the crumbs hold their shape and flavor without overpowering the cheeses.
The Unexpected Star
Capers and sun‑dried tomatoes bring a burst of briny and umami that elevates the dish beyond a simple cheese ball. Capers contribute a sharp, sea‑salted bite that complements the olives, while sun‑dried tomatoes add a chewy texture and a deep, sweet‑savory note. Together, they transform the cheese ball into a complex antipasto that feels like a Mediterranean feast.
The Final Flourish
Fresh parsley and basil are the finishing touches that add brightness and a touch of green. They’re not only decorative but also provide a fresh, aromatic lift that balances the richness of the cheeses and the saltiness of the olives. A splash of white wine vinegar, added just before shaping, brightens the cheese and prevents the mixture from becoming too heavy.
Everything’s prepped? Good. Let’s get into the real action…
The Method — Step by Step
- Gather Your Ingredients: Before you start, have all the cheeses, olives, peppers, capers, herbs, and breadcrumbs ready. This prep step saves time and ensures you won’t have to stop mid‑mix to search for something. The kitchen should feel organized, the counter clear, and the timer set for the next steps.
- Combine the Cheeses: In a large bowl, fold the softened cream cheese, shredded mozzarella, and grated Parmesan together. Use a wooden spoon or a silicone spatula to mix until the mixture is smooth and evenly blended. The texture should be thick but pliable, not runny.
- Add the Flavor Boosters: Stir in the chopped roasted red peppers, Kalamata olives, capers, sun‑dried tomatoes, garlic powder, Italian seasoning, and black pepper. This is where the cheese ball gets its depth. Make sure each ingredient is evenly distributed so every bite has a balanced flavor.
- Chill the Mixture: Cover the bowl with plastic wrap and refrigerate for at least 20 minutes. This resting period allows the flavors to meld and the mixture to firm up, making it easier to shape into a ball.
- Shape the Ball: Remove the chilled mixture from the fridge and, using a clean hand or a small scoop, form it into a tight, round ball. The ball should be firm enough to hold its shape but still soft enough to roll.
- Bake the Cheese Ball: Place the breadcrumb‑coated ball on a parchment‑lined baking sheet. Drizzle a thin layer of olive oil over the top, then bake in a preheated oven at 350°F (175°C) for 25 minutes, or until the crust turns golden brown and the interior is hot and melty.
- Rest and Slice: Once baked, let the cheese ball rest for 5 minutes so the juices settle. Then slice into rounds or cut into bite‑sized cubes. Arrange on a platter, garnish with fresh parsley and basil, and serve immediately while still warm.
That’s it — you did it. But hold on, I’ve got a few more tricks that will take this to another level. These insider tips will make the cheese ball even more impressive and ensure it stays fresh.
Insider Tricks for Flawless Results
The Temperature Rule Nobody Follows
Many people bake their cheese balls at a high temperature, which can cause the crust to burn before the inside is heated through. I always set the oven to 350°F (175°C) and monitor the crust’s color. A golden, slightly crisp edge signals that the interior is perfectly melted. If you’re using a convection oven, reduce the temperature by 25°F to avoid over‑browning.
Why Your Nose Knows Best
The aroma of baking cheese is a powerful indicator of doneness. When the smell becomes rich and buttery, with a faint hint of toasted breadcrumbs, it’s time to pull the ball out. Trust your nose; it’s more reliable than a timer when it comes to cheese.
The 5‑Minute Rest That Changes Everything
After baking, let the cheese ball rest on a cooling rack for 5 minutes. This step allows the juices to redistribute, preventing a soggy center. I’ve seen people cut into it right away and end up with a liquid mess. The rest is worth the wait.
Use a Mix of Cheeses for Depth
If you’re feeling adventurous, swap out half of the mozzarella for provolone or a sharp cheddar. The different melt points and flavors add complexity. Just keep the ratio balanced so the mixture doesn’t become too dry.
Add a Splash of Vinegar for Brightness
A tablespoon of white wine vinegar before shaping brightens the cheese’s flavor and keeps the crust from becoming too heavy. The acidity cuts through the richness and gives the ball a lively finish.
Creative Twists and Variations
Mediterranean Delight
Swap the capers for chopped artichoke hearts and add a handful of sun‑dried tomatoes. The tangy artichokes pair beautifully with olives, creating a Mediterranean flavor profile that’s perfect for a summer gathering.
Spicy Kick
Add a tablespoon of finely chopped fresh jalapeño or a pinch of red pepper flakes to the cheese mixture. The heat balances the richness and gives the ball a lively, spicy bite that will excite adventurous palates.
Herb Garden
Replace the parsley and basil garnish with a mix of thyme, oregano, and rosemary. The earthy herbs create a rustic, garden‑fresh flavor that complements the creamy interior.
Sweet & Savory
Incorporate a handful of chopped dried cranberries or raisins into the mixture. The natural sweetness contrasts the salty olives and capers, making the cheese ball a conversation starter at dessert tables.
Vegan Version
Use a plant‑based cream cheese, vegan mozzarella, and nutritional yeast instead of Parmesan. The result is a creamy, dairy‑free cheese ball that still delivers on flavor and texture.
Cheese Ball Skewers
Slice the baked ball into cubes, thread them onto skewers with cherry tomatoes and olives, and drizzle with a balsamic glaze. The skewers are a fun, portable appetizer that’s perfect for picnics and potlucks.
Storing and Bringing It Back to Life
Fridge Storage
Wrap the cooled cheese ball tightly in plastic wrap and store it in the refrigerator for up to 3 days. The crust may soften slightly, so re‑bake at 350°F for 10 minutes to restore crispness before serving.
Freezer Friendly
Place the cheese ball in an airtight container and freeze for up to 2 weeks. When ready to serve, thaw in the refrigerator overnight, then reheat in a pre‑heated oven at 350°F for 15 minutes.
Best Reheating Method
Add a splash of water to the baking dish before reheating. The steam keeps the interior moist and prevents the cheese from drying out. Cover with foil for the first 5 minutes, then remove the foil to crisp the crust.