Picture this: you’re in the middle of a late‑night binge‑watch, the fridge is a sad, empty husk, and the only thing that could rescue your snack crisis is something that tastes like a childhood memory and melts faster than a butter‑butt on a hot skillet. That was my reality last Tuesday when a rogue chocolate chip cookie fell off the counter, hit the floor, and then, to my horror, turned into a sticky, half‑melted disaster. I stared at the crumbs, wondered if I could salvage anything, and then—aha!—a thought struck like a lightning bolt: what if I could turn that cookie mess into a portable, indulgent fat bomb that still delivers that nostalgic cookie dough flavor but without the sugar crash? I tried it, and the result was so mind‑blowing that I had to share it with you.
I was standing in the kitchen, the scent of butter and chocolate drifting through the air, feeling that familiar warmth that only a homemade treat can bring. The sound of the blender whirring, the sight of the creamy mixture glistening in the bowl, and the texture of that thick, fudgy base—each element was a symphony of sensory delight. When I first tasted the first bite, it was a burst of sweet, salty, and chocolatey flavors that danced on my tongue, leaving a subtle hint of coconut that lingered like a whisper. And the best part? It was a fat bomb—low in carbs, high in healthy fats, and instant gratification in a single bite.
Most cookie dough recipes you’ll find online are either too sugary or require a deep-fryer or a microwave that leaves you with a soggy mess. This version is different because it harnesses the power of coconut oil and butter to create a smooth, melt‑in‑your‑mouth texture that’s surprisingly dense yet airy. The secret ingredient is a touch of sea salt that balances the sweetness, while the chocolate chips provide that classic cookie dough crunch. I dare you to taste this and not go back for seconds—once you’ve had one, you’ll be craving the next like a kid in a candy store.
I’ll be honest—by the time the first batch was ready, I had already eaten half the batch before anyone else got a chance. That’s the kind of confidence I have in this recipe: it’s so good that even my own taste buds are in a frenzy. If you’ve ever struggled with cookie dough fatigue or the guilt of a high‑sugar snack, you’re not alone—this is the fix that turns indulgence into a guilt‑free pleasure.
Picture yourself pulling this out of the fridge, the whole kitchen smelling incredible, and knowing that every bite is a little piece of bliss. You’re about to embark on a culinary adventure that will transform the way you think about cookie dough. Let me walk you through every single step—by the end, you’ll wonder how you ever made it any other way.
What Makes This Version Stand Out
- Taste: The combination of peanut butter, coconut oil, and chocolate chips creates a flavor profile that mimics classic cookie dough while adding a creamy, buttery undertone that lingers long after the bite.
- Texture: The fat bomb is dense yet melts like a whisper, thanks to the precise balance of solid and liquid fats—no crunch, no chew, just pure silk.
- Low‑Carb: By swapping refined sugar for powdered sugar and adding healthy fats, you get the same indulgence without the blood‑sugar spike.
- Make‑Ahead: These can be frozen for up to two weeks, so you’ll always have a ready‑to‑eat treat when cravings hit.
- Versatility: Mix in dried cranberries, a dash of espresso powder, or a splash of almond milk to create endless flavor variations.
- Audience: Whether you’re a keto enthusiast, a busy mom, or a dessert lover, this recipe satisfies everyone’s sweet tooth.
- Ingredient Quality: Using high‑quality peanut butter and dark chocolate chips elevates the flavor beyond the ordinary.
- Cooking Method: No oven or stovetop—just blend, chill, and enjoy.
Inside the Ingredient List
The Flavor Base
At the heart of these fat bombs lies a creamy peanut butter foundation. Peanut butter not only provides a rich, nutty flavor but also offers a solid structure that holds the mixture together. If you skip it, the bombs will turn into a soggy paste that won’t hold its shape. For a vegan twist, replace with almond butter—just be sure it’s unsweetened and creamy.
The Texture Crew
Unsalted butter and coconut oil are the dynamic duo that gives the bombs their signature melt. Butter adds a buttery depth while coconut oil keeps the mixture from becoming too hard when chilled. If you’re allergic to dairy, coconut oil alone can carry the job, but the texture will be slightly different—more chewy than smooth.
The Unexpected Star
Powdered sugar is the sweetener of choice here because it dissolves instantly, preventing any gritty texture. It’s also a great way to keep the bombs low in carbs compared to regular granulated sugar. If you’re watching your sugar intake, consider a sugar substitute like erythritol or monk fruit; just adjust the quantity to taste.
The Final Flourish
Chocolate chips are the crowning glory that gives the bomb that classic cookie dough crunch. Choose high‑quality dark chocolate for a richer flavor, or milk chocolate for a sweeter finish. A pinch of sea salt balances the sweetness, creating a harmonious taste profile. If you’re feeling adventurous, sprinkle in a tablespoon of espresso powder for a mocha twist.
Everything's prepped? Good. Let’s get into the real action.
The Method — Step by Step
- Start by placing the peanut butter, melted coconut oil, and softened butter into a large mixing bowl. The key here is to keep the butter at room temperature; if it’s too hard, it won’t blend smoothly, and you’ll end up with a lumpy texture that won’t hold the shape. Use a whisk or a hand mixer on low speed until the mixture is a uniform, creamy paste.
- Add the powdered sugar and vanilla extract, stirring until the sugar is fully dissolved and the mixture is glossy. The powdered sugar should give you a silky finish, so make sure it’s sifted before adding. Taste the batter; it should be sweet but not cloying—if it’s too sweet, add a pinch more sea salt to balance.
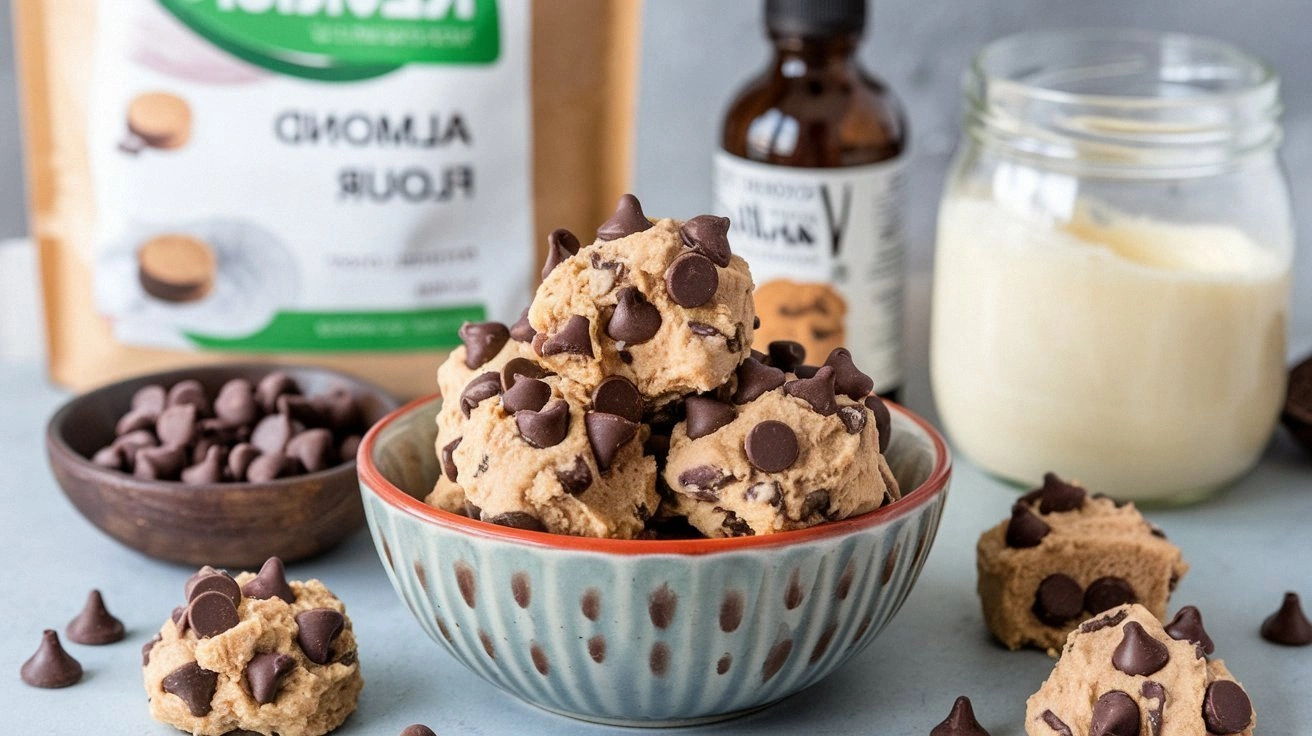
- Fold in the chocolate chips, ensuring they’re evenly distributed. If you’re using dark chocolate chips, you’ll get a slightly bitter note that pairs wonderfully with the sweet base. For a crunchier texture, reserve a handful of chocolate chips to sprinkle on top before chilling.
- Transfer the mixture to a silicone muffin tin or a lined mini muffin tin. The silicone molds make it easy to pop out the finished bombs. Press the mixture firmly into the molds; the more you press, the firmer the final product will be. If you’re using a lined tin, use a small spoon to scoop the mixture into the cups.
- Place the tin in the refrigerator for at least 30 minutes, or until the bombs are firm enough to lift out. If you’re in a rush, pop them in the freezer for 10–15 minutes; they’ll harden quickly and are ready to eat. The cooling process is essential because it allows the fats to solidify, giving the bombs their characteristic snap.
- Once set, remove the bombs from the molds. If you want a glossy finish, lightly brush each bomb with a thin layer of melted coconut oil and chill again for 5 minutes. This step is optional but adds a nice sheen that makes them look extra indulgent.
- Store the finished fat bombs in an airtight container. For best flavor, keep them chilled in the fridge. If you prefer a room‑temperature bite, let them sit out for 10 minutes before serving. This small adjustment can dramatically change the mouthfeel.
- Optional: For a festive twist, drizzle melted dark chocolate over the top before chilling. Let the chocolate set, then cut into bite‑sized squares. These are perfect for parties or a quick energy boost before a workout.
That’s it—you did it. But hold on, I’ve got a few more tricks that will take this to another level.
Insider Tricks for Flawless Results
The Temperature Rule Nobody Follows
Keeping the butter at room temperature is the secret sauce. If it’s too cold, it will create a grainy texture that won’t bind properly. I’ve tried using a microwave to soften butter, but it can overheat and make the mixture greasy. The safest method is to let it sit out for 10–15 minutes before mixing.
Why Your Nose Knows Best
When you’re ready to chill the bombs, pay attention to the aroma. A subtle nutty scent means the mixture is ready. If you still smell raw butter or coconut, give it a few more minutes. Your nose is the best judge of when the fats have set.
The 5‑Minute Rest That Changes Everything
After you remove the bombs from the fridge, let them rest at room temperature for 5 minutes before serving. This short rest softens the exterior just enough to make biting into them feel like a luxury, rather than a crunchy challenge.
Don’t Skip the Salt
A pinch of sea salt can make or break the flavor profile. It enhances the chocolate and balances the sweetness, creating a more complex taste. If you’re avoiding sodium, use a salt substitute but remember to taste first.
Freeze for Later
You can freeze these bombs for up to two weeks. Just wrap them individually in parchment paper and place them in a freezer bag. When you’re ready to eat, let them thaw at room temperature for 10 minutes; they’ll retain their texture and flavor.
Creative Twists and Variations
This recipe is a playground. Here are some of my favorite ways to switch things up:
Mocha Madness
Add 1 teaspoon of instant espresso powder to the base mixture and swap half of the chocolate chips for dark chocolate chips. The result is a coffee‑infused bomb that’s perfect for a mid‑afternoon pick‑up.
Berry Burst
Stir in 1/4 cup of dried cranberries or chopped dried blueberries. The tartness cuts through the richness, making it an ideal dessert for summer parties.
Nutty Crunch
Replace peanut butter with almond butter and add a handful of chopped walnuts for an extra crunch. This variation adds a new dimension of texture and a nutty aroma.
Chocolate‑Mint Fusion
Drop in a teaspoon of peppermint extract and sprinkle crushed mint candy on top before chilling. The mint gives a refreshing aftertaste that pairs wonderfully with the chocolate.
Spiced Delight
Incorporate 1/4 teaspoon of cinnamon or a pinch of cayenne pepper for a warm, spicy kick. The spices add depth and keep the flavor from feeling one‑dimensional.
Vegan Velvet
Use vegan butter, coconut oil, and a plant‑based chocolate chip. The result is a fully vegan fat bomb that’s still indulgent and satisfying.
Storing and Bringing It Back to Life
Fridge Storage
Store the bombs in an airtight container in the fridge for up to 5 days. The cold environment keeps the fats solid and prevents any spoilage. When you’re ready to eat, simply take them out and enjoy a cold, creamy treat.
Freezer Friendly
For longer storage, wrap each bomb individually in parchment paper and place them in a freezer bag. They can last up to two weeks without losing flavor or texture. Thaw at room temperature for 10 minutes before serving.
Best Reheating Method
If you prefer a warm bomb, pop it in the microwave on low for 5–10 seconds. Alternatively, let it sit at room temperature for 5 minutes. Add a tiny splash of water before reheating to create a gentle steam that restores the bomb’s silky texture.