I was standing in my kitchen at 2 a.m., half‑asleep, staring at a bowl of plain cream cheese that had somehow survived a midnight snack raid. My roommate had just challenged me to make something that would “blow the socks off anyone who ever tried a Danish.” I laughed, grabbed the nearest bag of flour, and thought, why not turn this bland blob into a show‑stopping pastry? The next morning, the whole apartment smelled like a bakery on a rainy day, and I was left with a batch of golden‑brown, buttery crescents that practically sang “Eat me!” every time I passed by the oven. I dare you to taste this and not go back for seconds.
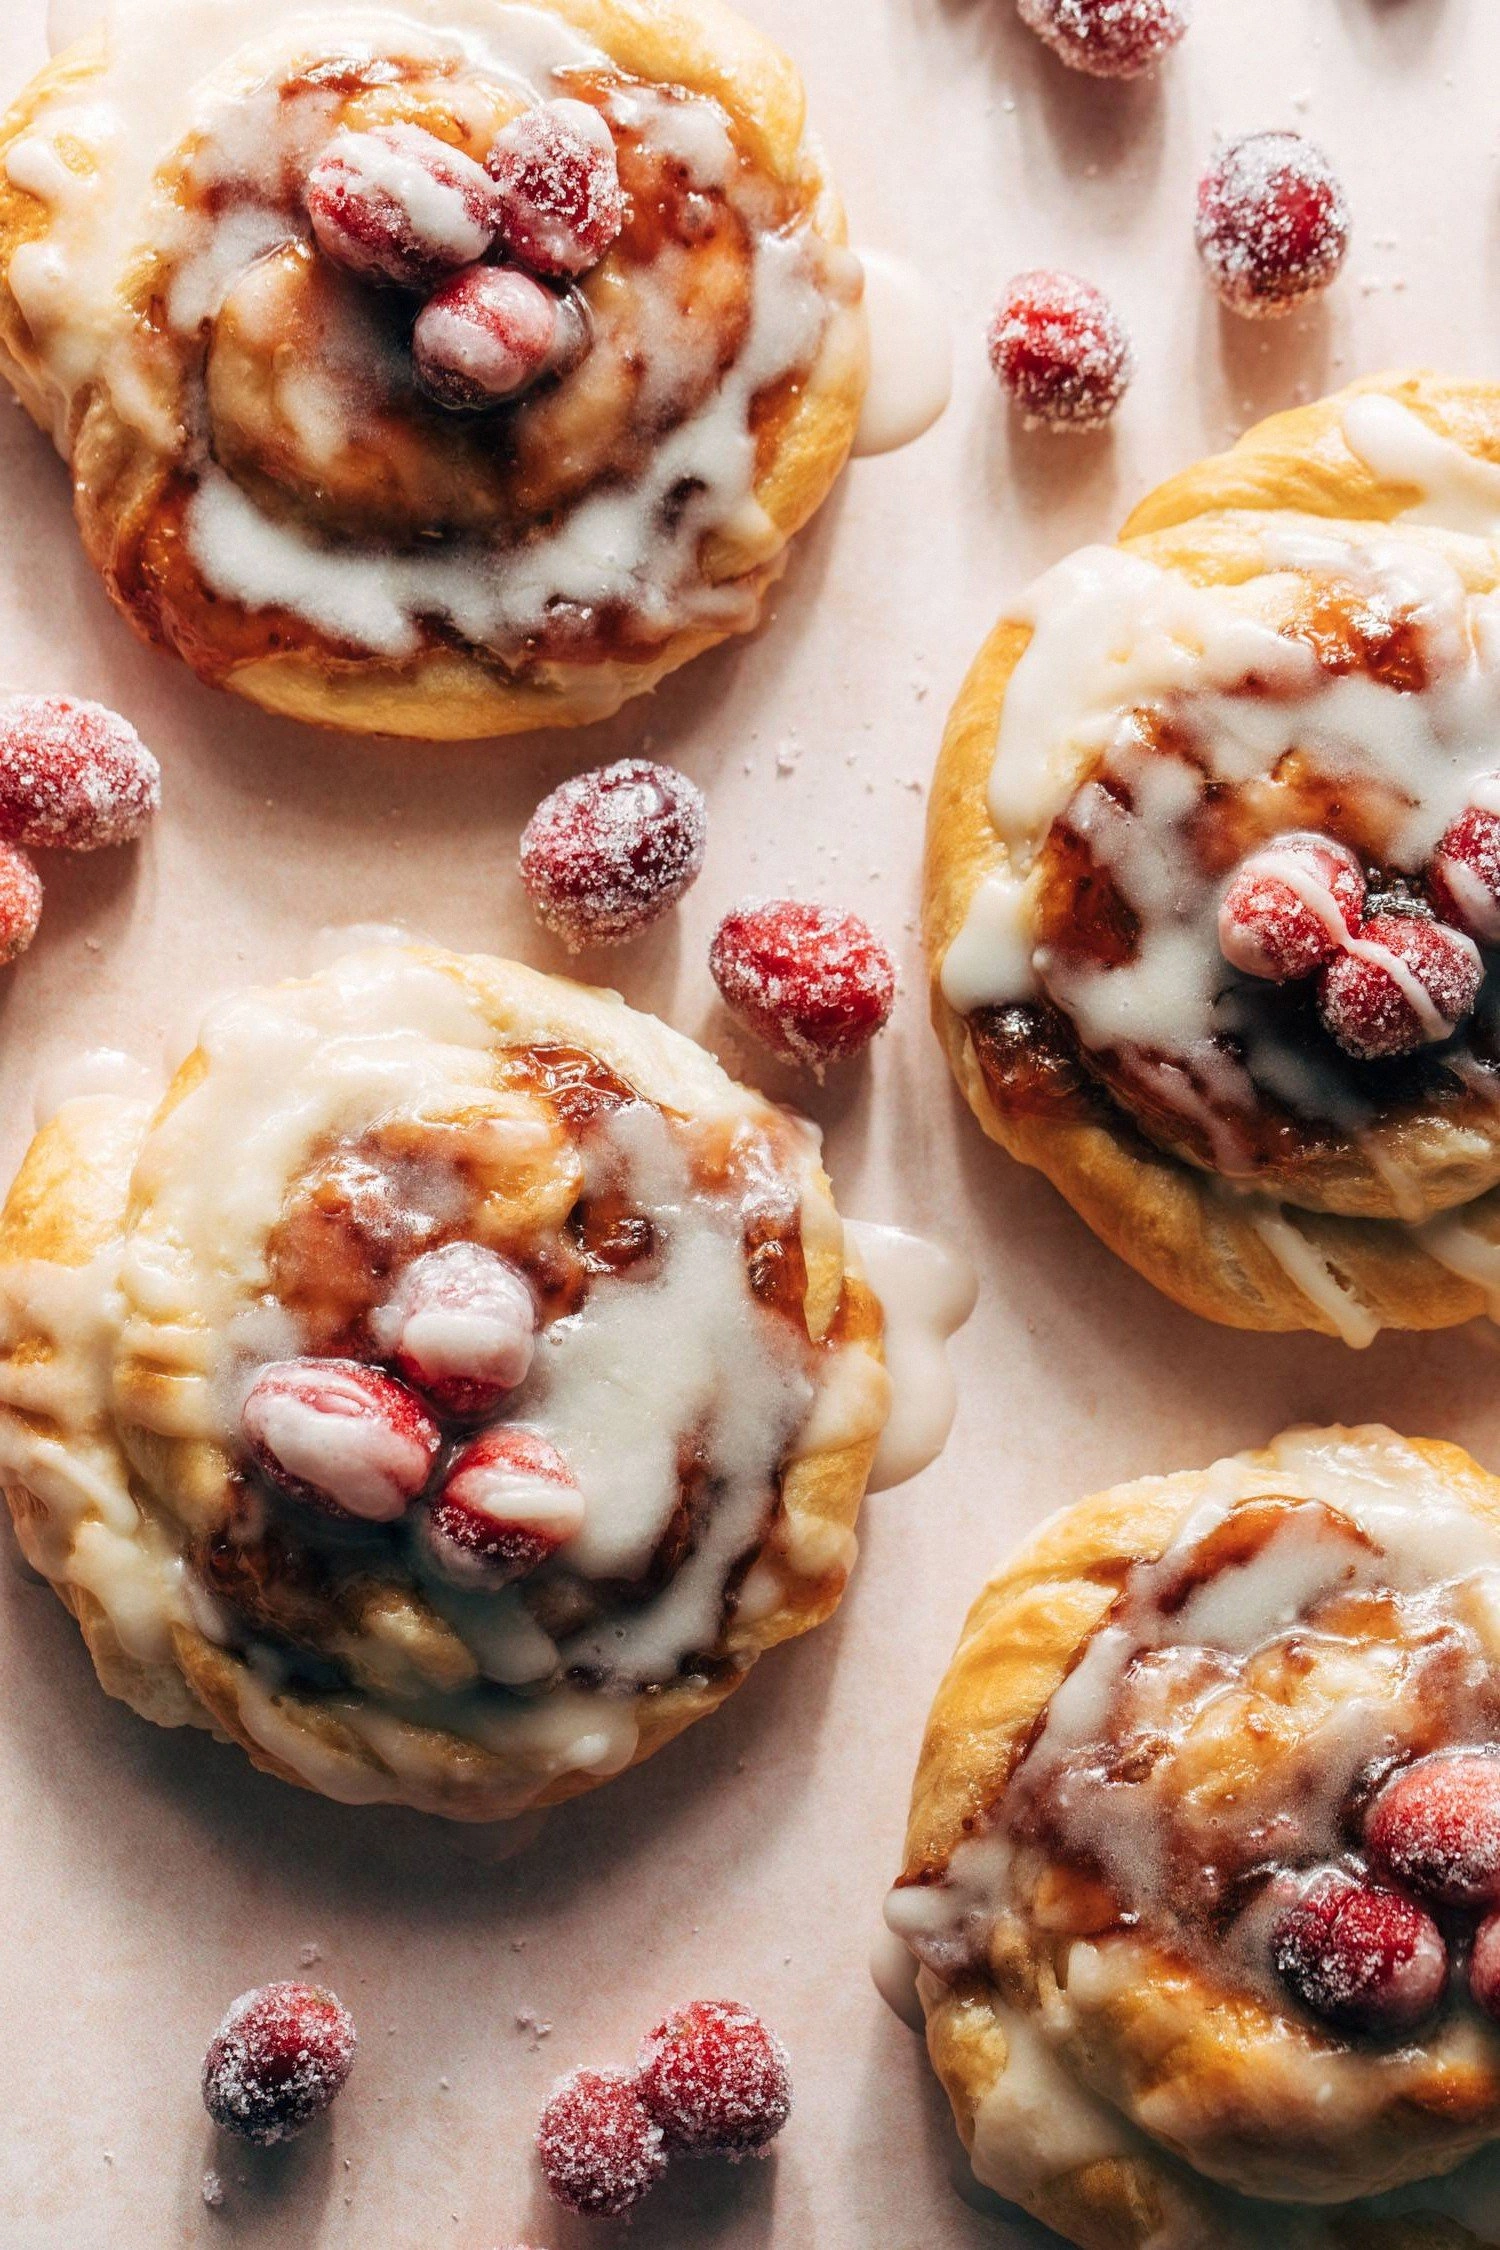
Picture this: a flaky, buttery crust that crunches like a fresh‑baked croissant, a silky cream‑cheese filling that spreads on the tongue like a cloud, and a burst of sugared cranberries that crackle with tart‑sweet fireworks. The aroma is a symphony of caramelized butter, a whisper of vanilla, and a hint of citrus that makes your nose do a little happy dance. When you bite in, the edges pull away with that perfect, delicate snap—like thin ice giving way under a gentle footstep—while the center stays soft, oozing just enough to coat the fork. It’s a textural roller coaster that makes every bite unforgettable.
Most Danish recipes get this completely wrong. They either drown the pastry in a soggy filling or bake a crust that’s as tough as shoe leather. This version? Hands down the best you’ll ever make at home. I’m talking about a laminated dough that’s easier than puff pastry, a cream‑cheese blend that’s richer than any store‑bought frosting, and a glaze that shines like a jewel‑boxed dessert. The secret? A quick butter‑glaze that you drizzle over the warm pastries, creating a glossy finish that looks like it belongs on a patisserie window. Most recipes skip this step, and you miss out on that “wow” factor.
Okay, ready for the game‑changer? I’m about to reveal the technique that keeps the dough buttery without the dreaded “layer collapse” that haunts many home bakers. It’s a simple “cold‑but‑combined” method: you keep the butter and cream cheese chilled while you work the dough, then give it a quick “turn” before baking. This ensures the layers stay distinct, giving you those flaky sheets that melt in your mouth. And if you’ve ever struggled with over‑mixing, you’re not alone—I’ve been there, and I’ve got the fix. Let me walk you through every single step — by the end, you’ll wonder how you ever made it any other way.
What Makes This Version Stand Out
- Flavor Explosion: The marriage of tangy cream cheese with sweet‑tart sugared cranberries creates a balanced palate that dances between sweet and sour, keeping you intrigued bite after bite.
- Texture Symphony: A flaky, buttery crust meets a luxuriously creamy interior, while the glaze adds a glossy, slightly crunchy finish that’s pure satisfaction.
- Simplicity Redefined: No need for a stand mixer or a dough hook; a simple hand‑mix does the trick, making this recipe accessible for even the most novice bakers.
- Unique Ingredient Twist: The addition of lemon zest lifts the flavor profile, giving the pastries a fresh, bright note that you don’t get in ordinary Danish recipes.
- Crowd‑Pleaser Factor: Whether it’s a brunch buffet, a coffee‑break treat, or a dessert table, these Danishes get rave reviews and disappear faster than you can say “second helping.”
- Ingredient Quality: Using real butter (not margarine) and full‑fat cream cheese ensures a richness that shortcuts can’t mimic.
- Cooking Method Mastery: The “cold‑but‑combined” technique guarantees lift and layers, preventing the dreaded soggy bottom.
- Make‑Ahead Magic: You can bake these a day ahead, store them, and reheat for a fresh‑out‑of‑the‑oven experience—perfect for busy mornings.
Inside the Ingredient List
The Flavor Base
The foundation of any great pastry is its flavor base, and here it starts with granulated sugar and vanilla extract. Sugar not only sweetens but also aids in browning, giving the crust that coveted caramel hue. Vanilla contributes a warm, aromatic undercurrent that ties the whole pastry together. If you skip the vanilla, you’ll miss that subtle depth that makes the filling feel like a luxury treat rather than a simple sweet.
The Texture Crew
All‑purpose flour provides the structure, while cold unsalted butter creates the flaky layers. The butter must be cold enough to stay in little pockets as you fold the dough; these pockets melt during baking, puffing up into airy layers. Cream cheese adds moisture and a velvety texture to the filling, preventing it from being overly dense. If you use low‑fat cream cheese, the result will be dry and crumbly—so stick with the full‑fat version for that melt‑in‑your‑mouth feel.
The Unexpected Star
Sugared cranberries are the surprise element that elevates this Danish from ordinary to extraordinary. Their natural tartness cuts through the richness of butter and cream cheese, while the sugar coating caramelizes during baking, creating tiny pockets of sweet jam. If you can’t find fresh cranberries, frozen works just as well—just thaw and pat dry before mixing. A quick tip: toss the cranberries in a tablespoon of sugar before folding them in to ensure they’re evenly sweetened.
The Final Flourish
The finishing glaze is a blend of melted butter, powdered sugar, and a splash of milk. This glaze sets into a glossy sheen that not only looks stunning but also adds a buttery snap on the surface. For an extra layer of flavor, you can stir in a pinch of sea salt or a drizzle of honey. Skipping the glaze means missing out on that signature “just‑out‑of‑the‑oven” sparkle that makes these Danishes Instagram‑ready.
Everything's prepped? Good. Let's get into the real action…
The Method — Step by Step
In a large mixing bowl, whisk together 2 cups of all‑purpose flour, 1/2 cup granulated sugar, 1 tsp salt, and 1 tsp baking powder. The dry ingredients should look like a fine sand—uniform and ready to hold the butter pockets. As you stir, imagine each grain of sand as a tiny building block for the flaky layers to come.
Kitchen Hack: Sift the flour and baking powder together. This aerates the mixture, ensuring a lighter crumb and preventing clumps of butter from sticking to the dry flour.Add the cold, cubed butter (½ cup) to the dry mixture. Using a pastry cutter or your fingertips, rub the butter into the flour until the mixture resembles coarse crumbs with some pea‑size pieces still visible. This is the critical stage where those buttery islands will later melt and create steam, lifting the dough.
In a separate bowl, combine ½ cup softened cream cheese, 1 large egg, 1 tsp vanilla extract, and 1 tbsp lemon zest. Beat until smooth and glossy. The lemon zest adds a bright citrus note that cuts through the richness, while the egg binds everything together.
Make a well in the center of the flour‑butter mixture and pour in the cream‑cheese blend. Gently fold with a spatula until the dough just comes together. Do not over‑mix; you want to keep those butter pieces intact. The dough will feel slightly sticky—this is normal.
Turn the dough onto a lightly floured surface. Pat it into a rectangle about ½ inch thick. Fold the top third down toward the center, then the bottom third up over that—classic “letter fold.” Rotate 90°, pat again, and repeat the fold two more times. This creates three layers of butter, giving you that signature flaky texture.
Watch Out: If the dough becomes too warm during folding, chill it for 10 minutes before continuing. Warm dough will cause the butter to melt, leading to a dense, non‑flaky result.Wrap the folded dough in plastic wrap and refrigerate for at least 30 minutes. This chilling step firms up the butter again, ensuring the layers stay separate when baked.
While the dough chills, toss 1 cup fresh cranberries with 2 tbsp sugar in a small bowl. Let them sit for 10 minutes; the sugar will draw out the juices, creating a natural syrup that will caramelize in the oven.
Preheat your oven to 375°F (190°C). Lightly flour a clean surface and roll the chilled dough to a ¼‑inch thickness. Using a sharp cutter or a floured pastry wheel, cut out circles about 3‑inch in diameter. Place the circles on a parchment‑lined baking sheet, leaving space between them.
Spoon a generous tablespoon of the sugared cranberries onto the center of each dough circle, leaving a small border. Fold the edges up and over the filling, pinching the seams to create a rustic, slightly irregular shape. This “pocket” method ensures the filling stays inside while allowing the edges to puff up beautifully.
Kitchen Hack: Lightly brush the folded edges with a beaten egg before baking. This gives the Danishes an extra golden sheen and helps the seams seal.Bake for 18‑22 minutes, or until the edges are a deep golden brown and the cranberries are bubbling and caramelized. You’ll know they’re done when the scent of toasted butter fills the kitchen, and the crust lifts slightly from the parchment.
While the Danishes cool for 5 minutes, prepare the glaze: melt 2 tbsp butter in a small saucepan, whisk in 2 tbsp powdered sugar and 1 tbsp milk until smooth and glossy. Drizzle the warm glaze over the pastries, allowing it to seep into the folds and create a shiny, sweet coating.
Let the glaze set for a minute, then serve warm or at room temperature. That glossy finish? Pure magic. That first bite? A symphony of buttery crunch, creamy tang, and bright cranberry pop. That's it — you did it. But hold on, I've got a few more tricks that'll take this to another level...
Insider Tricks for Flawless Results
The Temperature Rule Nobody Follows
Never, ever bake a Danish with room‑temperature dough. The secret is keeping the butter ice‑cold right up until it hits the oven. When the dough goes into a hot oven, the butter melts rapidly, creating steam that lifts the layers. If you let the dough warm up on the counter, you lose that steam effect, and the pastry ends up dense. A quick tip: after the final fold, keep the dough wrapped and store it in the freezer for 5 minutes before rolling—it’s the difference between “flaky” and “flat.”
Why Your Nose Knows Best
When the Danishes are nearing the end of their bake, trust your nose more than the timer. The moment you smell a nutty, caramelized butter aroma, you’re almost there. That scent means the Maillard reaction is at its peak, creating those gorgeous golden edges. If you keep the timer rigid, you risk over‑browning. So, set the timer, then hover over the oven, inhale deeply, and pull them out the instant the fragrance hits the sweet spot.
The 5‑Minute Rest That Changes Everything
After glazing, let the pastries rest for exactly five minutes before serving. This short pause lets the glaze settle, creating a glossy finish that won’t run off the plate. It also allows the interior to firm up just enough that the filling doesn’t ooze everywhere when you cut into it. Skipping this rest leads to a soggy bottom and a glaze that slides off—trust me, you don’t want that.
Butter‑Glaze Balance
A common mistake is using too much butter in the glaze, which makes it greasy rather than glossy. The perfect ratio is 1 part butter to 1 part powdered sugar, with just enough milk to bring it to a pourable consistency. If the glaze is too thick, thin it with a few drops of warm water; if it’s too runny, whisk in a pinch more powdered sugar. This balance ensures a sheen that catches the light and adds a buttery snap on the surface.
Freezing for Future Feasts
If you want to make a batch ahead, bake the Danishes fully, let them cool, then freeze them individually on a tray before transferring to a zip‑top bag. When you’re ready to serve, pop them in a 350°F oven for 8‑10 minutes; the glaze will re‑gloss and the pastry will regain its crunch. This trick turns a one‑day treat into a make‑ahead staple for brunch parties.
Creative Twists and Variations
This recipe is a playground. Here are some of my favorite ways to switch things up:
Apple‑Cinnamon Swirl
Swap the cranberries for a mixture of diced apples, cinnamon, and a drizzle of maple syrup. The warm spice pairs perfectly with the buttery crust, making it an autumn‑ready treat.
Chocolate‑Hazelnut Dream
Add 2 tbsp cocoa powder to the dry flour mixture and fold in chopped toasted hazelnuts with the cranberries. The result is a rich, nutty bite that satisfies any chocolate lover.
Lemon‑Blueberry Burst
Replace cranberries with fresh blueberries and increase the lemon zest to 2 tbsp. The bright citrus amplifies the berry’s natural sweetness, creating a sunny, spring‑time pastry.
Savory Herb Cheese
Omit the sugar entirely, and stir chopped fresh herbs (rosemary, thyme) and a pinch of black pepper into the cream‑cheese filling. Top with a light dusting of grated Parmesan before baking for a sophisticated appetizer version.
Caramel‑Pecan Delight
Toss the cranberries with a tablespoon of caramel sauce and sprinkle chopped pecans over the top before glazing. The caramel adds a buttery depth, while pecans bring a satisfying crunch.
Storing and Bringing It Back to Life
Fridge Storage
Place cooled Danishes in an airtight container lined with a parchment sheet. They’ll stay fresh for up to 3 days. If you notice any glaze hardening, let them sit at room temperature for 10 minutes before serving.
Freezer Friendly
Wrap each pastry individually in plastic wrap, then seal them in a zip‑top freezer bag. They’ll keep for up to 2 months. To reheat, preheat the oven to 350°F, remove the plastic, and bake for 8‑10 minutes until warmed through and the glaze glistens again.
Best Reheating Method
For the ultimate texture revival, place the pastry on a baking sheet, add a tiny splash of water (about a teaspoon) around the edges, and cover loosely with foil. Heat for 5‑7 minutes; the steam revives the flaky crust while the water prevents drying. The result? As if they just came out of the oven.