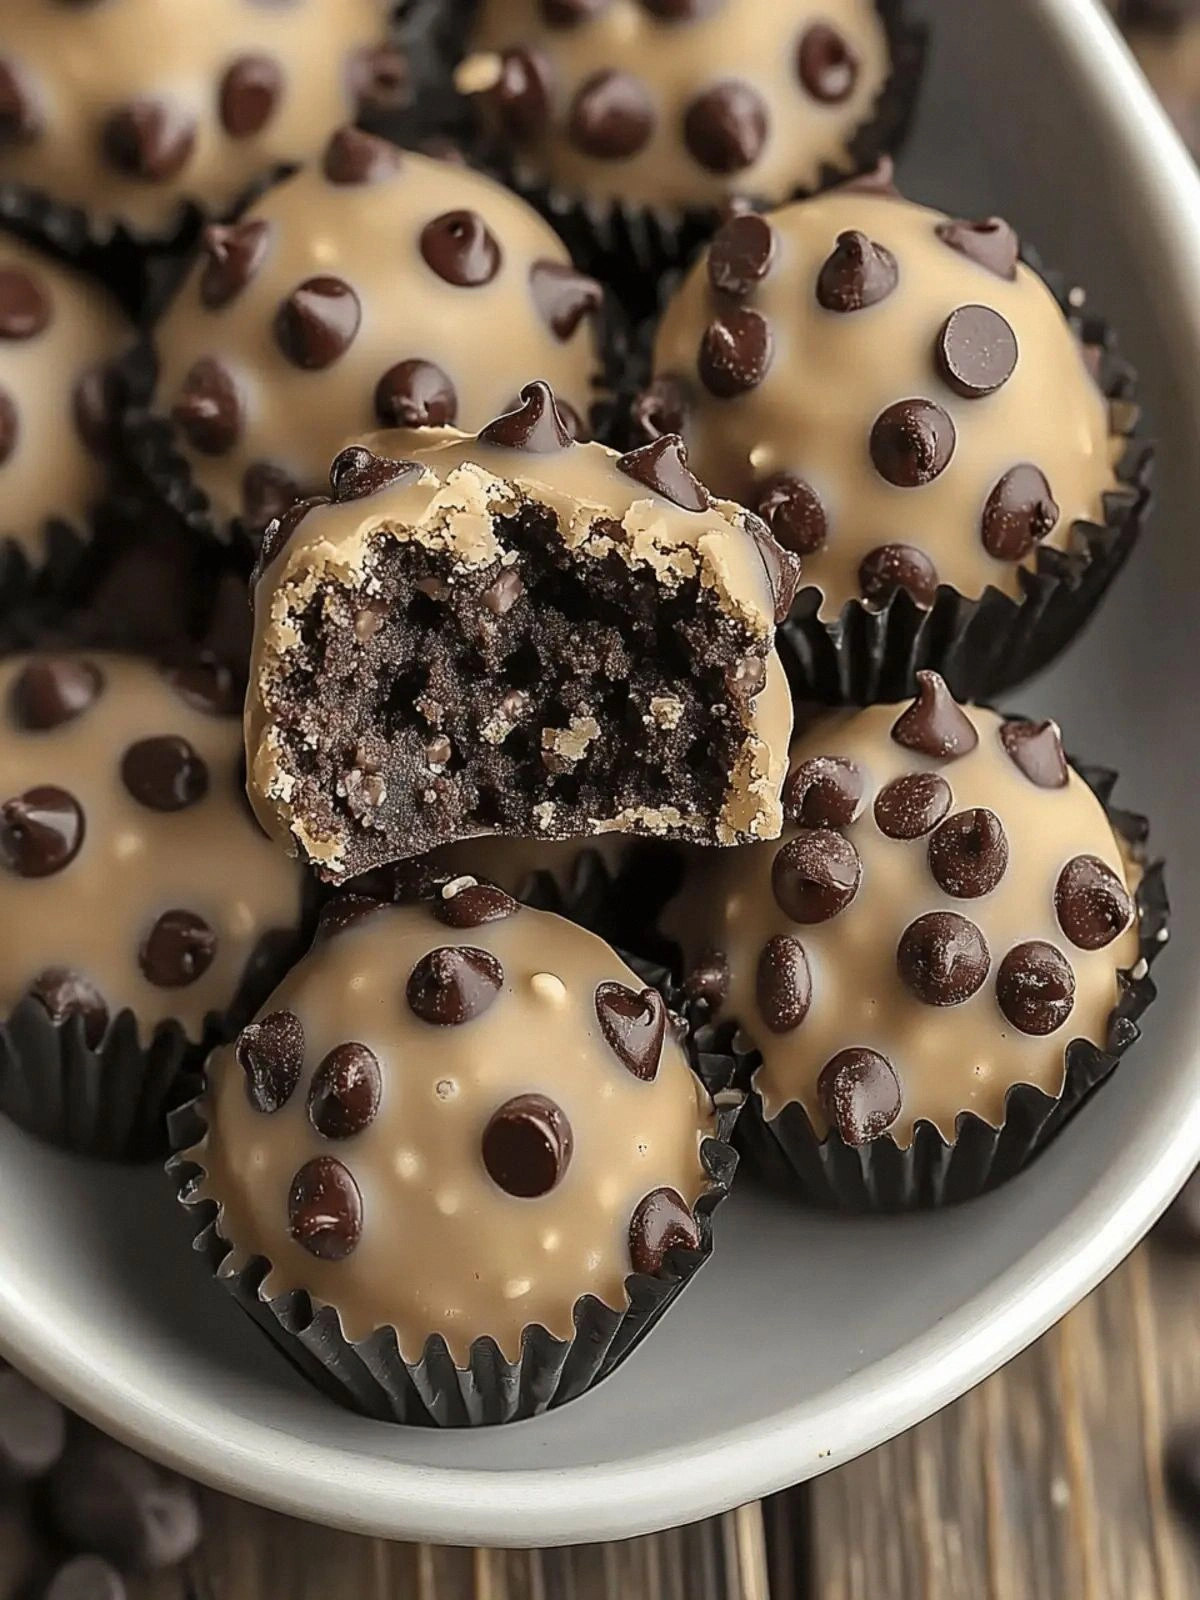
Picture this: a midnight kitchen, the fridge humming, and a sudden craving for chocolate that feels like a guilty love affair. I was rummaging through the pantry, pulling out every sweet item I could find, when the idea struck—no-bake chocolate truffles that taste like cookie dough but never bake. The result was a creamy, melt-in-your-mouth bite that left me shaking my head in disbelief. I dared my friends to taste this and not go back for seconds, and they all agreed, eyes wide, mouths water. I realized this was hands down the best version you'll ever make at home, because it eliminates the dreaded oven, the time, and the mess, while delivering the same indulgent experience. So buckle up, because I'm about to walk you through every single step—by the end, you'll wonder how you ever made it any other way.
Close your eyes and imagine the first bite: the chocolate chips pop, the butter melts into a silky ribbon, and the faint scent of toasted sugar lingers like a warm hug. The texture is a paradoxical blend of crunchy chocolate and soft cookie dough, a sensation that makes your taste buds dance like a salsa routine. The sound is minimal—just the faint clink of a spoon against the mixing bowl, but the aroma is a chorus of vanilla, cocoa, and butter that fills the entire room. When you take a breath, you can almost hear the kitchen clock ticking, counting down to the moment the truffles reach the perfect chill. The visual appeal is undeniable, with golden specks of chocolate dancing on a glossy, buttery base that gleams under the kitchen light. Each component sings together, creating a symphony that turns a simple snack into a gourmet experience.
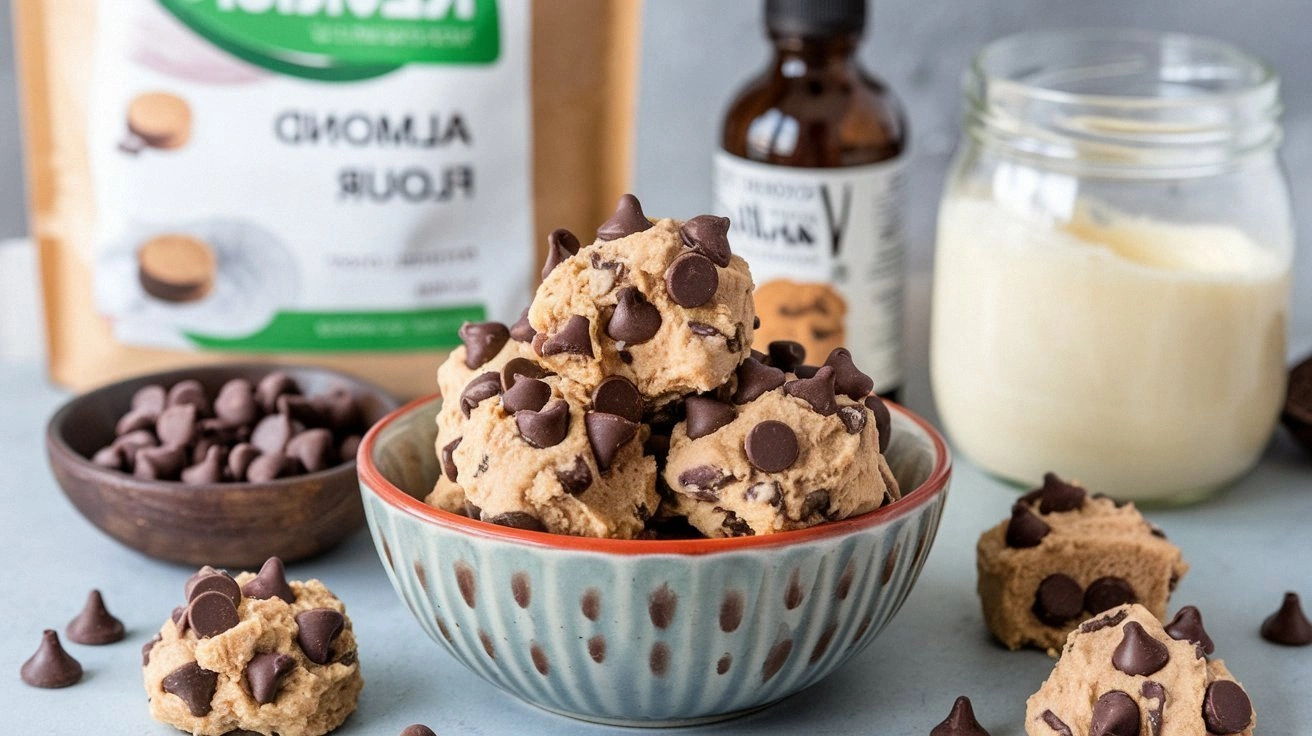
What sets this version apart from every other cookie dough truffle recipe is the deliberate balance of sweetness, richness, and texture. I used unsalted butter to control the salt level, preventing the chocolate from feeling too heavy. The combination of brown and granulated sugar gives depth and caramel notes that echo a fresh batch of cookie dough. I folded in both mini and semisweet chocolate chips to create layers of flavor that explode when you bite. The coconut oil/vegetable shortening adds a silky mouthfeel that keeps the truffles from becoming too crumbly. Finally, the small amount of milk lifts the mixture, allowing it to roll into smooth, bite-sized spheres that hold together without sticking. The result? A no-bake dessert that feels like a decadent treat, but with zero heat.
Now, I want to drop a teaser: I discovered that adding a splash of espresso powder at the last minute gives the chocolate a deeper, almost coffee-like bite that’s subtle but powerful. I’ll show you exactly how to incorporate that secret, and trust me, you’ll want to keep it to yourself until the taste test. I’ve also found that chilling the dough for a full hour before rolling ensures that the truffles hold their shape perfectly, no matter how many you make. If you’ve ever struggled with truffles that fall apart, you’re not alone—and I've got the fix. Picture yourself pulling these out of the fridge, the whole kitchen smelling incredible, and serving them to a group of friends who can’t stop raving. And now, ready for the game-changer? Let’s dive in.
What Makes This Version Stand Out
- Flavor Harmony: The blend of brown and granulated sugar creates a caramelized undertone that elevates the chocolate, giving each bite a subtle, lingering sweetness that feels like a freshly baked cookie.
- Texture Mastery: The mixture’s consistency allows for smooth rolling while maintaining a slight chew, so the truffles stay cohesive but still give way under your teeth.
- Ingredient Quality: Using unsalted butter and high‑quality chocolate chips ensures a clean, premium taste that doesn’t get buried under artificial flavors.
- No‑Bake Simplicity: Eliminates oven time, making it a quick, mess‑free dessert for any occasion—from midnight cravings to last‑minute party snacks.
- Crowd‑Pleasing: The bite‑sized truffles are perfect for parties, potlucks, or a midnight snack that everyone will rave about.
- Make‑Ahead Friendly: Chill for up to 48 hours; they stay fresh and firm, ready to serve whenever you need a sweet fix.
- Customizable Flavor: A splash of espresso or a pinch of sea salt can transform the flavor profile, making each batch unique.
Inside the Ingredient List
The Flavor Base
Unsalted butter is the cornerstone of this recipe, providing a rich, buttery foundation that carries the sweetness without overwhelming it. Brown sugar adds a deep molasses note, while granulated sugar gives a crisp, clean finish. Vanilla extract rounds out the flavor profile, adding a warm, floral undertone that makes the truffles feel like freshly baked cookies. Skipping any of these components will leave the truffles feeling flat or unbalanced; the synergy of these three flavors is what makes the base truly indulgent.
The Texture Crew
All-purpose flour gives the truffles structure, allowing them to hold their shape once chilled. Salt is a subtle enhancer; it brings out the chocolate’s richness and balances the sweetness. Milk, though only a tablespoon, hydrates the flour, creating a dough that’s easy to roll without sticking. Coconut oil (or vegetable shortening) is the secret to a silky mouthfeel; it keeps the truffles from becoming too crumbly and adds a hint of tropical nuance that pairs wonderfully with chocolate.
The Unexpected Star
The combination of mini and semisweet chocolate chips is what truly sets this recipe apart. Mini chips melt smoothly, creating a glossy, glossy interior, while semisweet chips add a slightly bittersweet contrast that balances the overall sweetness. The contrast of textures—soft chocolate against the slight crunch of the chips—creates a delightful bite that keeps you coming back for more. If you can’t find mini chips, you can substitute with regular chips; just break them into smaller pieces to maintain the texture.
The Final Flourish
The final touch is the optional splash of espresso powder or a pinch of sea salt, which can be added during the last stir. These additions are like a secret handshake between flavor and aroma, elevating the truffles from simple to unforgettable. If you’re feeling adventurous, a drizzle of melted dark chocolate over the finished truffles can add a glossy finish and an extra layer of richness. Remember, the key is to keep the dough moist enough to roll but firm enough to hold its shape once chilled.
Everything's prepped? Good. Let's get into the real action...
The Method — Step by Step
- Step 1: Melt the Fat. In a medium saucepan, combine the unsalted butter, brown sugar, granulated sugar, vanilla extract, milk, and coconut oil. Heat over medium-low, stirring constantly until the mixture is smooth and the sugars have dissolved. The aroma should be sweet and buttery, hinting at the chocolate that will soon follow. Watch the temperature; you don’t want it boiling, just gently simmering.
- Step 2: Bring to Simmer. Once the mixture is smooth, allow it to reach a gentle simmer for 2 minutes. This short simmer helps the flavors meld together. Keep an eye on it—if it starts to bubble too vigorously, reduce the heat immediately.
- Step 3: Remove from Heat. Take the pan off the burner and let the mixture cool for a minute or two. This prevents the flour from cooking when it’s added. While it’s cooling, you can prep your work surface by dusting it lightly with flour to keep the dough from sticking.
- Step 4: Add Dry Ingredients. Stir in the all-purpose flour and salt until the mixture pulls together into a thick dough. It should be thick enough to hold its shape when you lift it from the pan. The dough should look glossy and smooth, not dry or crumbly.
- Step 5: Fold in Chocolate. Remove the pan from the heat and fold in the mini and semisweet chocolate chips. Make sure every chip is coated in the buttery mixture, creating a chocolate‑laden dough that’s ready to be shaped.
- Step 6: Let Cool Slightly. Let the dough sit at room temperature for 5 minutes. This brief rest allows the mixture to thicken slightly, making it easier to roll into balls. Watch for the dough to firm up; if it’s still too liquid, give it a bit more time.
- Step 7: Chill for 30 Minutes. Cover the bowl with plastic wrap and refrigerate for 30 minutes. This chilling step firmed the dough so that it holds its shape when rolled. If you’re in a hurry, a 15‑minute chill will do, but the texture will be slightly softer.
- Step 8: Roll Into Balls. With floured hands, scoop spoonfuls of the chilled dough and roll them into small, bite‑sized balls. Aim for about 1.5 inches in diameter so they’re easy to handle but still substantial enough to satisfy.
- Step 9: Final Chill. Place the rolled truffles on a parchment‑lined tray and refrigerate for an additional 15 minutes. This final chill sets the shape and gives the truffles a firm, creamy bite.
- Step 10: Serve and Enjoy. Once chilled, serve the truffles on a platter or store them in an airtight container. They’re ready to be devoured, or you can keep them refrigerated for up to 48 hours.
That's it — you did it. But hold on, I've got a few more tricks that'll take this to another level...
Insider Tricks for Flawless Results
The Temperature Rule Nobody Follows
Many people think any temperature will do when melting the butter and sugar, but the sweet spot is just below 170°F. This ensures the sugars dissolve without caramelizing, which would give the truffles a burnt taste. Use a candy thermometer to keep the mixture in that sweet zone; if it climbs too high, reduce the heat immediately. When in doubt, let it sit for a minute—sugar will settle back into the ideal range.
Why Your Nose Knows Best
The aroma of chocolate chips melting into butter is a powerful indicator of readiness. If you smell a faint, sweet scent, the mixture is ready to incorporate the flour. If the smell is too sharp or burnt, the mixture has gone past the sweet spot and you’ll need to adjust the heat. Trust your nose; it’s a reliable guide that seasoned bakers use daily.
The 5‑Minute Rest That Changes Everything
After you add the flour, let the dough rest for exactly five minutes. This pause allows the flour to fully absorb the moisture, preventing a dry, crumbly texture. The five‑minute rest also gives the chocolate chips time to settle, ensuring they’re evenly distributed throughout the dough. Skipping this step can result in uneven chocolate distribution and a less satisfying bite.
The Perfect Chill Time
Chilling the dough for 30 minutes before rolling is the golden rule. A 15‑minute chill is acceptable if you’re short on time, but the dough will be slightly softer, making the truffles less firm. The 30‑minute chill ensures the truffles hold their shape and have a satisfying snap when bitten.
The No‑Stick Trick
If your dough sticks to the pan or your hands, lightly dust them with flour or a tiny amount of cocoa powder. The flour absorbs excess moisture, while cocoa powder gives a subtle chocolatey hint. Avoid using too much flour; it will dry out the truffles. A light dusting is all you need.
The Flavor Booster
Adding a teaspoon of espresso powder during the final stir amplifies the chocolate flavor and introduces a subtle coffee undertone. If you prefer a sweeter finish, replace the espresso with a splash of almond extract for a nutty twist. Experiment with different extracts to create your signature truffle.
Creative Twists and Variations
This recipe is a playground. Here are some of my favorite ways to switch things up:
Sea Salt Caramel Swirl
Stir a tablespoon of caramel sauce into the dough before rolling and sprinkle a pinch of sea salt on top of each truffle. The caramel adds a buttery sweetness while the salt sharpens the chocolate flavor. This variation is perfect for a sophisticated dessert spread.
Espresso Infusion
Add a teaspoon of instant espresso powder during the final stir for a coffee‑rich flavor. The espresso deepens the chocolate profile without overpowering it, giving the truffles a complex, adult taste. Pair with a glass of cold milk for a decadent treat.
Minty Chocolate Explosion
Replace half of the mini chocolate chips with mint chocolate chips and add a few drops of mint extract. The mint adds a refreshing contrast that balances the richness. These truffles are ideal for spring or summer gatherings.
Peanut Butter Crunch
Fold in 1/4 cup of creamy peanut butter and 1/4 cup of chopped roasted peanuts after the dough has cooled slightly. The peanut butter adds a creamy texture while the peanuts give a satisfying crunch. This version is a hit among peanut butter lovers.
Orange Zest Surprise
Grate the zest of one orange into the dough before rolling and add a splash of orange liqueur. The citrus brightens the chocolate flavor and adds a subtle, fruity note. These truffles pair beautifully with a glass of sparkling wine.
Chili Chocolate Heat
Mix in a pinch of cayenne pepper and a teaspoon of cocoa nibs for a spicy kick. The heat contrasts with the sweetness, creating a dynamic flavor profile. This variation is perfect for those who love a little heat in their desserts.
Storing and Bringing It Back to Life
Fridge Storage
Store the truffles in an airtight container at room temperature for up to 48 hours. The cold environment keeps them firm, while the airtight seal prevents them from drying out. If you notice any moisture buildup, simply let them sit at room temperature for a few minutes before serving.
Freezer Friendly
Wrap each truffle individually in parchment paper and place them in a freezer‑proof bag. They’ll stay fresh for up to 3 months. When you’re ready to enjoy them, let them thaw at room temperature for 15 minutes before serving.
Best Reheating Method
To revive a frozen or chilled truffle, place it on a microwave‑safe plate and heat for 10–15 seconds on a low setting. Alternatively, let it sit at room temperature for 5 minutes. Add a tiny splash of water before reheating—it steams back to perfection, restoring the silky texture.