I was standing in my kitchen on a sweltering July afternoon, the kind of day that makes you swear off cooking forever because the oven feels like a furnace. My grill was gathering dust, the pantry was whispering for attention, and a friend dared me to create something that would make even the most stubborn grill‑master weep with joy. I grabbed a bag of chicken thighs, a bottle of BBQ sauce, and a reckless amount of confidence, and what happened next was nothing short of culinary fireworks. The first bite was a revelation – a perfect marriage of smoky char, sweet‑tangy glaze, and juicy meat that practically sang “summer forever.”
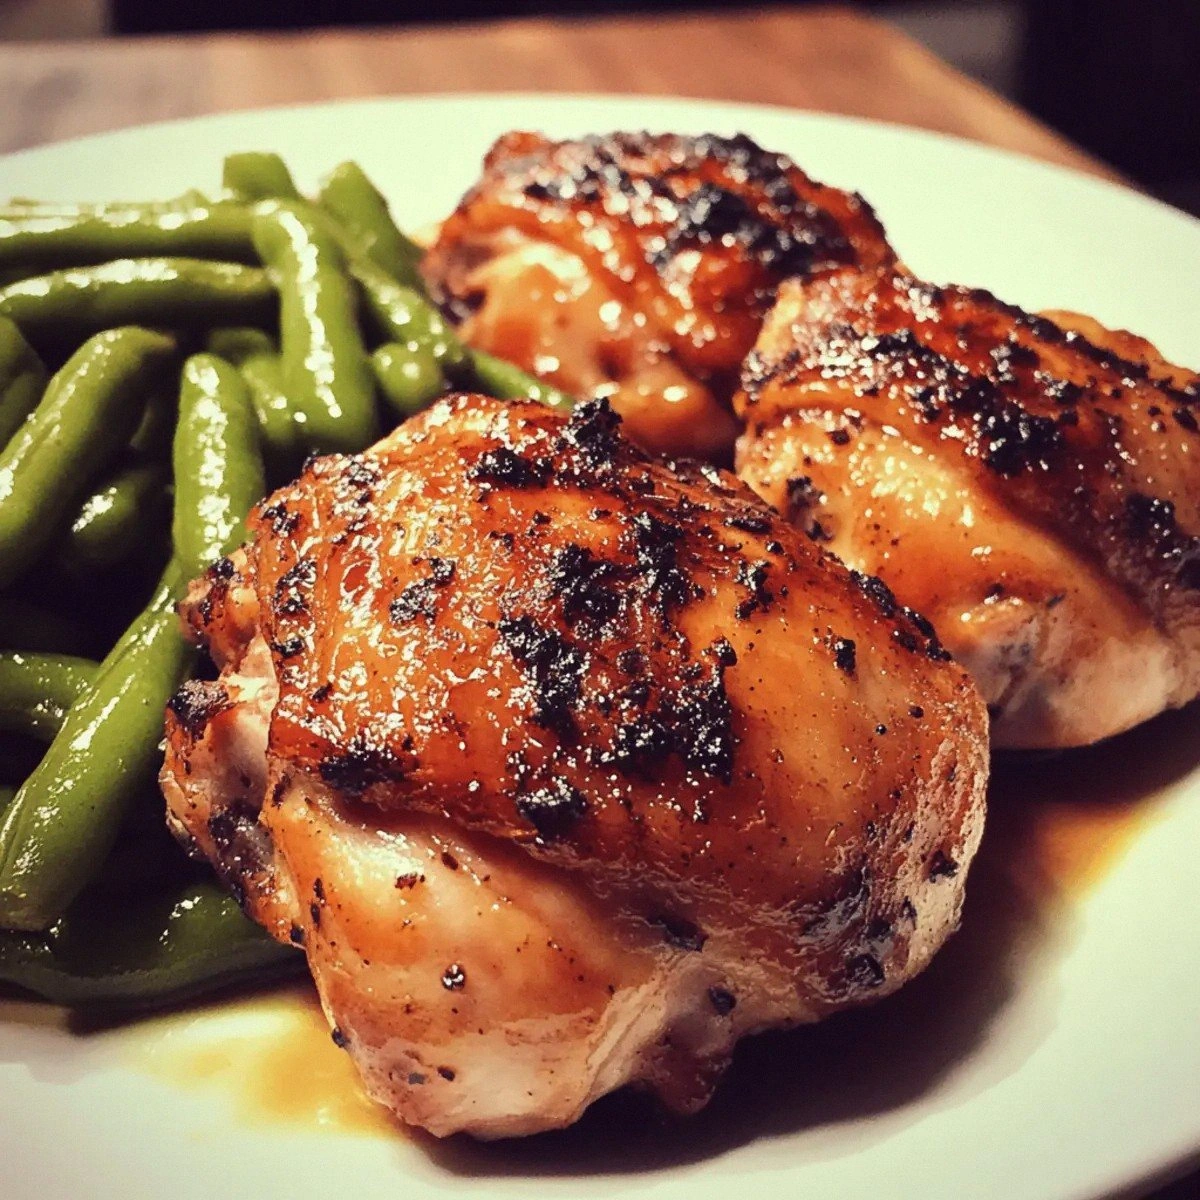
Picture this: the grill’s flames licking the air, the sound of sizzling meat like a drum solo, the aroma of caramelizing sauce swirling with hints of garlic and onion, and that subtle whisper of olive oil that keeps everything glossy. Your eyes lock onto those chicken thighs turning a gorgeous mahogany, the edges crisping just enough to crack like thin ice when you bite into them. The taste? Imagine a summer sunset captured in a bite – sweet, smoky, with a punch of spice that makes your taste buds do a happy dance. That’s the moment you realize you’ve stumbled onto a recipe that could redefine your BBQ game forever.
Most BBQ chicken recipes either drown the meat in sauce or leave it dry and bland. I’ve tried the “just dump sauce on it” approach, and it turned out like a soggy mess that clung to the plate without any personality. This version, however, respects the chicken’s natural juiciness while building layers of flavor that crescendo with every chew. I’m talking about a technique that sears the thighs first, locks in juices, then finishes them with a glaze that caramelizes without burning – a method most home cooks overlook, but it’s the secret sauce behind restaurant‑grade results.
And now, the twist you didn’t see coming: a splash of olive oil mixed with garlic and onion powder before the grill, creating a subtle crust that acts like a flavor‑conducting bridge between the meat and the BBQ sauce. I dare you to taste this and not go back for seconds. Let me walk you through every single step — by the end, you’ll wonder how you ever made it any other way.
What Makes This Version Stand Out
- Juicy Core: By searing the thighs first, we trap the natural juices, ensuring every bite bursts with moisture, not a dry crumb in sight.
- Caramelized Glaze: The final brush of BBQ sauce caramelizes under high heat, giving you that sweet‑tangy crust that shatters like thin ice.
- Flavor Layering: Garlic and onion powder aren’t just afterthoughts; they create a savory foundation that makes the sauce sing.
- Simple Prep: No complicated marinades or overnight soaking – you’re from fridge to grill in under 30 minutes.
- Versatile Crowd‑Pleaser: Whether you’re feeding a backyard crew or a picky teen, the balance of sweet, smoky, and savory wins every time.
- Make‑Ahead Magic: Cook a batch, store it, and reheat with a splash of water for a second‑day miracle that tastes fresh.
- Ingredient Integrity: Using quality chicken thighs and a good BBQ sauce elevates the dish from “okay” to “hands down the best version you’ll ever make at home.”
- Season‑Ready: Perfect for summer grilling, yet adaptable for indoor baking when the weather refuses to cooperate.
Inside the Ingredient List
The Flavor Base
The BBQ sauce is the heart‑beat of this dish. Choose a brand that balances sweet molasses with a hint of vinegar, or whisk together ketchup, brown sugar, apple cider vinegar, and a dash of smoked paprika for a homemade hero. If you skip the sauce, you’ll lose the signature glaze that makes the thighs glisten like polished mahogany. A quick tip: warm the sauce slightly before brushing – it spreads more evenly and prevents cold spots that can steam the meat.
The Texture Crew
Chicken thighs, unlike breasts, are naturally fattier and thus stay moist even under high heat. Look for bone‑in, skin‑on thighs for maximum flavor; the skin renders and crisps, acting like a protective shield. If you’re forced to use boneless, add a thin slice of butter on top during the last minutes of cooking to mimic that buttery richness. The olive oil in the rub isn’t just for slickness – it helps the spices adhere and adds a subtle richness that rounds out the tang of the sauce.
The Unexpected Star
Garlic powder and onion powder might seem like background singers, but they’re the secret harmonizers. Garlic powder gives depth without the risk of burning raw garlic, while onion powder adds a sweet, almost caramelized note that pairs perfectly with the BBQ sauce. If you’re allergic or simply out of one, a pinch of smoked paprika can stand in, delivering a smoky undertone that still sings.
The Final Flourish
Salt and pepper are the classic duo that awakens every other flavor. Salt enhances the meat’s natural taste and helps the skin crisp, while pepper adds a gentle heat that balances the sauce’s sweetness. Don’t be shy – a generous pinch of each makes a world of difference. If you love a little extra kick, a dash of cayenne or chipotle powder can turn this into a fire‑breather’s dream.
Everything's prepped? Good. Let's get into the real action…

The Method — Step by Step
-
First, pull your chicken thighs out of the fridge and let them sit at room temperature for about 15 minutes. This small step ensures even cooking; cold meat would cause the exterior to overcook while the interior stays raw. Pat them dry with paper towels – remember the hack from earlier, dryness is the secret to that crispy edge. Sprinkle both sides generously with salt, pepper, garlic powder, and onion powder, then drizzle olive oil and rub everything in until the thighs look like they’ve been lightly coated in a golden veil.
Kitchen Hack: Use a zip‑top bag to massage the seasoning into the meat; the bag acts like a mini‑marinade chamber and speeds up flavor absorption. -
While the thighs are seasoning, preheat your grill or oven. If you’re grilling, aim for a medium‑high heat, roughly 400‑425°F (205‑220°C). For oven lovers, set the broiler to high and position the rack about 6 inches from the heat source. The goal is a hot surface that can sear instantly, creating that coveted crust without steaming the meat.
-
Now comes the sear. Place the thighs skin‑side down on the grill grates or a hot cast‑iron pan. Hear that sizzle? That’s the sound of flavor being locked in. Let them cook undisturbed for 4‑5 minutes, or until the skin turns a deep amber and releases easily from the grates. Flip them over and give the other side a quick 3‑minute sear. This step is crucial – if you move them too early, the skin will stick and tear, ruining the texture.
Watch Out: If your grill flare‑ups start, move the thighs to a cooler part of the grill. Too much direct flame will char the sauce before it has a chance to caramelize, leaving a bitter taste. -
While the meat is still hot, brush the first generous layer of BBQ sauce onto each thigh. The heat will cause the sugars in the sauce to bubble and begin caramelizing, creating a glossy sheen. Let the sauce set for about a minute – you’ll see it start to thicken and cling, a visual cue that the flavor is bonding with the meat.
-
Reduce the heat to medium‑low (or move the oven rack a bit farther from the broiler) and continue cooking for another 10‑12 minutes, turning once and brushing with another layer of sauce halfway through. The internal temperature should reach 165°F (74°C) when checked with a meat thermometer. This gradual finish lets the sauce caramelize without burning, giving you that sweet‑tangy crust that’s both sticky and crisp.
Kitchen Hack: In the last 2 minutes, splash a teaspoon of water onto the grill surface and close the lid – the steam will keep the meat juicy while the sauce finishes its caramel dance. -
Once the thighs have reached the perfect temperature and the sauce has formed a glossy, slightly charred crust, remove them from the heat. Transfer them to a cutting board and let them rest for 5 minutes. Resting allows the juices to redistribute, preventing a flood of liquid when you bite in. This is the moment of truth – the aroma will hit you like a summer breeze, and the sight of that caramelized glaze will make your mouth water.
-
Serve the thighs whole or slice them against the grain for easier eating. Pair them with a crisp coleslaw, grilled corn, or a simple green salad, and you’ve got a plate that screams backyard feast. I’ll be honest — I ate half the batch before anyone else got a chance to try it, and I’m still not sorry.
That's it — you did it. But hold on, I've got a few more tricks that'll take this to another level…
Insider Tricks for Flawless Results
The Temperature Rule Nobody Follows
Most home cooks think “high heat = faster cooking,” but with chicken thighs you want a two‑stage approach: sear hot, then finish low. The initial high heat creates a crust that locks moisture, while the lower finish lets the interior cook gently, preventing dry edges. A friend once tried to grill the whole thing on high heat and ended up with burnt skin and a pink center – a classic rookie mistake.
Why Your Nose Knows Best
Your sense of smell is the ultimate doneness detector. When the sauce starts to caramelize, you’ll notice a sweet, slightly smoky perfume that signals the glaze is ready to set. If you smell a burnt sugar note, you’ve gone too far. Trust that nose; it’s more reliable than any timer.
The 5‑Minute Rest That Changes Everything
Resting isn’t optional – it’s essential. During those five minutes, the muscle fibers relax and re‑absorb the juices that were forced to the surface during cooking. Skipping this step results in a dry bite and a loss of that buttery mouthfeel. Think of it as the calm after the storm, where the flavors settle into perfect harmony.
Sauce Layering Secrets
Instead of slathering the sauce all at once, apply it in thin layers. Each layer caramelizes, building depth and a slightly crunchy texture. This technique prevents the sauce from becoming a soggy blanket and ensures every bite has that satisfying snap.
The Olive Oil Boost
A drizzle of high‑quality extra‑virgin olive oil right before the final glaze adds a silky richness that balances the tang of the BBQ sauce. It also helps the glaze adhere, giving you that glossy finish that looks as good as it tastes.
Creative Twists and Variations
This recipe is a playground. Here are some of my favorite ways to switch things up:
Spicy Chipotle Kick
Add 1‑2 teaspoons of chipotle in adobo sauce to the BBQ sauce before brushing. The smoky heat pairs beautifully with the sweet glaze, making it perfect for those who like a little fire.
Honey‑Mustard Fusion
Swap half the BBQ sauce for honey mustard. The result is a tangy‑sweet profile that pairs wonderfully with a side of roasted sweet potatoes.
Asian‑Inspired Glaze
Mix soy sauce, hoisin, a dash of sesame oil, and a sprinkle of ginger powder into the BBQ base. You’ll get a umami‑rich, slightly salty twist that feels like a cross‑cultural celebration.
Herb‑Infused Delight
Stir fresh chopped rosemary and thyme into the olive oil rub. The herbs infuse the meat with aromatic notes that elevate the dish from backyard fare to a gourmet experience.
Citrus Zest Finish
Just before serving, grate a bit of lemon or orange zest over the thighs. The bright citrus lifts the richness and adds a surprising pop of freshness.
Storing and Bringing It Back to Life
Fridge Storage
Allow the thighs to cool to room temperature, then place them in an airtight container. They’ll stay juicy for up to 4 days. When you’re ready to eat, reheat gently in a skillet over medium heat, adding a splash of water to revive the glaze.
Freezer Friendly
Wrap each thigh individually in parchment paper, then seal them in a freezer bag. They freeze beautifully for up to 3 months. To reheat, thaw overnight in the fridge, then follow the skillet reheating method – the added water trick will bring back that caramelized crust.
Best Reheating Method
For ultimate texture, use a hot oven (350°F / 175°C) on a wire rack placed over a baking sheet. Add a teaspoon of water to the bottom of the pan; the steam prevents drying while the oven’s dry heat revives the crispy skin. In just 10‑12 minutes, you’ll have thighs that taste as fresh as day one.