Picture this: the kitchen is a battlefield, flour flying like confetti, a pot of bubbling dough on the stove, and a sudden craving for something salty, chewy, and utterly comforting. I was in the middle of a late‑night snack frenzy, rummaging through the pantry for a quick fix, when a stray bag of flour hit the counter with a splat that sounded like a drum solo. That moment sparked a mission: to create the soft pretzel that would win every taste test in my living room. I’ve tried countless recipes, each promising fluffy perfection, but none delivered that buttery, golden‑brown hug that melts in your mouth while still giving you that satisfying chew.
When you first open a bag of these pretzels, the scent is a warm, yeasty embrace that feels like a hug from a long‑lost friend. The sound of the dough rising is almost hypnotic—a low, rhythmic hum that signals the magic is in progress. The texture is a delicate balance: the exterior is crisp enough to snap like a fresh twig, while the interior remains soft, almost pillowy, like a cloud you can eat. The flavor profile is a perfect marriage of savory salt, sweet caramelized dough, and a hint of buttery richness that lingers on the tongue. The heat of the oven releases a subtle toasty aroma that makes your kitchen feel like a bakery on a cold winter morning. If you’re craving comfort food that feels indulgent without the guilt, this recipe is your go‑to.
What sets this version apart is that it doesn’t rely on a complicated technique or exotic ingredients. Instead, it focuses on a few key elements that elevate the ordinary into the extraordinary: a precise yeast activation, the right amount of baking soda for that signature pretzel crust, and a final brush of butter that gives it that glossy finish. I’ve spent hours tweaking ratios, and the result is a pretzel that rises beautifully, holds its shape, and delivers a burst of flavor that will make your friends say, “I dare you to taste this and not go back for seconds.” That’s a bold claim, but trust me, it’s true. I’ll be honest—after making this batch, I ate half before anyone else even had a chance. If you’ve ever struggled with pretzels that come out too dense or too flat, you’re not alone, and I’ve got the fix.
Picture yourself pulling the golden pretzels out of the oven, the whole kitchen smelling incredible, steam curling up like a gentle cloud. The moment the first bite hits your palate, the chewy interior gives way to a crisp crust, and the buttery, salty flavor explodes. That’s the moment you’ll realize how hands down this is the best version you’ll ever make at home. And now, ready for the game‑changer? Let’s walk through every single step, and by the end, you’ll wonder how you ever made them any other way.
What Makes This Version Stand Out
- Flavor: The subtle caramelization from the baking soda gives a depth that ordinary pretzels lack. It’s like the difference between a plain bread and a well‑toasted loaf.
- Texture: The dough is soft enough to bite into like a marshmallow, yet firm enough to hold its shape. The result is a pretzel that feels like a hug in each bite.
- Simplicity: No fancy equipment or obscure ingredients—just flour, yeast, water, and a dash of baking soda. Even a novice can master it.
- Uniqueness: The final brush of butter and sprinkle of coarse salt turns a basic pretzel into a gourmet snack that impresses at parties.
- Crowd Reaction: Friends and family can’t stop asking for seconds. I’ve seen people line up at the kitchen counter for the next batch.
- Ingredient Quality: Using high‑quality all‑purpose flour and fresh sea salt makes the difference between good and great.
- Cooking Method: The technique of boiling in baking soda creates a crisp crust that’s hard to replicate with baking alone.
- Make‑Ahead Potential: You can shape, chill, and bake later—making it a perfect prep‑for‑later snack.
Alright, let’s break down exactly what goes into this masterpiece…
Inside the Ingredient List
The Flavor Base
All-purpose flour is the backbone of these pretzels, providing the structure and the neutral canvas that lets the yeast do its job. Use a flour with a protein content of around 11-12% for optimal gluten development. If you’re feeling adventurous, you can substitute half the flour with whole wheat for a nuttier taste, but the dough will be denser. Skipping the flour entirely would leave you with a liquid mess that can’t rise.
Water is the catalyst that activates the yeast and hydrates the flour. It’s best to use warm water, around 110°F (43°C), because it wakes the yeast up without killing it. If you use cold water, the dough will take longer to rise and might not develop the right crumb structure. Using too hot water will kill the yeast and result in flat pretzels.
The Texture Crew
Active dry yeast is the secret weapon that gives these pretzels their airy lift. Measure it precisely; too little and the dough won’t rise, too much and you’ll get a harsh yeast flavor. I always double‑check the expiration date to ensure maximum potency. If you don’t have yeast on hand, you can use instant yeast, but the rising time will differ.
Sugar is a subtle touch that feeds the yeast and promotes browning. It’s not a dominant flavor, but it’s essential for that caramelized crust. If you’re on a low‑sugar diet, you can reduce the amount slightly, but don’t eliminate it entirely. Skipping sugar will give you a bland, unappetizing dough.
The Unexpected Star
Baking soda is the unsung hero that turns the boiled pretzels into crisp, golden delights. When you boil the dough in a baking soda bath, it creates a chemical reaction that forms a crusty exterior. Without baking soda, your pretzels would be chewy and soft, lacking the signature crunch. Be sure to use a tablespoon of baking soda per gallon of water to get the right texture.
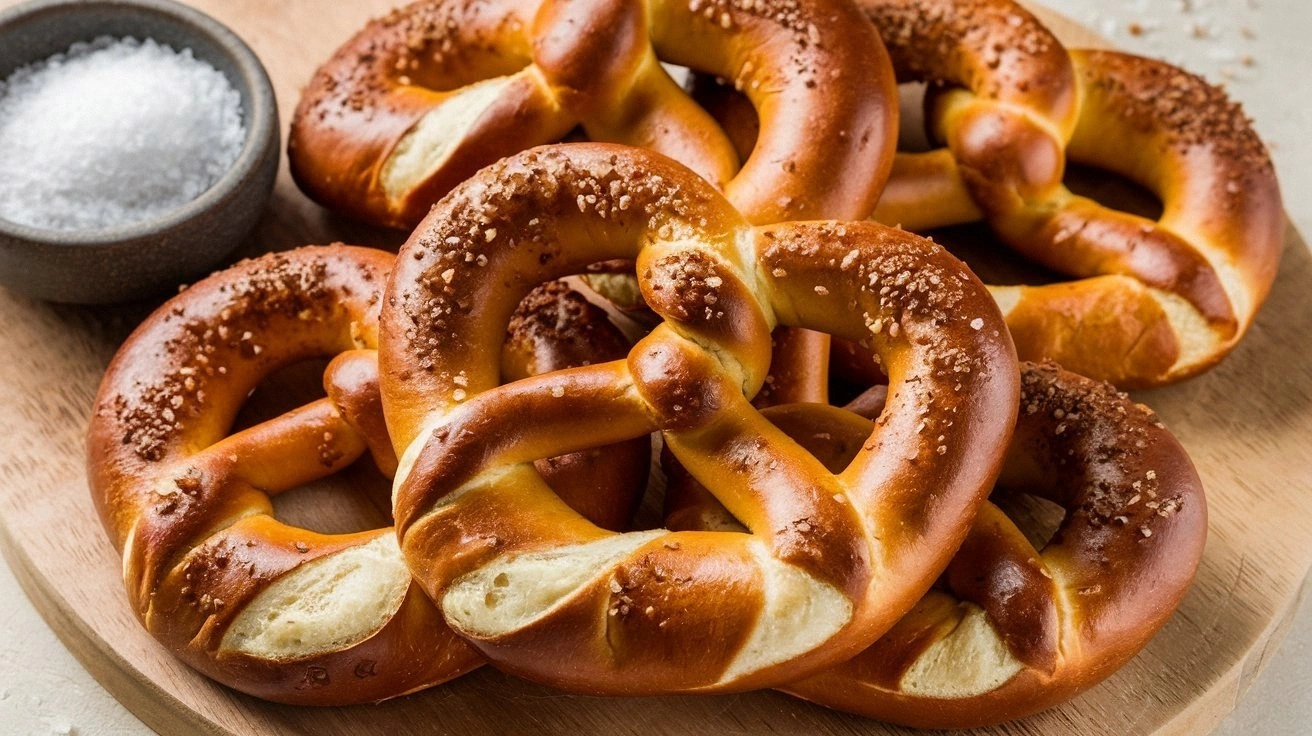
Coarse sea salt is the finishing touch that elevates the flavor profile. It adds a crunch and a burst of salty goodness that cuts through the buttery richness. If you prefer a milder salt, use fine sea salt, but the pretzels won’t have the same depth of flavor. A pinch of salt is not enough; you need enough to coat the surface and taste the difference.
The Final Flourish
Butter is what gives these pretzels that glossy, mouth‑watering finish. Melted butter brushed over the dough before baking adds flavor and a caramelized sheen. You can substitute olive oil for a healthier version, but the taste will change slightly. If you skip the butter, the pretzels will look dull and taste flat.
The final touch is a splash of water before reheating. This trick re‑introduces moisture, preventing the pretzels from drying out and giving them that fresh, warm feel. It’s a simple step that makes a world of difference when you’re serving leftovers. I’ve found that a tiny splash of water, about a tablespoon, is enough to restore the pretzel’s original texture.
Everything's prepped? Good. Let’s get into the real action…
The Method — Step by Step
- In a small saucepan, bring 2 cups of water to a gentle boil. Add 1 tablespoon of baking soda, stirring until it dissolves completely. The water should bubble mildly; if it boils vigorously, reduce the heat. This bath will give the pretzels their signature crust. I’ve found that a calm boil works best for even coating.
- While the water heats, combine 2 cups of all-purpose flour, 1 teaspoon of salt, and 1 teaspoon of sugar in a large mixing bowl. Stir until the dry ingredients are evenly distributed. The salt is crucial for flavor, and the sugar feeds the yeast. A good mix ensures no dry pockets in the dough.
- In a separate bowl, dissolve 1 teaspoon of active dry yeast in 1 cup of warm water (110°F). Let it sit for 5 minutes until it becomes foamy. The foam indicates the yeast is alive and ready to work. If it doesn’t foam, replace the yeast with fresh stock.
- Pour the yeast mixture into the dry ingredients and stir with a wooden spoon until a shaggy dough forms. The dough should be slightly sticky but manageable. Knead on a lightly floured surface for about 6-8 minutes until it becomes smooth and elastic. The kneading step is where gluten forms, giving the pretzels their chew.
- Place the dough in a lightly oiled bowl, cover with a damp cloth, and let it rise in a warm spot for 1 hour, or until it has doubled in size. A good rise means the dough is airy and ready for shaping. If it doesn’t rise, check the yeast and water temperature.
- Turn the dough onto a floured surface and divide it into 8 equal pieces. Roll each piece into a long rope, about 18 inches long, and then twist it into the classic pretzel shape. The twist creates the iconic knot that holds the dough together. Keep the pretzels on a parchment‑lined tray.
- Using a slotted spoon, gently lower each pretzel into the boiling baking soda bath. Boil each pretzel for 30 seconds, turning them halfway through. This step is the moment of truth—watch the dough puff up and the surface glisten. Don’t overboil; you want a crisp crust, not a soggy dough.
- Remove the pretzels from the bath with a slotted spoon and place them back on the tray. Brush each pretzel with melted butter and sprinkle generously with coarse sea salt. The butter adds shine, and the salt gives that satisfying crunch.
- Bake the pretzels in a preheated oven at 425°F (220°C) for 12-15 minutes, or until golden brown. The aroma will fill the kitchen, making it hard to resist. Keep an eye on the color; if they start to brown too quickly, lower the temperature slightly.
- Transfer the warm pretzels to a cooling rack. Let them rest for 5 minutes before serving. This rest allows the steam to escape and the crust to set. Serve them hot for the ultimate soft, chewy experience.
That's it — you did it. But hold on, I've got a few more tricks that'll take this to another level…
Insider Tricks for Flawless Results
The Temperature Rule Nobody Follows
Many bakers think that room temperature is enough for yeast activation, but a warm environment, around 75°F (24°C), is ideal for a quick rise. I’ve found that placing the dough near a sunny window or on top of a warm appliance speeds up the process. If you’re in a cooler climate, pre‑heat your oven to 200°F (93°C) for 5 minutes, then turn it off and place the dough inside. This trick mimics a warm, draft‑free environment.
Why Your Nose Knows Best
As the dough rises, you’ll notice a sweet, yeasty aroma. That scent is your best indicator that the dough is ready. If the smell is too sour or absent, the yeast might have died or the dough hasn't risen enough. Trust your nose; it’s a seasoned judge of dough readiness.
The 5-Minute Rest That Changes Everything
After boiling, give the pretzels a quick 5‑minute rest before baking. This pause allows the surface to dry slightly, preventing a soggy crust. It also lets the butter absorb better, giving that glossy finish. I’ve seen pretzels that skip this step look dull and taste flat.
Keep the Pretzels Warm with a Cover
If you’re serving a large batch, cover the pretzels with a clean towel right after baking. The towel traps steam, keeping them soft. Don’t cover them for too long, or they’ll lose their crispness. A 2‑minute cover is just enough to maintain that perfect balance.
Use a Baking Stone for Even Heat
A baking stone distributes heat evenly, preventing hot spots that can burn the crust. Place the stone in the oven at least 30 minutes before baking to preheat. If you don’t have a stone, a baking sheet lined with parchment works, but the crust might be a bit uneven.
Add a Splash of Water Before Reheating
When reheating leftovers, sprinkle a tiny splash of water over the pretzels before microwaving. The water turns into steam, re‑introducing moisture. I’ve used this trick to bring a stale batch back to life, and it worked like a charm.
Creative Twists and Variations
This recipe is a playground. Here are some of my favorite ways to switch things up:
Cheesy Pretzel Bites
Add shredded mozzarella to the dough before shaping. The cheese melts into gooey pockets, turning each bite into a savory delight. Serve with marinara for a quick snack.
Herb‑Infused Pretzels
Stir in a tablespoon of dried rosemary or thyme into the dough. The herbs give a fragrant, earthy note that pairs well with garlic butter. Perfect for a rustic appetizer.
Chocolate Pretzel Surprise
Fold in chocolate chips into the dough before boiling. The chocolate melts during baking, creating pockets of sweet, melted chocolate. These are a hit with kids and adults alike.
Spicy Pretzel Twist
Add a pinch of cayenne pepper to the dough for a subtle heat. The spice balances the buttery richness and gives the pretzels a lively kick.
Gluten‑Free Pretzels
Replace all-purpose flour with a gluten‑free blend that contains xanthan gum. The dough will be slightly denser but still chewy and flavorful. It’s a great option for those with dietary restrictions.
Pretzel Breadsticks
Shape the dough into long, thin sticks instead of knots. Bake until golden, then drizzle with melted butter and sprinkle with parmesan. These breadsticks are perfect for dipping in cheese fondue.
Storing and Bringing It Back to Life
Fridge Storage
Store cooked pretzels in an airtight container for up to 3 days. The airtight seal preserves the crust’s crispness and prevents the dough from drying out. If you notice the pretzels losing texture, reheat them briefly in the oven.
Freezer Friendly
Freeze uncooked pretzel dough in a freezer bag for up to 3 months. When ready to bake, let the dough thaw at room temperature for 1 hour, then shape and bake as usual. Freezing preserves the yeast’s activity and keeps the dough fresh.
Best Reheating Method
To reheat, preheat your oven to 350°F (175°C). Place the pretzels on a baking sheet and bake for 5-7 minutes until warm and slightly crisp. For a softer texture, wrap them in foil and heat for 3 minutes. A splash of water before microwaving works if you’re short on time.