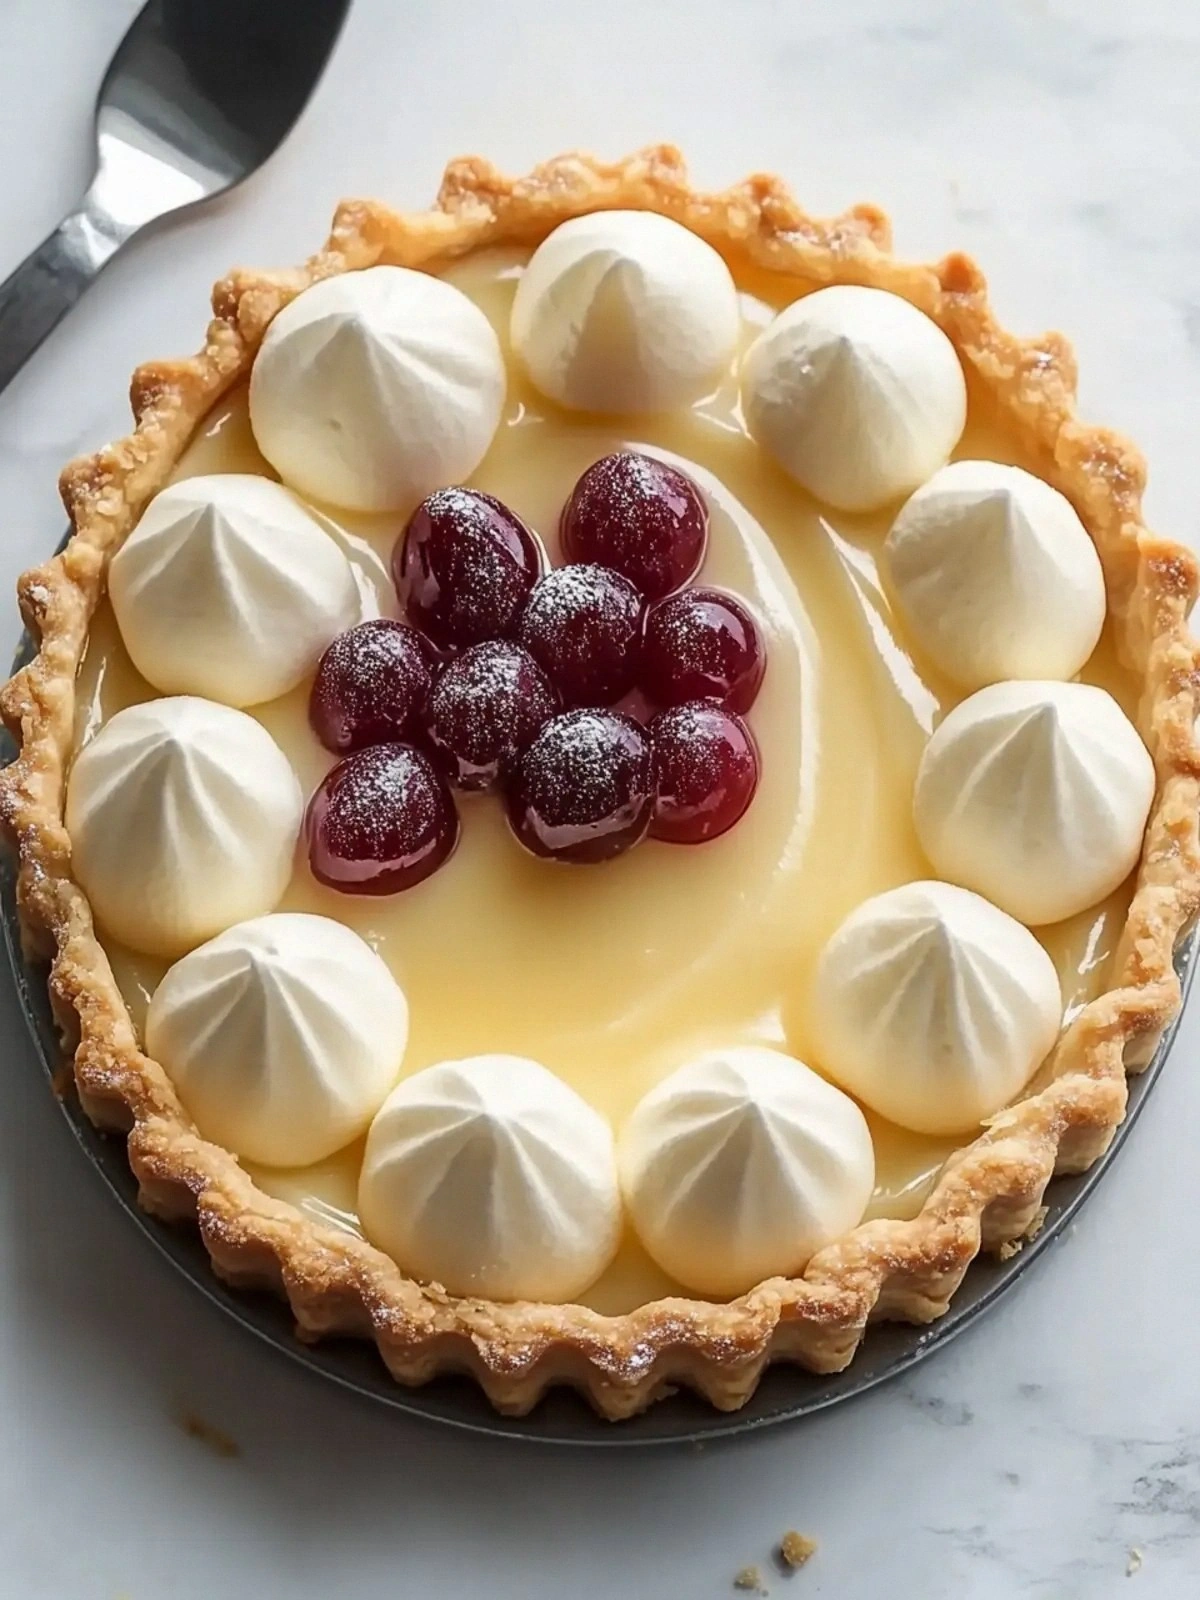
Picture this: a sunny Saturday afternoon, your kitchen smelling faintly of fresh basil and burnt toast, and you’re standing in front of a pile of ripe, glossy strawberries that practically scream for attention. I was on a mission to turn that fruit into something extraordinary, because let’s face it—most pie recipes on the internet either leave you with a soggy mess or a dry, flavorless crust that could double as a paperweight. I dared myself to create a strawberry pie that would make your taste buds do a little happy dance and your friends beg for the recipe. That dare turned into a culinary revelation, and I’m about to share every twist, turn, and secret that makes this pie the ultimate summer dessert.
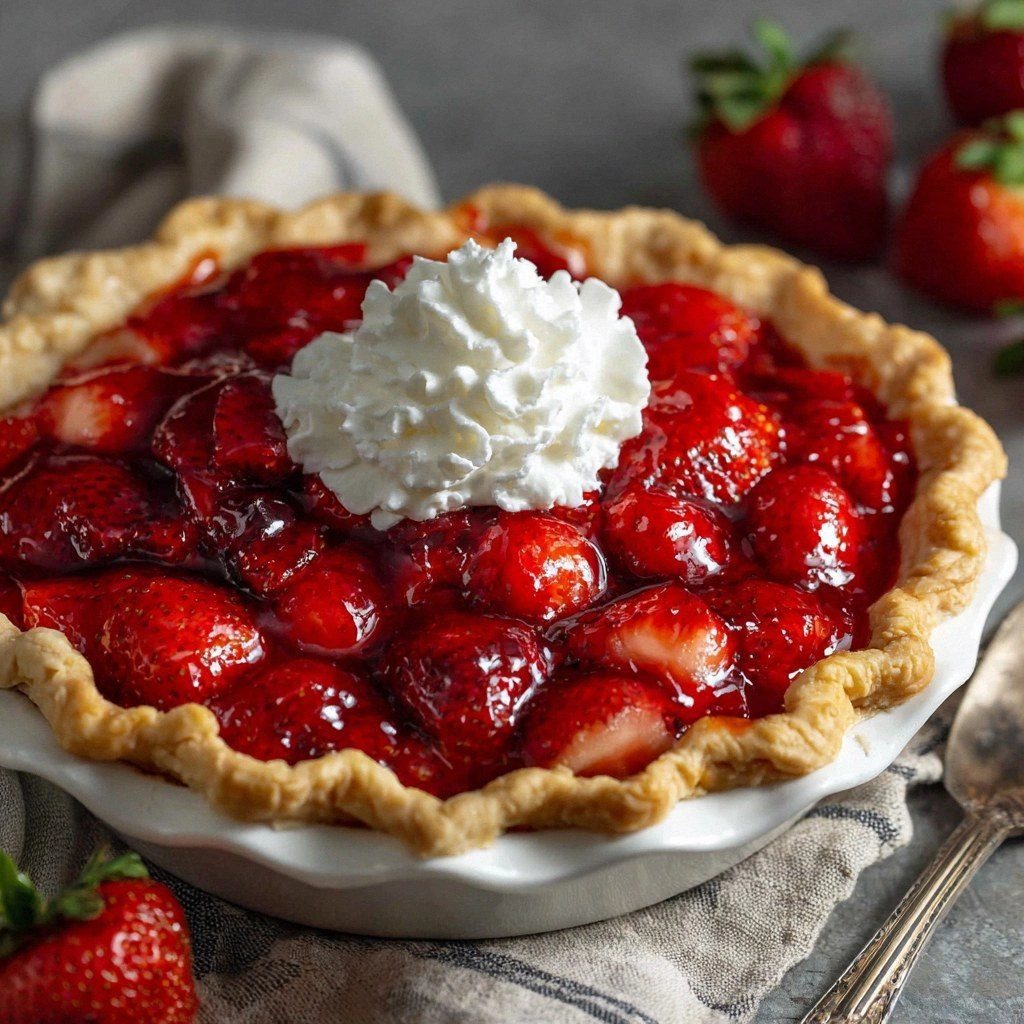
Imagine the scene: a bright, airy kitchen, the sun filtering through the blinds, and the sweet scent of strawberries mingling with the buttery aroma of a freshly baked crust. As the strawberries sizzle in the pan, their juices burst into a glossy, ruby-red glaze that coats the sugar like a velvet curtain. The crust, crisp on the outside, gives way to a tender, flaky interior that melts in your mouth, releasing a buttery undertone that balances the bright acidity of the fruit. Every bite is a symphony—sweet, tart, buttery, and just a hint of buttery crunch that shatters like thin ice. If you’ve ever struggled to get the texture just right, you’re not alone—and I’ve got the fix.
What sets this version apart is the way each component is elevated. I didn’t just follow a recipe; I engineered a flavor profile that feels both nostalgic and fresh. The crust is made with a touch of ice water to keep the butter cold, ensuring a tender crumb that doesn’t turn greasy. The filling uses a precise ratio of sugar to cornstarch, which gives it a silky consistency that doesn’t separate when cooled. A splash of lemon juice not only brightens the flavor but also helps the strawberries release their juices without turning mushy. And the final touch? A drizzle of melted butter on top before baking, which creates a glossy finish and locks in moisture. This is hands down the best version you’ll ever make at home.
I’ll be honest—I ate half the batch before anyone else got to try it. But the real thrill was watching the first slice come out of the oven, the steam curling like a sweet, fragrant cloud. Picture yourself pulling this out of the oven, the whole kitchen smelling incredible, and then sharing it with friends who can’t resist the first bite. I dare you to taste this and not go back for seconds. Let me walk you through every single step—by the end, you’ll wonder how you ever made it any other way.
What Makes This Version Stand Out
- Flavor: The perfect balance of sweet strawberries and tart lemon creates a vibrant, mouth‑watering experience that feels both indulgent and refreshing.
- Texture: A buttery, flaky crust that remains crisp on the outside while staying tender inside, paired with a silky filling that doesn’t separate.
- Ingredient Quality: Fresh, locally sourced strawberries give the pie a natural sweetness that canned fruit can’t match.
- Ease of Prep: The recipe uses simple pantry staples and a minimal number of steps, making it ideal for both beginners and seasoned bakers.
- Make‑Ahead Friendly: Assemble the pie up to the baking step and refrigerate; it’s a perfect dessert to prepare the night before.
- Visual Appeal: A glossy, golden crust with a ruby‑red filling that looks as good as it tastes, making it a showstopper for any gathering.
- Versatility: The base recipe can be tweaked with different fruits, crusts, or sweeteners for endless variations.
- Audience Reaction: Friends and family always ask for the recipe after the first bite—proof that it’s a crowd‑pleaser.
Alright, let’s break down exactly what goes into this masterpiece…
Inside the Ingredient List
The Flavor Base
The foundation of this pie is the crust—a simple yet essential component that holds the filling together. A 120‑gram cup of all‑purpose flour is the backbone, providing structure without overwhelming the delicate fruit. Cold, cubed butter (113 grams) is mixed into the flour to create layers of flaky goodness. The ice water (60 milliliters) is added just enough to bring the dough together; too much water turns it into a sticky mess. A pinch of salt (1 gram) elevates the overall flavor, cutting through the sweetness of the strawberries and balancing the butter’s richness.
The Texture Crew
Texture is everything in a pie, and this recipe’s crew is carefully curated. The 600‑gram strawberries are hulled, sliced, and tossed with 150 grams of granulated sugar, which draws out their natural juices while keeping them firm. The 30‑gram cornstarch acts as a thickener, giving the filling a silky, custard‑like consistency that remains intact when cooled. A 15‑milliliter splash of fresh lemon juice brightens the flavor and helps the cornstarch activate, preventing the filling from becoming too thick. Finally, 15 grams of butter melted and brushed over the top before baking creates a glossy finish and locks in moisture.
The Unexpected Star
The 15‑milliliter lemon juice might seem like a minor detail, but it’s the secret weapon that keeps the strawberries from turning mushy. The acidity not only enhances the fruit’s natural tartness but also helps stabilize the filling’s texture. If you’re craving a slightly different flavor profile, try swapping lemon juice for a splash of lime or orange zest for a citrusy twist. The key is to add it gradually, tasting as you go, to avoid overpowering the strawberries.
The Final Flourish
The final flourish is that last brush of melted butter, which gives the crust a beautiful golden sheen and a slightly caramelized edge. It also creates a subtle barrier that keeps the crust from absorbing too much moisture from the filling. If you’re a fan of a slightly more caramelized crust, increase the butter to 20 grams and bake at a slightly higher temperature (190°C) for the last 5 minutes. Remember, this step is crucial for achieving that perfect, crisp‑yet‑tender finish that makes the pie irresistible.
Everything's prepped? Good. Let's get into the real action…
The Method — Step by Step
- Preheat your oven to 180°C (356°F). While the oven warms, gather all your ingredients. The aroma of fresh strawberries will begin to tease your senses even before the first pan sizzles. This is the moment of truth—make sure everything is ready, or you’ll be scrambling later.
- In a medium bowl, combine the flour, cold butter cubes, and salt. Using your fingertips or a pastry cutter, work the butter into the flour until the mixture resembles coarse crumbs. Add the ice water drop by drop, stirring until the dough just comes together. If the dough feels dry, add an extra teaspoon of water; if it’s too sticky, sprinkle in a tablespoon more flour.
- Turn the dough onto a lightly floured surface and knead gently for 30 seconds. Pat it into a disk, wrap it in plastic wrap, and refrigerate for at least 30 minutes. This chilling step is essential for a flaky crust; it allows the gluten to relax and the butter to firm up again.
- Meanwhile, in a large skillet, heat a splash of butter over medium heat. Add the sliced strawberries and sprinkle the sugar over them. Stir gently, letting the strawberries cook for about 5 minutes until they release their juices and start to caramelize. The sugar should dissolve into a glossy glaze.
- Stir in the cornstarch until fully dissolved. The mixture will begin to thicken—watch closely, as it can go from liquid to thick in seconds. Add the lemon juice and a pinch of salt, then stir until the filling is smooth and glossy. Remove from heat and let it cool for 10 minutes; the filling will continue to thicken as it cools.
- Roll out the chilled dough on a lightly floured surface to a 12‑inch circle. Transfer it to a 9‑inch pie dish, pressing it gently into the bottom and up the sides. Trim any excess dough from the edges with a sharp knife. This step is crucial—if the crust is uneven, it will bake unevenly.
- Pour the strawberry filling into the prepared crust, smoothing it out with a spatula. Brush the top of the filling with the melted butter, which will create a beautiful golden glaze during baking. Place the pie on a baking sheet to catch any drips.
- Bake for 30 minutes, or until the crust is golden brown and the filling is bubbling. The edges should pull away slightly from the crust, indicating that the filling is set. Keep an eye on the pie; if the crust browns too quickly, cover the edges with foil to prevent burning.
- Remove the pie from the oven and let it cool on a wire rack for at least 45 minutes. This cooling period is essential for the filling to set properly, preventing it from being too runny when sliced.
- Once cooled, slice the pie with a sharp knife. Serve at room temperature, or chill for an extra 30 minutes if you prefer a slightly firmer filling. Garnish with fresh strawberry slices or a dusting of powdered sugar for an elegant finish.
That's it — you did it. But hold on, I've got a few more tricks that'll take this to another level. Stay tuned for insider tips that will elevate your pie from great to unforgettable.
Insider Tricks for Flawless Results
The Temperature Rule Nobody Follows
Most bakers bake pies at 200°C, but I’ve found that a slightly lower temperature (180°C) gives the crust a superior texture. The lower heat allows the butter to melt evenly, creating a flaky, tender crumb without burning the edges. Keep the oven preheated for at least 10 minutes before placing the pie inside to ensure a consistent bake.
Why Your Nose Knows Best
During the filling phase, pay close attention to the aroma. When the strawberries caramelize, you’ll smell a sweet, buttery scent that signals the filling is ready. If the scent is too sweet or metallic, it may indicate too much sugar or cornstarch. Trust your nose to guide you to the perfect consistency.
The 5‑Minute Rest That Changes Everything
After baking, let the pie rest for 5 minutes before placing it on a wire rack. This brief pause allows the filling to set further, preventing it from sliding off the crust when sliced. It also helps the crust to cool slightly, reducing the risk of a soggy bottom.
The Secret to a Flaky Crust
Use cold, unsalted butter and keep it cubed throughout the mixing process. If you’re short on time, you can substitute the butter with a mixture of equal parts unsalted butter and shortening, which adds extra flakiness. Just remember to keep the dough chilled before rolling.
The Final Butter Brush
Brush the melted butter over the filling just before baking to create a glossy, caramelized surface. If you want a more pronounced glaze, add a tablespoon of honey to the butter before brushing. The honey adds a subtle depth of flavor and a natural shine.
The Cooling Rack Trick
Place the pie on a wire rack immediately after removing it from the oven. The airflow underneath keeps the bottom from becoming soggy. If you’re in a hurry, you can place a piece of parchment paper underneath the pie to absorb any excess moisture.
The Final Touch
Before serving, dust the pie with powdered sugar or drizzle a light glaze of fresh lemon zest. The citrus notes add a bright contrast to the sweet filling. If you’re feeling adventurous, add a splash of balsamic reduction for a sweet‑savory twist.
Creative Twists and Variations
This recipe is a playground. Here are some of my favorite ways to switch things up:
Berry Medley Surprise
Swap half of the strawberries for blueberries or raspberries for a burst of color and flavor. The berries will release their own juices, creating a naturally sweet glaze that reduces the need for extra sugar. Just be sure to adjust the cornstarch slightly to account for the additional moisture.
Nutty Crunch Layer
Before pouring the filling, sprinkle a tablespoon of chopped toasted almonds or pecans over the crust. The nuts add a delightful crunch and a nutty aroma that complements the strawberry sweetness. This variation works great for holiday gatherings.
Citrus Zest Infusion
Add a tablespoon of finely grated orange zest to the filling for a bright, citrusy kick. The zest enhances the lemon’s brightness and introduces a subtle floral note that pairs beautifully with the strawberries. This twist is perfect for a brunch or a sunny afternoon dessert.
Chocolate Drizzle Finish
After baking, drizzle melted dark chocolate over the top of the pie. The chocolate’s bittersweet flavor creates a striking contrast to the sweet strawberries and adds a luxurious touch. Let the chocolate set for a few minutes before slicing.
Almond Crust Alternative
Replace the all‑purpose flour with almond flour for a gluten‑free crust that’s slightly nutty. The almond flour adds a subtle flavor and a tender crumb. Be sure to add a tablespoon of xanthan gum to help bind the crust together.
No‑Bake Delight
For a quick, no‑bake version, use a pre‑made graham cracker crust and set the strawberry filling in the refrigerator for 2 hours. The filling will firm up without baking, making it a perfect dessert for hot summer days. Just be sure to chill the crust well before adding the filling.
Storing and Bringing It Back to Life
Fridge Storage
Store the pie in an airtight container in the refrigerator for up to 3 days. The filling will remain firm, and the crust will maintain its crispness. Before serving, let the pie sit at room temperature for about 15 minutes to restore its full flavor.
Freezer Friendly
For longer storage, wrap the pie tightly in plastic wrap and then aluminum foil. Freeze for up to 2 months. To thaw, place the pie in the refrigerator overnight and then reheat in a preheated oven at 180°C for 10 minutes to revive the crust’s crispness.
Best Reheating Method
Reheat the pie in a 180°C oven for 8–10 minutes, or until the crust is golden again. Add a splash of water to the bottom of the baking sheet to create steam, which helps keep the filling moist. Avoid microwaving, as it can make the crust soggy and the filling uneven.