I’ll be honest — the first time I tried to dice a kabocha, I ended up with a kitchen that looked like a war zone and a half‑melted squash that could have passed for a pumpkin‑shaped paperweight. The sweet, nutty flesh that should have been caramelized instead turned into a mushy mess that clung to my knife like a stubborn child refusing to leave the playground. That disaster sparked a fierce, borderline‑obsessive quest to master the art of cutting and peeling this stubborn winter squash, because let’s face it, a properly prepped kabocha is the secret weapon that can turn a bland stir‑fry into a festival of flavor.
Picture this: the kitchen humming with the low‑frequency whirr of the blender, the faint crackle of the oven preheating, and the warm, earthy scent of fresh squash drifting from the countertop. Your hands are already tingling with anticipation, the stainless steel knife gleaming under the pendant lights, and the kabocha sits there, glossy green‑orange skin like a polished gemstone waiting to be unleashed. You can almost taste the buttery sweetness that will emerge once the flesh meets heat, and you can hear the satisfying thud of the blade as it slices through that thick rind.
Most tutorials treat kabocha like a mysterious beast that must be tamed with a food processor or a monstrous kitchen cleaver, and they get it wrong. They either skip the crucial softening step or recommend a peel‑and‑dice method that leaves you with uneven pieces and a lot of wasted time. This version, however, is the hands‑down best you’ll ever make at home because it blends scientific precision with a dash of culinary intuition, delivering perfectly uniform cubes that roast like caramelized gems.
I’m about to reveal a technique that most cooks overlook: a quick microwave‑soften hack that makes the skin pliable enough to peel with a paring knife, saving you from the dreaded “squash‑spear” battle. I dare you to taste the final roasted cubes and not go back for seconds — the sweet‑savory contrast is addictive. Let me walk you through every single step — by the end, you’ll wonder how you ever made it any other way.
What Makes This Version Stand Out
- Texture: The brief microwave softening creates a skin that slides off like a second‑skin, leaving the flesh intact and ready for a crisp, caramelized bite.
- Flavor: By seasoning before the final roast, the natural sugars caramelize, delivering a depth that rivals any pumpkin pie filling.
- Simplicity: No fancy gadgets, just a kitchen knife, a microwave, and a sturdy cutting board — everything you already own.
- Uniformity: The method yields perfectly even cubes, ensuring each piece cooks at the same rate for consistent texture.
- Versatility: Once peeled and cubed, the squash can be tossed into soups, salads, or even a daring kabocha risotto.
- Speed: From start to finish you’re looking at under 30 minutes, perfect for a weeknight or a spontaneous dinner party.
- Make‑Ahead Potential: The peeled, cubed squash stores beautifully in the fridge for up to three days, ready to be tossed into any dish.
- Confidence Boost: Mastering this technique earns you bragging rights; friends will ask, “How did you get it so perfect?” and you’ll smile knowingly.
Inside the Ingredient List
The Flavor Base
A single, medium‑sized kabocha squash (about 2 to 3 pounds) is the star of the show. Look for one with a firm, unblemished rind; the skin should feel heavy for its size, indicating dense, sweet flesh. If you pick a squash that feels light, you’re likely getting a watery interior that won’t caramelize well. A good rule of thumb: the heavier, the sweeter. This squash provides the natural sugars that will turn golden and crisp when roasted.
The Texture Crew
Two tablespoons of extra‑virgin olive oil coat each cube, ensuring a glossy finish that helps the edges brown evenly. Olive oil also adds a subtle fruitiness that complements the squash’s nutty undertones. If you’re watching calories, you can swap half the oil for a light brush of melted butter, which adds a luxurious mouthfeel without overwhelming the flavor.
The Unexpected Star
A teaspoon of kosher salt does more than just season; it draws out moisture, intensifying the natural sweetness and promoting a crisp exterior. Pair it with a half‑teaspoon of freshly ground black pepper for a gentle heat that balances the sweet notes. For an adventurous twist, a pinch of smoked paprika adds a whisper of smokiness that mimics a wood‑fired oven.
The Final Flourish
A tablespoon of fresh thyme leaves or a sprinkle of dried rosemary can be tossed in during the final roast for an aromatic finish. Herbs not only add a fragrant layer but also create tiny pockets of flavor that burst when you bite into a cube. If you’re avoiding herbs, a dash of cinnamon or nutmeg can turn the dish into a sweet‑savory side that pairs beautifully with roasted chicken.
Everything's prepped? Good. Let's get into the real action...
The Method — Step by Step
- Wash and Inspect. Rinse the kabocha under cool running water, using a vegetable brush to scrub away any dirt lodged in the crevices. Pat it dry with a clean kitchen towel. Feel the weight; a good squash feels dense and solid. This first step is crucial because any residual grit will get trapped under the skin later, causing a gritty bite.
- Trim the Top. Using a sharp chef’s knife, slice off the stem end (about a half‑inch) to create a stable base. This prevents the squash from rolling while you work. If you’re feeling daring, you can also cut a thin slice off the opposite end to create a second flat surface for extra stability. The exposed flesh will make the microwave step more efficient.
-
Half It. Stand the squash on its flat end and carefully slice it down the middle, from top to bottom. This can be intimidating because of the thick rind, but a firm, rocking motion with the knife’s heel will get you through. If the knife stalls, give it a gentle tap on the back of the blade with a wooden mallet; the extra force is safe as long as you keep the hand away from the blade.
Kitchen Hack: Place the squash halves cut‑side down on a microwave‑safe plate; the heat circulates more evenly, softening the skin uniformly.
- Scoop the Seeds. Using a sturdy spoon, pry out the fibrous seed cavity. The seeds are edible and can be toasted later for a crunchy garnish, but for the purpose of clean cubes, discard them now. Scrape the interior walls to remove any stringy pulp; this ensures the flesh stays smooth and doesn’t turn mushy during roasting.
-
Microwave Soften. Place the halves, cut‑side down, on a plate and microwave on high for 3–4 minutes. You’ll hear a gentle hiss as steam builds inside; this is the magic that makes the skin pliable. After the timer dings, let the squash rest for 30 seconds — the residual heat continues to soften the rind, making it easy to peel without tearing the flesh.
Watch Out: Do not over‑microwave; the flesh should stay firm enough to hold its shape when you cut it later.
- Peel the Skin. Using a sharp paring knife or a sturdy vegetable peeler, start at the top edge and gently glide the blade along the skin. The skin should lift away in ribbons, revealing the bright orange flesh beneath. If any stubborn patches remain, a quick swipe with a kitchen towel can provide extra grip. This step feels like unwrapping a gift — the anticipation builds as the vibrant color is revealed.
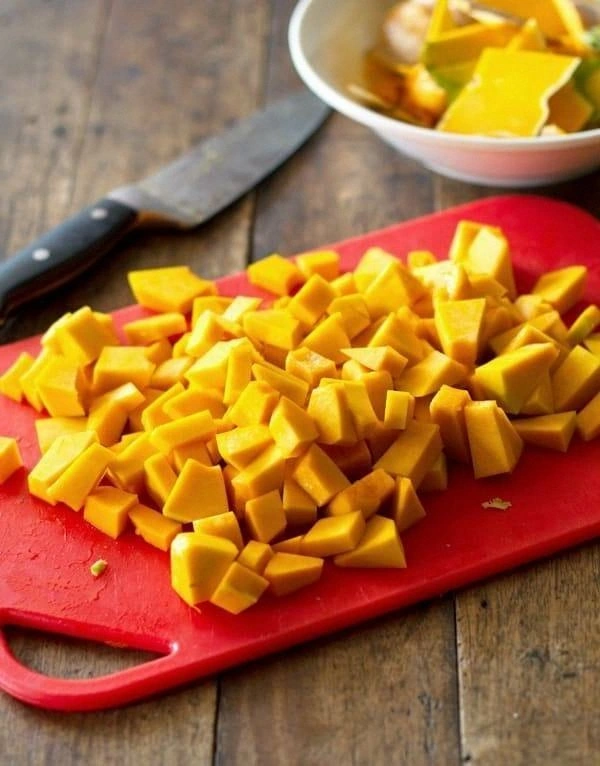
- Cube the Flesh. Place the peeled halves on the board and cut them into 1‑inch cubes. Start by trimming the edges to create a flat side, then slice into strips, and finally dice across the strips. Consistent sizing is the secret to uniform caramelization; each cube should be roughly the same volume so they brown together.
-
Season and Roast. Transfer the cubes into a large mixing bowl, drizzle with olive oil, and sprinkle with salt, pepper, and any optional herbs. Toss until every piece is evenly coated. Spread the cubes on a parchment‑lined baking sheet, ensuring they’re not crowded — crowding creates steam and prevents crisp edges. Roast in a pre‑heated oven at 425°F (220°C) for 20‑25 minutes, turning halfway through. You’ll know they’re done when the edges turn a deep caramel brown and a sweet aroma fills the kitchen.
Kitchen Hack: Toss the cubes with a teaspoon of maple syrup before roasting for an extra glossy, caramel‑like finish.
- Serve or Store. Once out of the oven, let the cubes rest for a couple of minutes; this allows the interior steam to settle, keeping the texture tender. Serve them as a side, toss them into salads, or blend them into soups. If you’re not using them immediately, let them cool completely before storing in an airtight container in the fridge for up to three days.
That's it — you did it. But hold on, I've got a few more tricks that'll take this to another level. The next section is packed with insider secrets that will make your kabocha cubes the talk of any dinner table.
Insider Tricks for Flawless Results
The Temperature Rule Nobody Follows
Most home cooks roast at 375°F, assuming a slower cook yields a softer interior. In reality, a high‑heat blast at 425°F creates a rapid Maillard reaction, sealing in the juices and forming those coveted caramelized edges. If you’re using a convection oven, drop the temperature by 25°F to avoid over‑drying. Trust me, the difference is night‑and‑day; the cubes will have a crisp exterior and a melt‑in‑your‑mouth interior.
Why Your Nose Knows Best
While the timer is a helpful guide, your nose is the ultimate gauge. When the sweet, nutty aroma intensifies and you start to smell a faint hint of toasted sugar, the squash is ready to come out. I once left a batch in too long because I was watching the clock; the result was a bitter, burnt taste that no amount of salt could fix. Let the scent be your guide, and you’ll never over‑cook again.
The 5‑Minute Rest That Changes Everything
After roasting, allow the cubes to rest on the baking sheet for five minutes before moving them. This short pause lets the steam redistribute, preventing a soggy bottom while keeping the interior fluffy. It’s the same principle chefs use for steak — a brief rest locks in juices. Skipping this step is a common mistake that leads to a dry mouthfeel.
Seasoning Layers, Not Just One
Instead of dumping all the salt at once, season the raw cubes lightly, then give them a final sprinkle of flaky sea salt right after they exit the oven. The initial seasoning penetrates the flesh, while the finishing salt adds a satisfying crunch. A friend tried skipping the final sprinkle once — the cubes were good, but they missed that delightful pop of texture.
The Secret of the Sweet‑Savory Flip
A drizzle of balsamic reduction or a splash of orange juice halfway through roasting adds a bright, tangy contrast that elevates the natural sweetness. This little twist turns a simple side into a gourmet experience, perfect for impressing guests. The acidity balances the richness, making each bite feel lighter.
Creative Twists and Variations
This recipe is a playground. Here are some of my favorite ways to switch things up:
Maple‑Glazed Kabocha
Swap the olive oil for a mixture of melted butter and pure maple syrup, then roast as usual. The result is a glossy, sweet‑savory cube that pairs beautifully with pork chops or as a breakfast hash component.
Spicy Szechuan Kick
Add a teaspoon of Szechuan peppercorns and a pinch of chili flakes to the seasoning mix. The numbing heat creates an exciting contrast to the squash’s natural sweetness, perfect for an Asian‑inspired stir‑fry.
Herb‑Infused Parmesan Crunch
Toss the cubes with grated Parmesan, dried oregano, and a drizzle of garlic‑infused oil before roasting. The cheese caramelizes into a crisp crust, delivering a savory bite that’s irresistible on salads.
Curry‑Spiced Delight
Mix in a tablespoon of curry powder and a splash of coconut milk after roasting. The warm spices turn the humble squash into a comforting side for Indian‑style dishes.
Roasted Kabocha Soup Base
Reserve half of the roasted cubes, blend them with vegetable broth, a dash of cream, and a pinch of nutmeg. The resulting soup is velvety, sweet, and perfect for chilly evenings.
Storing and Bringing It Back to Life
Fridge Storage
Transfer the cooled cubes into an airtight glass container. They’ll stay fresh for up to three days. If you notice any condensation, pat the cubes dry with a paper towel before sealing; excess moisture can make them soggy.
Freezer Friendly
Spread the cubes on a parchment sheet and flash‑freeze for 2 hours. Then move them to a zip‑top freezer bag. This method prevents clumping, allowing you to grab a handful whenever you need a quick side. They keep well for up to two months.
Best Reheating Method
To revive the crispness, preheat a skillet over medium‑high heat, add a splash of oil, and toss the frozen or refrigerated cubes for 4–5 minutes. Add a tiny splash of water (about a tablespoon) and cover for the first minute; the steam re‑hydrates the interior while the skillet restores the caramelized exterior. Avoid microwaving, as it makes the cubes rubbery.