It all began on a rainy Saturday when I was trying to rescue a batch of over‑baked pumpkin muffins that had turned into a dry, crumbly mess. I stared at the cracked, charred edges, feeling the sting of disappointment that only a seasoned baker can feel. A friend called, demanding “I need something sweet right now,” and I thought, “Why not turn this disaster into a triumph?” That impulse set me on a mission to create a dessert that would not only rescue the pumpkin but also redefine comfort food in a single bite.
Picture this: the kitchen is alive with the aroma of toasted oats and warm pumpkin spice, a faint crackle from the skillet, and the sound of butter sizzling like a tiny applause. The first spoonful of the filling is a silky, creamy swirl that coats the palate like velvet, followed by a subtle crunch from the oatmeal crust that snaps like thin ice. The sweetness is balanced, not overwhelming, with a gentle hint of caramelized brown sugar that lingers. The texture is a perfect marriage of crisp and smooth, and the pumpkin’s earthy undertone ties everything together in a single, unforgettable flavor profile. I felt the kitchen transform from a place of failure to a stage for culinary magic.
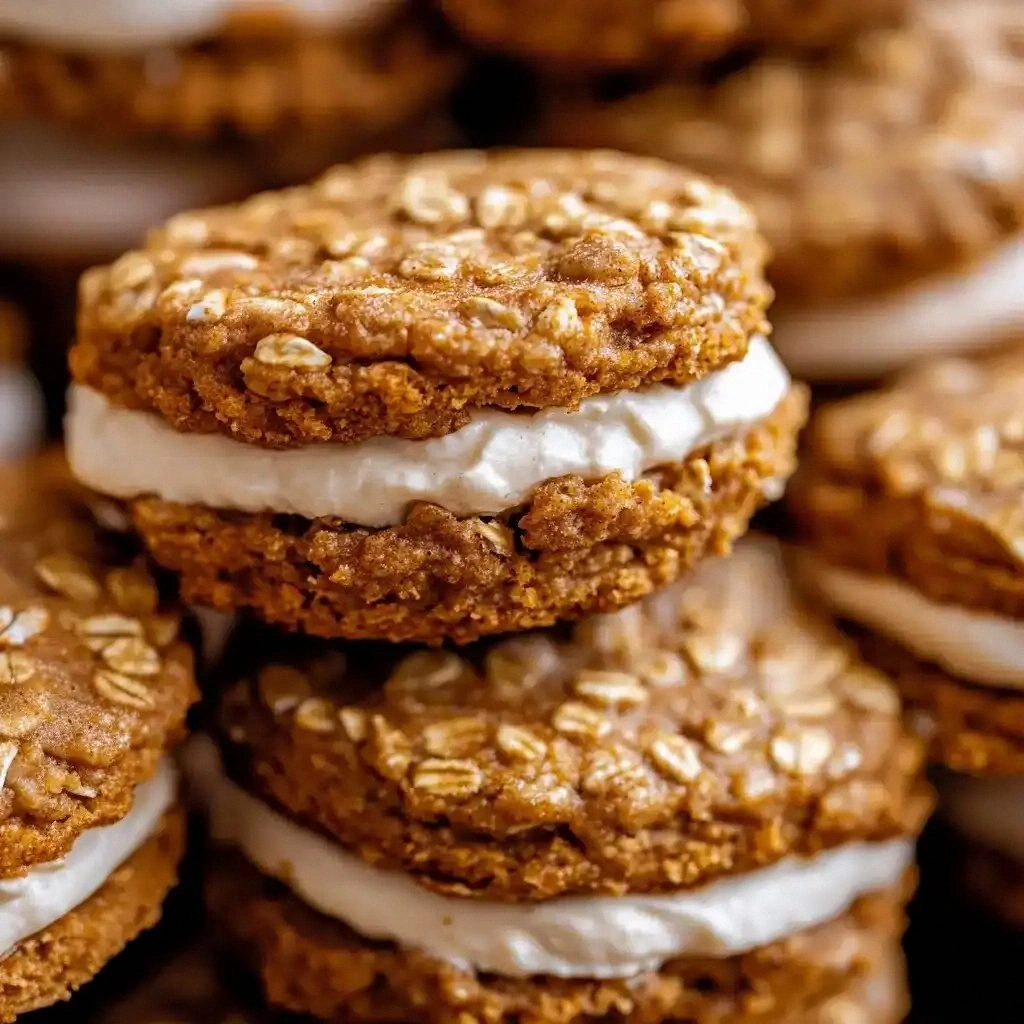
What makes this version stand out is that it’s not just a pumpkin pie in miniature form; it’s an edible orchestra where each component plays a distinct, harmonious role. The oatmeal crust adds a nutty, chewy texture that contrasts beautifully with the creamy filling, creating layers of mouthfeel that dance on your tongue. The use of old‑fashioned oats instead of quick oats gives the crust a rustic, hearty bite that feels like a hug. The subtle sweetness from the brown sugar is tempered by a splash of granulated sugar, preventing the pie from becoming syrupy. And the final dusting of powdered sugar gives it a cloud‑soft finish that’s almost too good to eat.
And here’s the kicker: the filling is made with a combination of pumpkin puree, cream cheese, and a whisper of vanilla that melts into a velvety sauce, all topped with a light dusting of powdered sugar that turns every bite into a cloud of flavor. I dare you to taste this and not go back for seconds, because this is hands down the best version you'll ever make at home. If you've ever struggled with pumpkin desserts that feel too heavy or too sweet, this recipe is the fix you’ve been waiting for. Picture yourself pulling these out of the oven, the whole kitchen smelling incredible, and the first bite melting in your mouth. Okay, ready for the game‑changer? Let me walk you through every single step — by the end, you'll wonder how you ever made it any other way.
What Makes This Version Stand Out
- Crunch Factor: The oatmeal crust delivers a satisfying crunch that breaks up the creamy filling, creating a delightful contrast in every bite.
- Balanced Sweetness: The combination of brown and granulated sugar keeps the sweetness at just the right level, avoiding the sugary trap of many pumpkin desserts.
- Creamy Texture: Cream cheese in the filling gives a silky, indulgent mouthfeel that’s richer than traditional pumpkin pie but lighter than cheesecake.
- Authentic Pumpkin Flavor: Using pure pumpkin puree instead of canned pumpkin powder ensures a genuine, earthy pumpkin taste that permeates the entire pie.
- Time‑Efficient: The recipe can be completed in 45 minutes from prep to bake, making it perfect for a quick yet impressive dessert.
- Make‑Ahead Friendly: The crust can be baked ahead and stored, while the filling can be assembled the night before, saving you precious kitchen time.
- Visual Appeal: The golden crust and the soft, powdered sugar finish create an Instagram‑ready dessert that will impress any crowd.
- Kid‑Friendly: The recipe uses simple, common ingredients that even a novice can handle, making it a great family‑friendly dessert.
Alright, let's break down exactly what goes into this masterpiece...
Inside the Ingredient List
The Flavor Base
The foundation of this dessert is the pumpkin puree, which provides a natural sweetness and a velvety texture that’s essential for the filling’s creaminess. Pumpkin puree is packed with beta‑carotene and fiber, making this treat not only delicious but also slightly nutritious. If you skip it, the filling will feel thin and lack depth, turning your pies into bland, dry cakes. You can use homemade pumpkin puree for extra flavor, but canned puree is fine if you’re in a hurry. For a richer taste, choose a puree that’s labeled “100% pumpkin” and avoid those with added sugars or preservatives.
The Texture Crew
Old‑fashioned oats are the unsung hero of the crust, delivering a chewy, nutty bite that’s a far cry from the usual crumbly pastry. They absorb moisture from the butter and sugar, creating a cohesive structure that holds the pie together. If you substitute quick oats, the crust will be too soft and may collapse. Oats also add a subtle earthy flavor that pairs beautifully with pumpkin spice. For an extra crunchy edge, toast the oats briefly in a dry skillet before mixing.
The Unexpected Star
Unsalted butter is used twice in this recipe, first for the crust and then for the filling. The butter’s high fat content gives the crust a flaky, golden texture and a buttery aroma that elevates the overall flavor. In the filling, butter helps to bind the cream cheese and sugar, creating a silky consistency that coats the spoon. Using salted butter would alter the balance of flavors and might make the filling taste overly salty. A small tip: let the butter soften at room temperature before mixing to ensure a smooth, even crumb.
The Final Flourish
Powdered sugar, the final touch, adds a light dusting that creates a cloud‑soft finish and a subtle sweetness that doesn’t overpower the pumpkin. It’s also used to sweeten the filling, balancing the tanginess of the cream cheese. If you prefer a lower‑sugar option, you can reduce the powdered sugar by half or replace it with a sugar substitute that measures the same volume. A pinch of pumpkin pie spice in the filling adds a fragrant warmth that ties the whole dessert together. Remember, the key is to keep the spice subtle so it doesn’t eclipse the pumpkin’s natural flavor.
Everything's prepped? Good. Let's get into the real action...
The Method — Step by Step
- Preheat your oven to 375°F (190°C). Line a 12‑cup muffin tin with paper liners, ensuring each cup is evenly spaced. This step guarantees that the pies will release easily after baking. While the oven warms, gather all your dry ingredients in a large mixing bowl.
- In the bowl, combine 1½ cups all‑purpose flour, 1 cup old‑fashioned oats, 1 tsp baking soda, 1 tsp pumpkin pie spice, and ½ tsp salt. Whisk the mixture until the dry components are evenly distributed. The dry mix is the backbone of the crust; a good blend means a cohesive, flavorful base.
- Cut ¾ cup unsalted butter into small cubes and add it to the dry mix. Using your fingertips, rub the butter into the flour until the mixture resembles coarse crumbs. The butter should be cold enough to stay in small pieces; this will create a flaky, buttery crust.
- Add ¾ cup brown sugar and ¼ cup granulated sugar to the mixture. Stir until the sugars are well incorporated. The sugars not only sweeten the crust but also help with browning, giving the crust a golden finish.
- Press the dough into each muffin cup, forming a tight, even layer that covers the bottom and rises slightly over the rim. This creates a sturdy shell that will hold the creamy filling without leaking. Use a flat spoon or your palm to smooth the surface.
- Bake the crusts for 10 minutes, or until they start to turn golden brown. Keep a close eye on them; over‑baking can lead to a hard, unappetizing texture. Once done, remove the tin from the oven and let the crusts cool for 5 minutes before adding the filling.
- In a separate bowl, whisk together ½ cup pumpkin puree, 1 large egg, 1 tsp vanilla extract, 4 oz cream cheese (softened), and ¼ cup unsalted butter. Beat until the mixture is smooth and creamy. This filling should be thick enough to hold its shape but still silky when spooned.
- Fold in 1½ cups powdered sugar, 2 tbsp pumpkin puree, ¼ tsp pumpkin pie spice, and ½ tsp vanilla extract. The extra pumpkin puree intensifies the flavor, while the spice adds depth. Mix until the filling is glossy and uniform.
- Fill each pre‑baked crust with the creamy mixture, leaving a small gap at the top to prevent overflow. The filling should look like a smooth, velvety dome sitting atop the crust.
- Return the filled tin to the oven and bake for an additional 18–20 minutes, or until the filling is set but still slightly jiggly in the center. This gentle bake ensures the filling remains moist and creamy. Once done, let the pies cool completely before serving.
That’s it — you did it. But hold on, I've got a few more tricks that'll take this to another level. These insider tips will help you avoid common pitfalls and elevate the flavor profile to professional standards.
Insider Tricks for Flawless Results
The Temperature Rule Nobody Follows
Many bakers bake at a high temperature to get a quick crust, but this can cause the crust to brown too fast while the filling remains undercooked. I always set the oven to 375°F (190°C) and let the pies bake slowly. This controlled heat allows the filling to set gently, ensuring a creamy interior and a crisp exterior. A friend once tried 425°F and ended up with a burnt crust and a watery filling — a disaster that could have been avoided.
Why Your Nose Knows Best
During the baking process, keep your nose open. The aroma of toasted oats and pumpkin is a reliable indicator that the crust is developing the right flavor. If the scent is too sweet or too bitter, adjust the sugar or spices accordingly. I’ve learned that a subtle, warm scent is the sweet spot. Trust your olfactory senses; they’re more reliable than the eye when judging doneness.
The 5‑Minute Rest That Changes Everything
After removing the pies from the oven, let them rest for exactly five minutes on the rack. This brief pause allows the filling to set further and the crust to firm up slightly, making it easier to remove the paper liners without tearing the crust. A quick glance can make a difference between a perfectly neat pie and a messy mess. I always set a timer to avoid forgetting this crucial step.
Using a Silicone Baking Mat
Line the muffin tin with a silicone mat before adding the paper liners. This extra layer prevents the crust from sticking and makes clean‑up a breeze. The mat also provides a slightly elevated surface that helps the crust bake evenly. It’s a small investment that pays off with consistent results.
Choosing the Right Pumpkin Puree
Not all pumpkin purees are created equal. Look for a puree labeled “100% pumpkin” with no added sugars or thickeners. This ensures a pure, earthy flavor that won’t be masked by artificial sweetness. If you’re using homemade puree, cook the pumpkin until it’s soft and mash it until smooth. The texture of the puree directly affects the creaminess of the filling.
Creative Twists and Variations
This recipe is a playground. Here are some of my favorite ways to switch things up:
Nutty Crunch
Add a handful of chopped walnuts or pecans to the crust mix. The nuts provide a buttery crunch that pairs well with the creamy filling. They also add a subtle, earthy flavor that complements the pumpkin.
Spiced Latte Twist
Stir 1 tsp of instant espresso powder into the filling. The coffee notes enhance the pumpkin’s natural sweetness, creating a dessert that feels like a warm latte in pie form.
Maple Syrup Infusion
Replace ¼ cup butter in the crust with 2 tbsp maple syrup. The syrup adds a sweet, caramelized flavor that elevates the pumpkin’s earthiness.
Chocolate Swirl
Fold in 2 tbsp cocoa powder into the filling for a chocolate‑pumpkin fusion. The chocolate adds depth and a rich undertone that satisfies chocolate lovers.
Herbal Touch
Add ½ tsp dried thyme or rosemary to the crust. The herbal aroma provides a savory contrast that makes the dessert feel sophisticated and unexpected.
Low‑Sugar Option
Swap the powdered sugar in the filling for a sugar substitute that measures the same volume. This reduces the calorie count while keeping the texture smooth and creamy.
Storing and Bringing It Back to Life
Fridge Storage
Store the filled pies in an airtight container in the refrigerator for up to 3 days. The crust may soften slightly, but the filling remains firm. When ready to serve, let them sit at room temperature for 10 minutes to regain their original texture.
Freezer Friendly
Wrap each pie tightly in plastic wrap and place them in a freezer bag. They can be frozen for up to 2 weeks. Thaw overnight in the refrigerator before reheating.
Best Reheating Method
Reheat frozen or chilled pies in a 350°F oven for 8–10 minutes, or until warmed through. Add a tiny splash of water to the bottom of the tin to create steam, which helps the filling stay moist. Serve warm for the best experience.