I’ve tried countless recipes for salmon appetizers, and most of them feel like they’re missing that final spark—something that turns a simple bite into an unforgettable experience. This version, however, is a game changer. The combination of flaky, tender salmon inside a buttery, crisp shell, brightened by dill and a zesty lemon‑mustard swirl, creates a flavor profile that is both comforting and daring. It’s the kind of dish that makes you pause mid‑conversation and say, “I dare you to taste this and not go back for seconds.”
What sets this recipe apart is the meticulous balance of textures and flavors. The panko coating is not just crunchy; it’s a buttery, airy shell that crumbles delightfully, revealing the moist salmon center. The dill and lemon juice cut through the richness with a bright, almost citrusy zing that lifts every bite. And the final touch—a drizzle of Greek yogurt mixed with a whisper of garlic powder—adds a creamy, tangy finish that feels like a gentle hug for your palate. It’s hands down the best version you’ll ever make at home, and I promise, once you taste it, you won’t look at salmon the same way again.
Stay with me here—this isn’t just a recipe; it’s a culinary adventure that will have you humming “I’m ready for the next bite.” By the end of this post, you’ll walk away with a foolproof method, insider tricks, and a recipe card that will become your go-to reference for the perfect salmon balls. Let’s dive in and turn a humble can of salmon into a show‑stopping dish that will have everyone asking for the recipe.
What Makes This Version Stand Out
- Flavor: The bright dill and lemon give each bite a fresh, citrusy punch that cuts through the richness of the salmon.
- Texture: A buttery panko crust that shatters like thin ice, revealing a tender, flaky center that melts in your mouth.
- Ease: No advanced techniques required—just a few simple steps and the results are professional‑level.
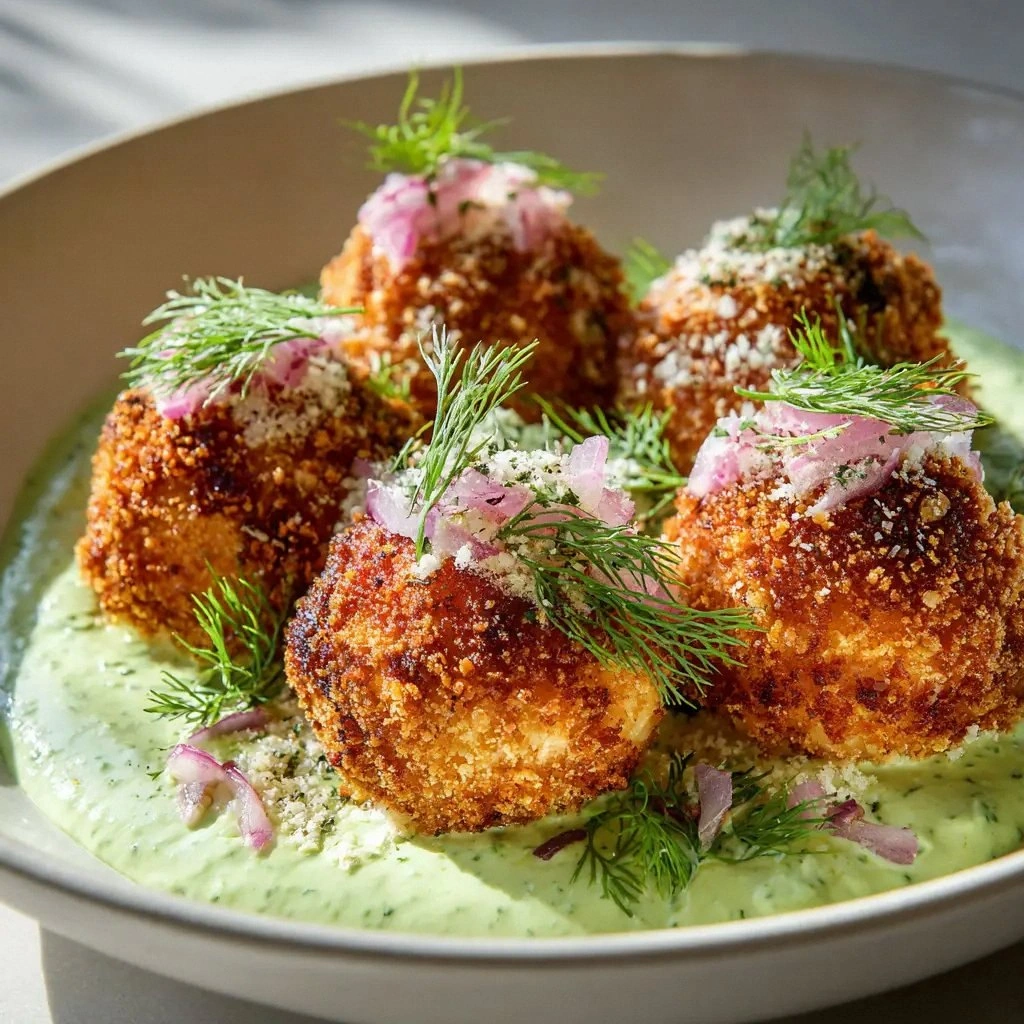
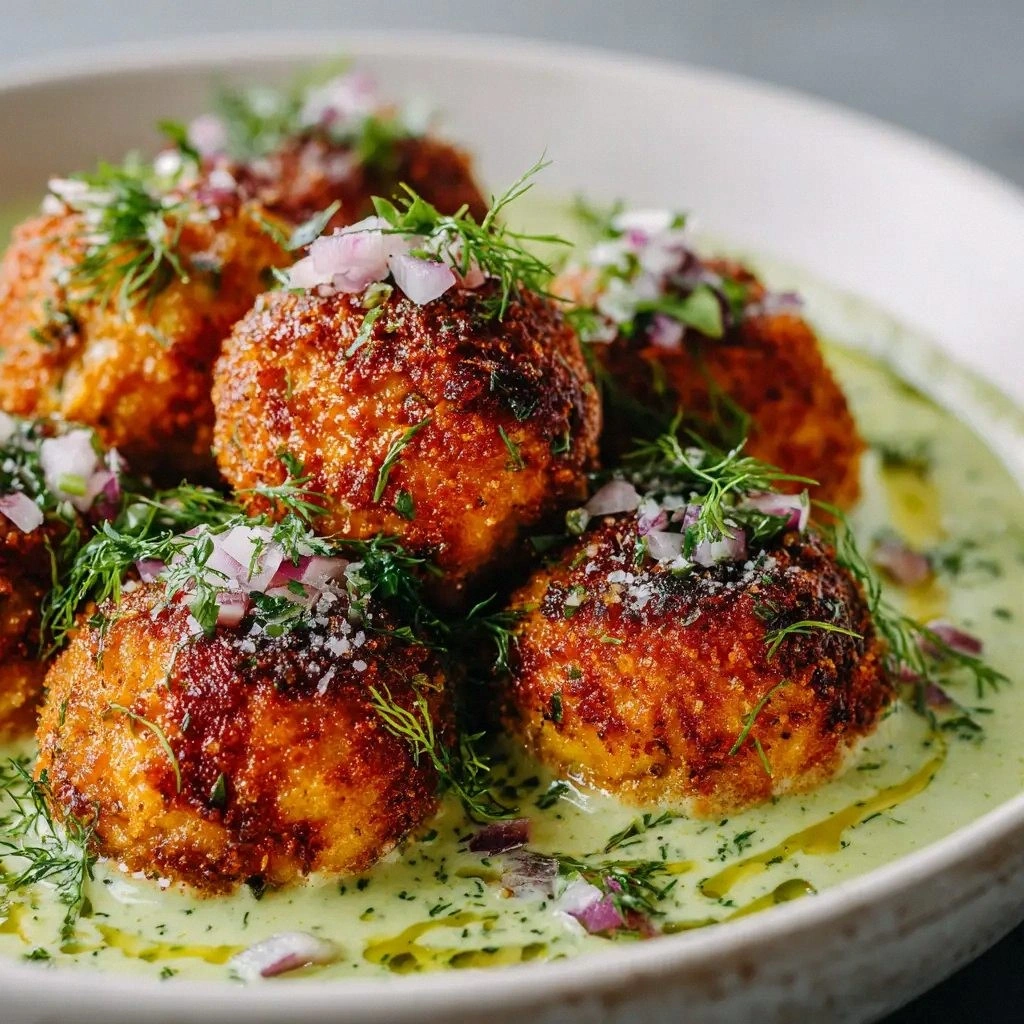
- Visual Appeal: The golden, glossy exterior with a slight sheen makes the dish look as good as it tastes.
- Make‑Ahead Friendly: Form the balls, chill, and reheat quickly; they’re perfect for entertaining on short notice.
- Ingredient Quality: Using fresh dill and a high‑quality canned salmon ensures the dish is packed with flavor.
- Versatility: Works as a party starter, a side dish, or a light main course with a side salad.
- Audience: Even the most skeptical foodies will be won over by the crisp texture and bright finish.
Alright, let’s break down exactly what goes into this masterpiece…
Inside the Ingredient List
The Flavor Base
The canned salmon is the heart of the dish, providing a robust, savory foundation that carries the other flavors. It’s essential to use a high‑quality, minimally processed salmon to keep the flavor bright and the texture moist. If you can’t find canned salmon, a fresh fillet can be used, but you’ll need to season it with a pinch of salt and pepper before shredding.
Dill is the hero herb in this recipe. Fresh dill adds a bright, almost citrusy flavor that pairs beautifully with the salmon. If fresh dill is unavailable, dill weed can be a suitable substitute, though it will be slightly less aromatic. A teaspoon of dried dill can also work in a pinch, but use half the amount to avoid overpowering the dish.
Lemon juice is the secret to cutting through the richness of the salmon and panko. The acidity lifts the flavors and adds a fresh brightness that keeps the dish from feeling heavy. If you’re allergic to citrus or prefer a milder taste, replace the lemon juice with a splash of white wine vinegar or apple cider vinegar.
The Texture Crew
Panko breadcrumbs give the salmon balls their signature crunch. Unlike regular breadcrumbs, panko is lighter and flakier, which means each bite has a satisfying snap before the fluffy interior is revealed. If you want to add a nutty undertone, mix in a tablespoon of toasted almond flour with the panko.
Mayonnaise and Greek yogurt are the binding agents that keep the salmon mixture together. Mayonnaise adds richness and helps the panko adhere to the salmon, while Greek yogurt introduces a slight tang that balances the savory elements. If you’re avoiding dairy, a tablespoon of silken tofu blended with a bit of lemon juice can mimic the creaminess of Greek yogurt.
Egg is the classic binder that brings everything together. It also gives the balls a subtle firmness that helps them hold their shape during frying. If you’re vegan, a tablespoon of flaxseed meal mixed with 3 tablespoons of water can replace the egg, but the texture will be slightly different.
The Unexpected Star
Garlic powder adds a subtle, savory depth that complements the dill and lemon. It’s a quick way to introduce garlic flavor without the risk of burning it on the stovetop. If you prefer fresh garlic, finely minced and sautéed briefly before mixing can give a more pronounced aroma, but be careful not to let it burn.
Vegetable oil is used for frying the balls. Opt for a neutral oil with a high smoke point, such as canola or grapeseed oil, to avoid imparting unwanted flavors. If you’re aiming for a healthier option, try using avocado oil, which has a high smoke point and a buttery undertone.
The Final Flourish
The final touch is a drizzle of Greek yogurt mixed with a pinch of garlic powder, which adds a creamy, tangy finish that balances the crispy exterior. This sauce can be served on the side or drizzled over the salmon balls just before serving. If you’re looking for a dairy-free option, a simple tahini lemon sauce will provide a similar creamy texture.
Everything's prepped? Good. Let's get into the real action…
The Method — Step by Step
- Begin by draining the canned salmon thoroughly. Use a fork to break it into fine flakes, then transfer to a large mixing bowl. As you break the salmon, you’ll notice a subtle aroma that signals freshness—trust your nose, it’s a good sign. If you see any excess liquid, let the salmon sit in a colander for a few minutes to ensure the mixture stays firm.
- Add the 1.5 cups of panko breadcrumbs to the salmon. Mix gently, ensuring the breadcrumbs are evenly distributed. The panko should absorb some of the salmon’s moisture, creating a cohesive base. If the mixture feels too dry, add a splash of water or a tablespoon of mayonnaise to bring it together.
- Stir in 1/4 cup of mayonnaise, the 1 large egg, 2 green onions finely chopped, 2 tbsp fresh dill, 1 tbsp lemon juice, 1 tsp Dijon mustard, 1/2 tsp salt, and 1/4 tsp black pepper. The mayonnaise adds creaminess, while the egg locks everything in place. As you mix, the mixture should become smooth and pliable, a sign that the binding agents are working.
- Using a small cookie scoop or spoon, portion the mixture into 1‑inch balls. Roll them between your palms to smooth the surface. The size should be consistent for even cooking. If the mixture is sticky, wet your hands with a little water or oil to prevent sticking.
- Heat 1/2 cup of vegetable oil in a large skillet over medium heat. The oil should shimmer but not smoke. To test the temperature, drop a single salmon ball into the oil; if it sizzles immediately and begins to brown, the oil is ready. This step is crucial for achieving the perfect crispy exterior.
- Carefully place the salmon balls into the hot oil, ensuring they’re not overcrowded. Fry for 3–4 minutes on each side, or until the exterior is golden brown and the balls feel firm. Flip them with a slotted spoon to avoid breaking. The sound of the sizzling is a cue that the panko is caramelizing beautifully.
- Remove the balls from the oil and place them on a paper towel‑lined plate to drain excess oil. The oil should evaporate, leaving the balls with a light, airy coating. Let them rest for a minute; this helps the flavors settle and prevents the surface from becoming soggy.
- In a small bowl, whisk together 1/2 cup Greek yogurt, 2 tbsp mayonnaise, 1 tbsp fresh dill, 1 tsp lemon juice, and 1/4 tsp garlic powder. This creamy sauce should be smooth and slightly thick. The yogurt adds a cooling counterpoint to the hot, crispy balls.
- Serve the salmon balls immediately, drizzled with the yogurt‑dill sauce. Pair them with a crisp cucumber salad or a light vinaigrette for a complete meal. The contrast between the crunchy exterior and the tender interior will keep your taste buds dancing.
That's it — you did it. But hold on, I've got a few more tricks that'll take this to another level.
Insider Tricks for Flawless Results
The Temperature Rule Nobody Follows
Many home cooks fry their salmon balls at a low temperature, resulting in a soggy exterior. The trick is to maintain a steady medium heat and test the oil with a single ball before adding the rest. When the oil is at the right temperature, the balls will sizzle immediately, giving you a golden crust in minutes. If you’re using a non‑stick skillet, preheat for a couple of minutes to ensure even heat distribution.
Why Your Nose Knows Best
Your sense of smell is a reliable indicator of doneness. As the salmon balls fry, the aroma shifts from metallic to nutty. When you smell a faint, toasted scent, the exterior is ready to flip. Trusting your nose saves you from overcooking and guarantees a crisp, flavorful shell.
The 5-Minute Rest That Changes Everything
After frying, let the salmon balls rest on a wire rack for five minutes. This brief pause allows the heat to redistribute, preventing the interior from steaming and the exterior from becoming soggy. The rest period also lets the flavors meld, making each bite more harmonious.
Using Fresh Dill vs. Dried
Fresh dill offers a bright, almost citrusy flavor that elevates the dish, while dried dill can be harsher and more concentrated. If you’re short on fresh herbs, use half the amount of dried dill, but be mindful that the flavor will be stronger. The key is to balance the dill with the lemon juice to keep the dish from becoming overwhelmingly herbaceous.
Keeping the Balls Moist
If the salmon balls feel dry during mixing, add a tablespoon of olive oil or a splash of water. The oil will help bind the mixture and keep the interior moist, while water will thin it slightly, preventing it from becoming too thick and clumpy. This small adjustment can make a big difference in the final texture.
Creative Twists and Variations
This recipe is a playground. Here are some of my favorite ways to switch things up:
Spicy Asian Fusion
Add 1 tsp Sriracha to the salmon mixture and replace the dill with fresh cilantro. Serve with a side of pickled ginger for a tangy contrast. The heat from the Sriracha will give the dish a bold kick that pairs wonderfully with the buttery panko.
Herb‑Infused Mediterranean
Swap the dill for a mix of oregano, thyme, and parsley. Replace the lemon juice with a splash of red wine vinegar and add a teaspoon of feta cheese for a salty, tangy finish. This version is perfect for a summer picnic or a light lunch.
Sweet and Savory Bacon‑Wrapped
Wrap each salmon ball with a thin strip of bacon before frying. The bacon will render its fat into the ball, creating a rich, smoky flavor. The sweet, salty bacon also adds a delightful crunch on the outside.
Vegan Version
Replace the salmon with a blend of chickpeas and mashed sweet potato for a hearty, plant‑based ball. Use flaxseed egg and coconut yogurt as binders, and fry in coconut oil. This version maintains the crispy texture while offering a completely vegan option.
Low‑Calorie Light Version
Use a non‑stick skillet and a spray of cooking oil instead of deep frying. Reduce the amount of mayonnaise and Greek yogurt in the sauce, and increase the lemon juice for a zesty finish. The result is a lighter, lower‑calorie version that still delivers on flavor.
Garnish Ideas
Finish the dish with a sprinkle of toasted sesame seeds, a drizzle of honey, or a few capers for an extra burst of flavor. The garnish not only adds visual appeal but also introduces new textures and tastes that elevate the dish.
Storing and Bringing It Back to Life
Fridge Storage
Store the cooked salmon balls in an airtight container in the refrigerator for up to 3 days. Keep them in a single layer to prevent sticking. When you’re ready to serve, reheat them in a skillet over medium heat for a few minutes, or microwave on a low setting for 30 seconds.
Freezer Friendly
Freeze the salmon balls on a parchment‑lined tray for 2–3 hours until solid, then transfer to a freezer bag. They’ll stay fresh for up to 2 months. When reheating, thaw overnight in the refrigerator and then reheat as described above. The texture remains crisp if you reheat in a hot skillet.
Best Reheating Method
The secret to keeping the panko crisp is to heat the salmon balls in a preheated skillet, not the microwave. Heat a small amount of oil in a pan, add the balls, and fry for 1–2 minutes per side. If you prefer the microwave, add a splash of water to the container before reheating; the steam will help restore moisture without making the exterior soggy.