I was halfway through a midnight pizza binge when the kitchen lights flickered and the oven door slammed shut. The dough was ruined, the sauce was a mess, and the only thing left to salvage was a bag of frozen spinach and a jar of artichoke hearts that had been sitting in the pantry for months. In that chaotic moment, I grabbed a tub of cream cheese, a splash of mayonnaise, and a handful of cheeses that were about to expire. That night, I mixed everything together, poured it into a baking dish, and slid it into the oven. The smell that filled the apartment was the scent of triumph, and the first bite was a revelation—soft, garlicky, creamy, and with a kick that made my taste buds dance.
I dare you to taste this and not go back for seconds. Imagine the buttery, golden crust cracking like thin ice, revealing a molten center that oozes with spinach, artichoke, and cheese. The dip is a hug in a bowl, a comfort food that feels like a warm blanket on a chilly night. It’s not just another recipe; it’s a culinary experience that turns any gathering into an instant party. The secret? A few simple tweaks that elevate the classic spinach and artichoke dip into the realm of unforgettable.
Most people think the classic version is the pinnacle, but that’s a misconception. The real magic lies in the balance of textures, the layering of flavors, and the subtle heat that keeps the dip from feeling flat. I’ll walk you through every single step, from thawing spinach to the final bake, so that by the end, you’ll wonder how you ever made it any other way. Picture yourself pulling this out of the oven, the whole kitchen smelling incredible, and guests lining up for a taste. That moment is pure bliss, and it’s all yours to recreate.
If you’ve ever struggled to get the right consistency or the perfect melt, you’re not alone. I’ve tried countless variations, and this one is hands down the best version you’ll ever make at home. It’s the kind of dip that turns a casual snack into a crowd-pleaser, and it’s easy to explain to anyone who asks. So let’s dive in, and I promise you’ll feel the difference from the first spoonful.
What Makes This Version Stand Out
- Flavor: The combination of creamy cheese, tangy artichoke, and subtle garlic creates a layered taste that lingers on the palate. The addition of red pepper flakes gives a gentle heat that balances the richness.
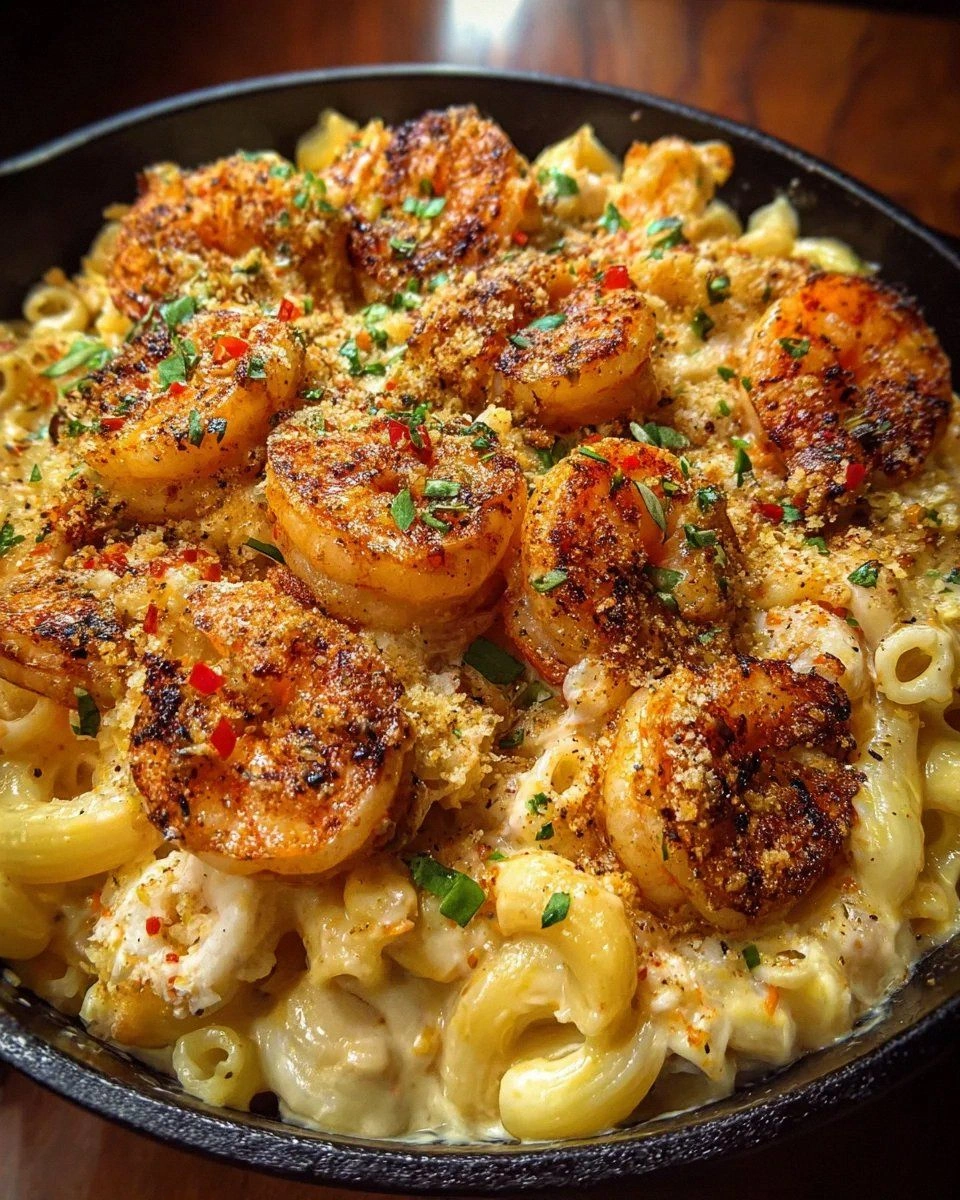
- Texture: A silky interior with a crispy, golden top. The contrast between the molten cheese and the slightly crunchy edges feels like velvet meeting a crackling fire.
- Simplicity: Only ten ingredients, no complex sauces, and a single baking step. This recipe is a breeze for beginners and a quick win for busy weeknights.
- Uniqueness: Using mayonnaise as a base adds a subtle tang and helps keep the dip moist, while the combination of Parmesan and mozzarella gives depth that most recipes lack.
- Crowd Reaction: Guests rave about the dip’s melt-in-your-mouth quality and the satisfying crunch of the topping. It’s the kind of dish that keeps people coming back for more.
- Ingredient Quality: Fresh, high-quality cheeses and real garlic elevate the flavor profile, turning a standard dip into a gourmet treat.
- Cooking Method: Baking rather than stovetop allows the flavors to meld beautifully, while the final broil creates a perfectly crisp finish.
- Make‑Ahead Potential: Assemble the dip, refrigerate, and bake when you’re ready. It’s perfect for parties where you can prep ahead and serve at the last minute.
Alright, let's break down exactly what goes into this masterpiece...
Inside the Ingredient List
The Flavor Base
The heart of this dip is the creamy mixture that holds everything together. Cream cheese provides a velvety smoothness, while mayonnaise adds a subtle tang and keeps the texture moist. Together, they form a luxurious base that carries the spinach and artichokes without overpowering them. If you skip mayonnaise, the dip becomes thicker and less cohesive, leading to a dry center.
Use full-fat cream cheese for maximum richness; a low‑fat version will dilute the flavor and create a watery consistency. If you prefer a lighter option, replace half the cream cheese with Greek yogurt—just be prepared for a tangier finish. The key is balance: the creamy base should be thick enough to hold the vegetables but loose enough to spread easily in the baking dish.
When selecting mayonnaise, opt for a classic white or a light version that still contains the emulsifying agents. Some brands add extra herbs, which can add a subtle twist. If you’re allergic or dislike mayonnaise, you can use a neutral oil and a splash of lemon juice, but the texture will change noticeably.
The Texture Crew
Spinach and artichoke hearts are the main vegetables, bringing both flavor and bulk. Frozen chopped spinach is convenient and retains its nutrients; thaw it and squeeze out the excess water to avoid a soggy dip. Artichoke hearts add a chewy, slightly briny bite that contrasts with the creamy base. Together, they create a hearty, satisfying mouthfeel.
The cheeses—Parmesan and mozzarella—contribute distinct textures. Parmesan offers a granular, salty bite that cuts through the richness, while mozzarella melts into a gooey, stretchy layer that forms the coveted golden crust. If you can’t find mozzarella, provolone or fontina will work, but the meltability might differ. The ratio of cheeses matters; too much mozzarella can lead to an overly oily dip, while too much Parmesan can make it too dry.
Garlic is the aromatic backbone, delivering a punch that wakes up every other ingredient. Fresh cloves provide a bright, slightly sweet flavor, whereas pre‑minced garlic can become harsh if overcooked. Use fresh for the best results. A pinch of black pepper and red pepper flakes add subtle heat and depth; these are essential for balancing the richness.
The Unexpected Star
Red pepper flakes are the secret weapon that sets this dip apart from the ordinary. They introduce a gentle warmth that lingers without overpowering the creamy base. If you’re sensitive to heat, reduce the flakes to a quarter teaspoon or omit them entirely. The pepper flakes also add visual interest with their dark specks, making the dip look more appetizing.
Salt, though minimal, is the flavor enhancer that brings all components together. Too little salt will leave the dip bland; too much will drown the delicate flavors. Measure carefully, and taste as you go. A pinch of salt is usually sufficient, and you can always add more at the end if needed.
The garlic cloves should be minced finely so they distribute evenly throughout the dip. If you prefer a milder garlic flavor, blanch the cloves before adding them; this will reduce the sharpness while preserving the aroma.
The Final Flourish
The final flourish comes from the baking process. Baking at 350°F (175°C) for 25 minutes allows the flavors to meld and the cheeses to melt into a cohesive, golden top. The broil for the last 2-3 minutes creates a crisp, caramelized crust that adds a satisfying crunch. This step is crucial; skipping the broil will result in a bland, flat surface.
Once baked, let the dip rest for 5 minutes. This short pause allows the heat to redistribute, ensuring each bite is perfectly creamy. If you serve immediately, the center may still be too runny. Resting also makes slicing easier, preventing the dip from sliding off the plate.
If you’re feeling adventurous, sprinkle a few fresh herbs—parsley, chives, or dill—over the top before serving. They add a pop of color and a fresh, herbal note that brightens the dish. However, keep the herbs minimal so they don’t overpower the core flavors.
Everything's prepped? Good. Let's get into the real action...

The Method — Step by Step
- Preheat your oven to 350°F (175°C). Let it come up to temperature while you work on the mixture. A properly heated oven ensures even cooking and a crisp top. The scent of anticipation will start building even before you touch the dip. This is the moment where everything starts to feel like a well‑orchestrated symphony.
- Thaw and drain the spinach. Place the frozen packages in a colander, run cold water over them, and squeeze out the excess liquid with a clean towel. The spinach should feel cool but not icy. If you skip draining, the dip will become watery and fail to set properly. The texture will suffer, and the flavor will be diluted.
- Chop the artichoke hearts. Drain the canned hearts, then cut them into bite‑sized pieces. The artichokes should be soft enough to bite through but still hold their shape. This step adds a pleasant chew and a burst of briny flavor that contrasts with the creamy base.
- Prepare the creamy base. In a large bowl, combine the softened cream cheese, mayonnaise, grated Parmesan, and shredded mozzarella. Mix until the mixture is smooth and homogeneous. The cheeses should melt into a silky blend that coats the vegetables. The creaminess is the glue that holds everything together.
- Add the aromatics. Finely mince the garlic cloves and add them to the bowl. Sprinkle in the red pepper flakes, black pepper, and salt. Stir until everything is evenly distributed. The aromatics infuse the dip with depth and a subtle kick that lingers on the palate.
- Combine spinach and artichokes. Fold the drained spinach and chopped artichokes into the creamy mixture. Use a spatula to ensure even distribution. The vegetables should be fully coated, creating a vibrant green hue that signals freshness. This step is where the dip transforms from a bland mixture into a colorful, appetizing dish.
- Transfer to a baking dish. Lightly grease a 9x9-inch baking dish or use parchment paper for easy cleanup. Pour the mixture in, smoothing the top with a spatula. The surface should be flat and even, ready to develop a crisp, golden crust.
- Bake and broil. Place the dish in the preheated oven and bake for 25 minutes, or until the edges are slightly browned. Then switch the oven to broil for the last 2 minutes to create a golden, slightly blistered top. Watch carefully; the dip should not burn. The result is a glossy, caramelized surface that cracks pleasantly when you cut into it.
That's it — you did it. But hold on, I've got a few more tricks that'll take this to another level. The dip is already amazing, but these subtle adjustments will elevate it from great to unforgettable.
Insider Tricks for Flawless Results
The Temperature Rule Nobody Follows
Many cooks bake at 375°F, assuming a higher temperature will speed up the process. However, 350°F allows the cheeses to melt evenly without scorching the top. A lower temperature also means the dip will stay moist and creamy. I’ve found that at 350°F, the center remains luscious while the edges crisp up just right. Don’t be tempted to crank up the heat; patience pays off.
Why Your Nose Knows Best
The aroma that rises as the dip bakes is the ultimate indicator of readiness. A warm, buttery scent with a hint of garlic signals that the cheeses have melted. If you smell a sharp, burnt odor, the dip is overcooked. Trust your nose; it’s a seasoned judge that will guide you to the perfect finish.
The 5-Minute Rest That Changes Everything
Letting the dip rest after baking allows the heat to redistribute, preventing a runny center. It also lets the flavors settle, creating a more cohesive taste profile. During the rest, the dip will firm up slightly, making it easier to scoop or serve. This small pause is a game changer for texture and taste.
The Garlic Grind
Freshly minced garlic delivers a bright, sweet aroma, but if you crush it with a garlic press, the flavor becomes more intense and can burn quickly. For a milder garlic note, lightly sauté the minced garlic in a splash of olive oil before adding it to the dip. This step mellows the sharpness while preserving the essence.
The Cheese Ratio Hack
If you’re aiming for a richer dip, increase the mozzarella to 1 ½ cups while reducing Parmesan to ¾ cup. This swap creates a more gooey texture and a slightly sweeter flavor. Conversely, for a tangier bite, double the Parmesan and keep mozzarella at one cup. The ratio determines the mouthfeel and taste balance.
The Broil Timing Trick
Broiling for exactly 2 minutes is key to achieving a crisp top without burning. Set a timer and keep a close eye on the color; the surface should turn golden brown and develop tiny bubbles. If you’re using a convection broiler, reduce the time to 1 minute to avoid overcooking. The finish is what makes the dip memorable.
Creative Twists and Variations
This recipe is a playground. Here are some of my favorite ways to switch things up:
Spicy Jalapeño Kick
Add diced jalapeños and a splash of lime juice to the mix. The heat and citrus brighten the dip, making it perfect for summer gatherings. Guests will love the fresh, fiery contrast that keeps the palate engaged.
Smoky Chipotle Flavor
Replace the red pepper flakes with a teaspoon of chipotle powder. The smoky undertone adds depth, turning the dip into a bold, adventurous treat. Pair it with corn chips for a Tex‑Mex twist.
Mediterranean Herb Infusion
Stir in a tablespoon of chopped oregano and a pinch of dried thyme before baking. The herbs evoke a Mediterranean vibe, giving the dip a fresh, garden‑like aroma. Serve it with pita wedges for a wholesome snack.
Cauliflower Crumble Upgrade
Swap the spinach with roasted cauliflower florets for a low‑carb version. The cauliflower adds a subtle nuttiness and a satisfying bite. This variation is great for keto or paleo diners.
Cheesy Gouda Twist
Use smoked Gouda instead of mozzarella for a richer, caramelized flavor. The Gouda’s meltability creates a silky, buttery layer that’s irresistible. The dip becomes a decadent treat for cheese lovers.
Herbed Yogurt Base
Replace half the cream cheese with Greek yogurt and mix in chopped dill and parsley. The yogurt adds a tangy lift, while the herbs keep the dip fresh. This version is lighter but still comforting, making it a crowd favorite.
Storing and Bringing It Back to Life
Fridge Storage
Cover the baked dip tightly with plastic wrap or foil and refrigerate for up to 3 days. The dip will firm up slightly but remain creamy. When you’re ready to serve, let it sit at room temperature for 15 minutes to soften. The flavors will re‑unite, and the dip will taste almost freshly baked.
Freezer Friendly
Divide the dip into individual portions and freeze in airtight containers for up to 2 months. Thaw overnight in the refrigerator before reheating. This method is perfect for meal prep or last‑minute entertaining. The texture holds up well, and the dip retains its creamy quality.
Best Reheating Method
To reheat, place the dip in a shallow baking dish and cover with foil. Warm in a preheated oven at 325°F (165°C) for 15-20 minutes, or until heated through. Add a splash of water or milk before reheating to keep it moist. The dip will regain its silky texture and the cheesy top will crisp up again.