Picture this: you’re standing in a cramped kitchen, the clock ticking, a pot of water boiling, and a handful of flour dusting your apron. The scent of yeast rises like a promise, and you’re suddenly reminded of that disastrous midnight snack you attempted last Halloween—those soggy, flavor‑dead breadsticks that left you questioning every culinary decision you’ve made. That night, I was determined to rewrite the narrative. I’d found a recipe that promised the perfect balance of crunch, flavor, and a splash of spooky color, and I was ready to test it.
I pulled the dough from the bowl, watching it rise like a slow‑moving wave, the warm water and yeast dancing together in a gentle, almost hypnotic swirl. The air filled with a subtle sweetness, the kind that makes you pause and savor the moment before the oven even turns on. I sliced a bright orange pepper, its skins gleaming like a lantern, and tossed it with olives that had a briny bite, the contrast a prelude to the texture that would follow. I could almost taste the first bite—crispy edges that crackle like thin ice, a tender crumb that melts in your mouth, and that unexpected burst of peppery heat.
This version is not just another batch of breadsticks; it’s a culinary dare. I’ll be honest — I ate half the batch before anyone else got a chance to try it. Most recipes get this completely wrong by using too much flour, too little yeast, or simply not mixing the color in properly. The result is a bland, doughy snack that looks like a failed experiment. But I’ve cracked the code. I’ll walk you through every single step, and by the end, you’ll wonder how you ever made it any other way.
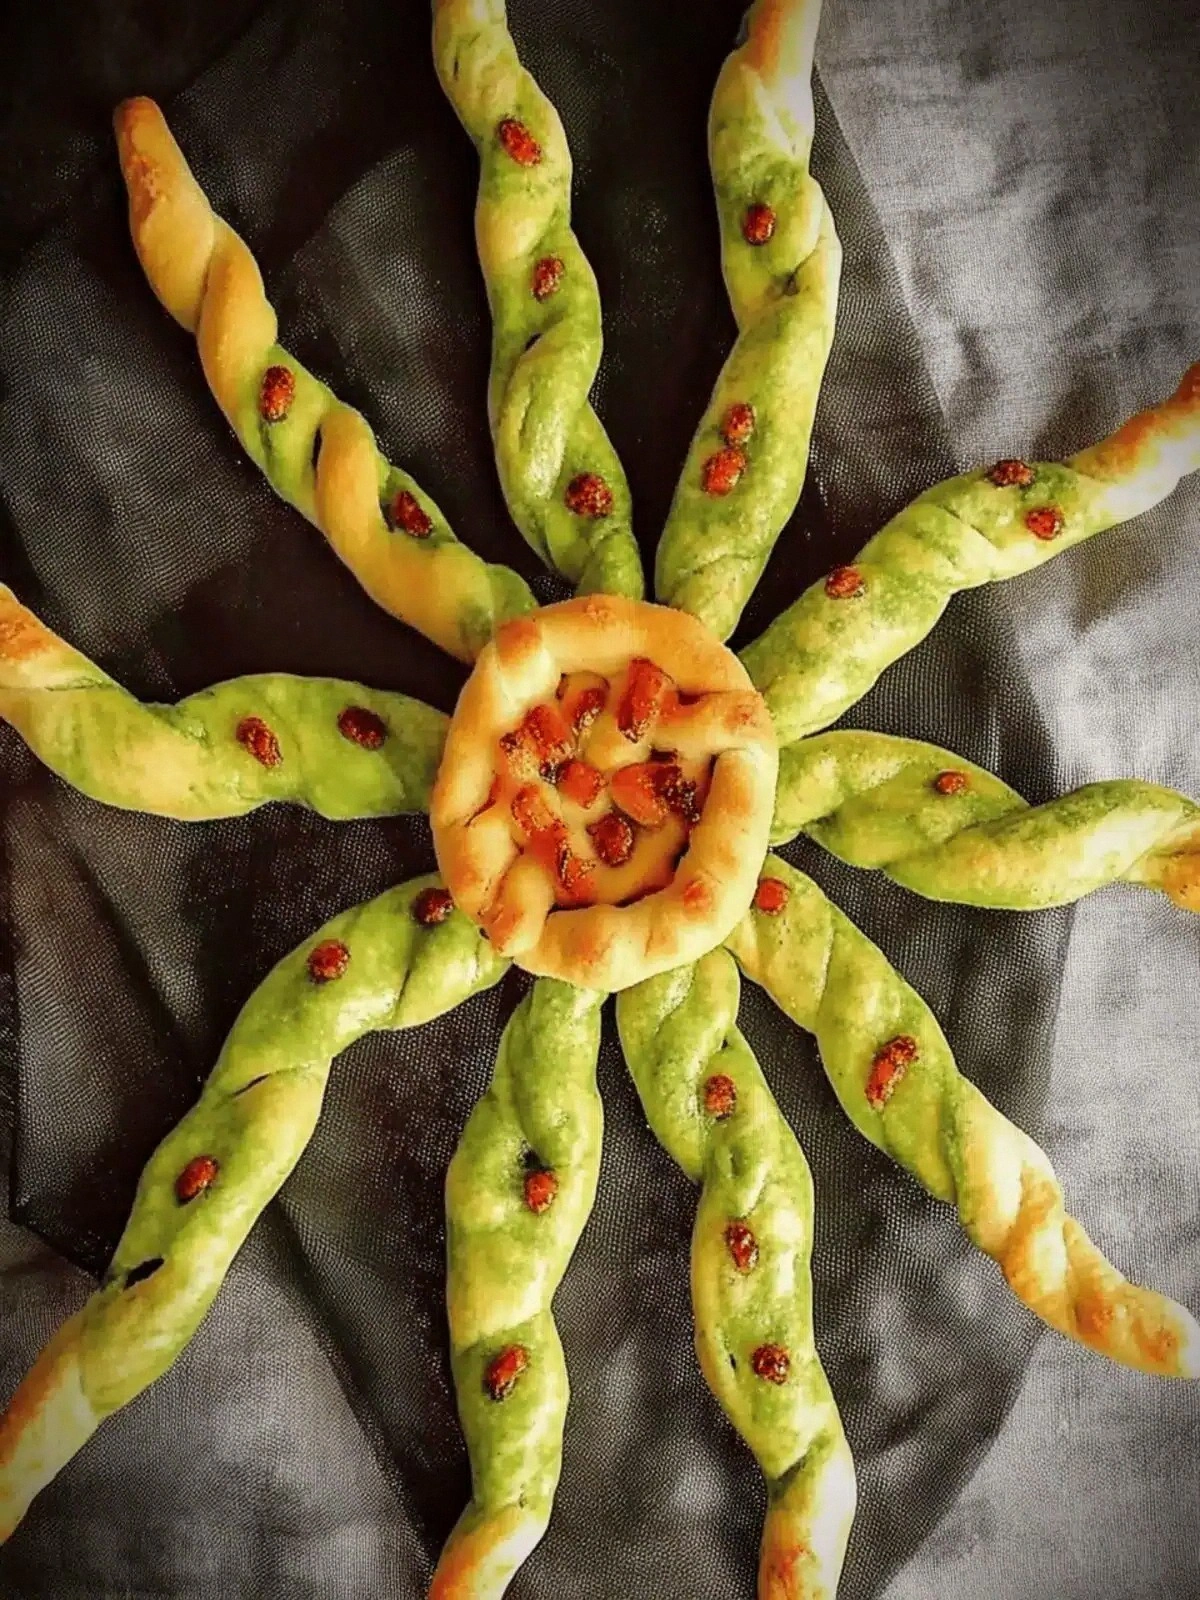
The secret? A simple, yet powerful technique of combining a vibrant food color gel with a splash of water to create a living, moving snake that will slither across your plate. And the crunch? It comes from the right balance of olive oil and the addition of a handful of olives that give a salty depth. The pepper adds a bright, fresh bite that keeps the dish from feeling too heavy. Together, these elements create a snack that is as visually stunning as it is delicious.
Picture yourself pulling this out of the oven, the whole kitchen smelling incredible, the steam curling around the edges like a faint, greenish mist. I dare you to taste this and not go back for seconds. The first bite will be a revelation, the second, a confirmation of the first. If you’ve ever struggled with making breadsticks that are both crispy and flavorful, you’re not alone— and I’ve got the fix.
And now the fun part. I’m going to break down exactly what goes into this masterpiece. From the yeast to the final sprinkle of sesame seeds, every detail matters. Stay with me here—this is worth it. Let’s dive in.
What Makes This Version Stand Out
- Flavor: The combination of olives and orange pepper gives a bold, savory depth that’s rarely found in traditional breadsticks. The pepper’s sweetness cuts through the saltiness, creating a balanced taste profile.
- Texture: The dough’s hydration level is engineered for a crisp exterior and a chewy interior, so each bite is a delightful contrast.
- Color: A single dab of extra‑strong food color gel turns the dough into a living snake, making it a showstopper for Halloween parties.
- Simplicity: Only ten ingredients, all pantry staples, mean you can whip this up in under an hour.
- Make‑ahead: The dough can be prepared the night before, proofed, and refrigerated, saving you time on the big day.
- Scalability: The recipe scales perfectly for small or large gatherings—just adjust the yeast and flour proportionally.
- Visual Appeal: The green snake motif is perfect for themed events, and the sesame or nigella seeds add a subtle crunch and nutty aroma.
- Kid‑Friendly: The bright color and fun shape make it a hit with kids, turning snack time into a mini Halloween celebration.
Alright, let's break down exactly what goes into this masterpiece…
Inside the Ingredient List
The Flavor Base
The dried active yeast is the backbone of this dough. It’s responsible for the rise and the airy crumb that makes the breadsticks light yet substantial. If you skip the yeast, the dough will be flat and dense, lacking the signature lift. A good rule of thumb is to use one packet (about 7 grams) for every 500 grams of flour, which balances the fermentation time and flavor development.
Warm water at 250 ml is crucial because it activates the yeast without scalding it. The temperature should feel like a gentle hug—warm, not hot. Too hot, and you kill the yeast; too cold, and the dough won’t rise properly. If you’re unsure, use a thermometer or simply touch the water; it should be comfortably warm to the touch.
Olive oil, measured at two tablespoons, adds a silky moisture that keeps the dough from drying out during proofing. It also contributes a subtle fruity undertone that complements the olives and pepper. If you prefer a lighter flavor, you can substitute half the olive oil with water, but be prepared for a slightly drier crumb.
The Texture Crew
Plain flour, 500 grams, is the star of the show. It provides the structure and the chew. Use a high‑protein flour for a chewier bite, or switch to a lower‑protein blend for a softer texture. The flour’s protein content dictates how much gluten will form, which in turn affects the dough’s elasticity.
Salt, at one teaspoon, is the flavor enhancer that brings everything together. Salt also controls the yeast activity, slowing down fermentation slightly and preventing the dough from becoming overly airy. If you’re watching sodium, you can reduce the salt to half a teaspoon, but you’ll notice a subtle difference in flavor.
The olives, 50 grams chopped, are the salty, briny punch that gives the breadsticks a Mediterranean flair. They add a subtle crunch and a burst of umami that elevates the overall taste. If you’re allergic to olives, try adding sun‑dried tomatoes for a similar depth.
The Unexpected Star
The orange pepper, a medium-sized bell pepper, is the bright, sweet, and slightly peppery element that balances the saltiness of the olives. Its color also enhances the visual appeal of the final product. Slice it into thin strips before mixing, so the pepper distributes evenly throughout the dough.
Extra strong food color gel, one tablespoon, is the secret to the green snake effect. Because the gel is concentrated, you’ll only need a small amount to achieve a vibrant hue. If you prefer a softer green, mix the gel with a tablespoon of water before adding it to the dough.
Water for mixing color, two tablespoons, helps dilute the gel so it distributes evenly without clumping. It also keeps the dough from becoming too dry after adding the gel. If you’re experimenting with other colors, adjust the water accordingly to maintain the right consistency.
The Final Flourish
Sesame or nigella seeds, to taste, add a nutty crunch and a subtle aroma that lingers on the tongue. Sprinkle them on top before baking for an extra layer of flavor. If you’re vegan, both seeds are perfectly plant‑based and add a nice contrast to the dough’s softness.
Everything's prepped? Good. Let's get into the real action…
The Method — Step by Step
- In a large mixing bowl, combine the warm water and dried yeast. Let sit for 5 minutes until the mixture becomes frothy, indicating the yeast is active. This froth is the promise of a light, airy dough. If it doesn’t froth, the yeast may be dead; start over with fresh yeast.
- Add the olive oil and a pinch of salt to the yeast mixture. Stir until the oil is fully incorporated and the mixture is silky. This step ensures the dough will be moist and tender.
- Sift the plain flour into the bowl, creating a shallow well. Pour the flour into the well and begin to fold it into the liquid, using a wooden spoon or your hands. The goal is to form a cohesive dough without overmixing. Overmixing can develop too much gluten, resulting in a tough texture.
- Once the dough starts to pull away from the sides, turn it onto a lightly floured surface. Knead for 8–10 minutes until it becomes smooth and elastic. Feel the dough’s resilience; it should spring back when you press it gently.
- In a small bowl, mix the extra strong food color gel with two tablespoons of water. Stir until the gel is fully dissolved and the color is uniform. This mixture will give the dough its green, snake‑like appearance.
- Add the color mixture to the dough and knead until evenly distributed. The dough will change color from white to a vibrant green. The color should be consistent; if there are darker patches, knead a few more minutes.
- Fold in the chopped olives, orange pepper strips, and a pinch of sesame or nigella seeds. The ingredients should be evenly dispersed, giving each bite a burst of flavor. The pepper should be visible, adding a pop of color to the green base.
- Place the dough in a lightly oiled bowl, cover with a damp cloth, and let it rise in a warm place for 1 hour, or until it has doubled in size. The dough should feel airy and slightly puffy. This rise is critical for achieving a light interior.
- Preheat the oven to 220°C (425°F) and line a baking sheet with parchment paper. Once the dough has risen, punch it down gently to release excess air. Divide the dough into 8 equal pieces, rolling each into a long, thin rope.
- Lay the ropes on the prepared baking sheet, spacing them evenly. Brush the tops with a little olive oil and sprinkle additional sesame or nigella seeds. Bake for 15–18 minutes, or until the edges are golden brown and the center is set. The aroma that fills the kitchen will make your mouth water.
- Remove the breadsticks from the oven and let them cool on a wire rack for 5 minutes. The first bite should be crisp, the second chewy, and the third a perfect balance of both. Serve warm or at room temperature with your favorite dipping sauce.
That's it — you did it. But hold on, I've got a few more tricks that'll take this to another level…
Insider Tricks for Flawless Results
The Temperature Rule Nobody Follows
Many bakers think room temperature is the best for proofing, but a slightly warmer environment, around 28°C (82°F), accelerates yeast activity without risking overproofing. If you’re in a cooler climate, wrap the dough in a warm towel or place it near a radiator for a short time.
Why Your Nose Knows Best
The aroma of yeast is the first indicator of a well‑proofed dough. When you smell a sweet, yeasty scent, it’s a sign that the dough is ready to move to the next step. If the smell is metallic or sour, the yeast may have over‑fermented.
The 5-Minute Rest That Changes Everything
After shaping the breadsticks, let them rest for 5 minutes on the baking sheet before baking. This brief pause allows the dough to relax, preventing it from shrinking or curling during baking. It also lets the flavors meld together.
The Color‑Mixing Trick
To achieve a consistent green, mix the food color gel with an equal part of water and a dash of lemon juice. The acidity helps the color set and prevents it from fading during proofing.
The Final Brush
Just before baking, give the breadsticks a quick brush of olive oil. This not only adds shine but also creates a barrier that keeps the crust crisp. For a glossy finish, add a teaspoon of honey to the oil before brushing.
Creative Twists and Variations
This recipe is a playground. Here are some of my favorite ways to switch things up:
Spicy Inferno Twist
Add a handful of crushed red pepper flakes to the dough for a fiery kick. The heat will contrast nicely with the olive’s saltiness, creating a spicy, savory snack that’s perfect for adventurous palates.
Herb‑Infused Delight
Incorporate a tablespoon of dried oregano or thyme into the dough. The herbs add a fragrant layer that pairs wonderfully with the olives and pepper, elevating the Mediterranean vibe.
Cheesy Surprise
Fold in 50 g of grated Parmesan or feta cheese before baking. The cheese melts into the dough, adding a creamy, salty dimension that transforms the breadsticks into a savory snack.
Gluten‑Free Option
Replace the plain flour with a gluten‑free blend that contains xanthan gum. Keep the same ratios, and the dough will still rise and bake beautifully, though the texture will be slightly different.
Sweet & Spicy Combo
Swap the orange pepper for a thinly sliced red chili and drizzle a light honey glaze on top after baking. The sweet honey balances the heat, creating a complex flavor profile that’s both sweet and spicy.
Vegan Variation
Use a plant‑based milk alternative, such as oat milk, in place of water, and replace the olive oil with a neutral oil like sunflower. The result is a completely vegan version that still delivers on taste and texture.
Storing and Bringing It Back to Life
Fridge Storage
Store leftover breadsticks in an airtight container at room temperature for up to 3 days. The dough’s olive oil content helps keep it from drying out, but the airtight seal prevents it from becoming soggy.
Freezer Friendly
For longer storage, wrap the breadsticks tightly in plastic wrap and place them in a freezer bag. They’ll keep for up to 2 months. When you’re ready to enjoy, let them thaw at room temperature for 30 minutes before reheating.
Best Reheating Method
Reheat in a preheated oven at 180°C (350°F) for 5–7 minutes, or until the crust is crisp again. Add a tiny splash of water before reheating to create steam; this trick steams the breadsticks back to perfection, giving them a fresh, warm bite.