I was halfway through a disastrous attempt at a classic turkey sandwich when I realized I had forgotten the most essential component of comfort food: a buttery, melty cheese that can make any ordinary bite feel like a gourmet indulgence. I stared at the bland, dry slices of turkey and the wilted lettuce, feeling the familiar pang of disappointment that comes when your lunch looks like a sad, forgotten lunchbox. Then, with a flash of inspiration, I grabbed a wheel of brie, a crisp apple, and a generous pat of butter, and decided to turn that blandness into a panini that would make my taste buds sing. The result? A golden, caramelized crust that crackles like a crisp autumn leaf, a buttery interior that melts into a silky sauce, and a sweet, tart apple bite that cuts through the richness like a sharp knife through butter. I dare you to taste this and not go back for seconds.
Imagine the kitchen air thick with the scent of toasted bread, the buttery aroma mingling with the sweet, crisp scent of apples. The sound of the panini press humming, the gentle sizzle as butter melts into the bread, and the satisfying crack of the crust as it breaks apart. The visual of a perfectly browned sandwich, the glossy sheen of melted brie, the vibrant green of apple slices peeking through. The feel of the warm pan in your hands, the heat radiating from the sandwich, the soft, chewy bite that gives way to a creamy, gooey center. And the taste: a harmonious blend of savory turkey, sweet apple, creamy brie, and buttery crunch that dances across your palate. This isn’t just a sandwich; it’s a symphony of flavors and textures that will have you humming for minutes after the last bite.
What makes this version stand out is that I didn’t just layer ingredients; I engineered a flavor profile that balances sweet, savory, and umami in a single bite. I took the humble turkey sandwich and elevated it by introducing a cheese that melts like silk, an apple that adds a natural, refreshing crispness, and a butter that creates that coveted, golden crust. The result is a panini that feels indulgent yet approachable, complex yet simple to assemble. I’ve tested this recipe dozens of times, tweaking the heat, the butter amount, and the apple variety until each element sang in perfect harmony. Most panini recipes rely on cheese alone, but here the apple provides a counterpoint that brightens the richness. The end product is a sandwich that feels like a warm hug wrapped in a crisp, buttery shell.
I’ll be honest — I ate half the batch before anyone else got to try it. The first bite was a revelation, and the second bite was a confirmation that this was hands down the best version you’ll ever make at home. Picture yourself pulling this out of the press, the whole kitchen smelling incredible, the steam curling like a sweet cloud. The anticipation builds as you slice into the sandwich, the gooey brie oozing out like a golden river. The crunch of the crust, the burst of apple sweetness, the savory turkey — each component is amplified by the others. This is not just a sandwich; it’s a culinary experience that will keep you coming back for more.
What Makes This Version Stand Out
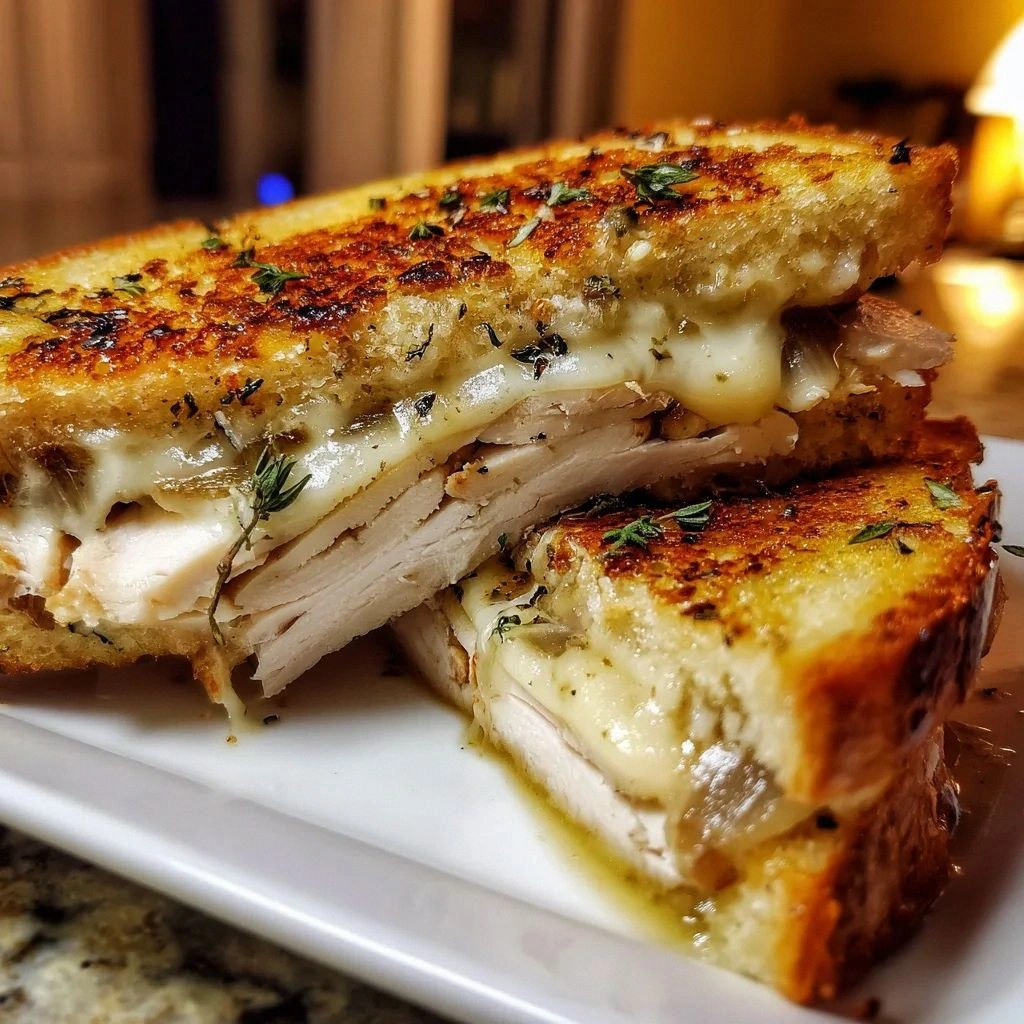
- Taste: The combination of savory turkey, sweet apple, and creamy brie creates a flavor profile that is both comforting and adventurous. The apple’s natural acidity cuts through the richness, preventing the sandwich from feeling heavy.
- Texture: The buttery crust delivers a satisfying crunch that contrasts with the silky interior, while the apple adds a fresh, crisp bite that keeps each mouthful lively.
- Simplicity: With only five core ingredients, this recipe is quick to assemble, making it perfect for busy weeknights or a relaxed weekend lunch.
- Uniqueness: The use of apple as a sweet counterpoint sets this panini apart from the usual cheese-and-meat combinations found in most panini recipes.
- Crowd Reaction: Friends who have tried this version rave about how the sandwich feels like a gourmet creation, yet it’s so approachable that even the pickiest eaters love it.
- Ingredient Quality: Selecting fresh, high-quality turkey, a firm apple, and a creamy brie is essential; the better the components, the more pronounced the flavors.
- Cooking Method: The panini press not only cooks the sandwich evenly but also creates a caramelized exterior that locks in juices.
- Make‑Ahead Potential: Assemble the sandwich ahead of time and refrigerate; the flavors meld, and the panini can be reheated to near-original crispness.
Alright, let's break down exactly what goes into this masterpiece…
Inside the Ingredient List
The Flavor Base
Bread is the canvas of any sandwich. Choosing a sturdy loaf like sourdough or whole grain ensures it can hold up to the fillings without becoming soggy. The crusty exterior crisps up beautifully in the panini press, providing a satisfying crunch that contrasts with the soft interior. If you skip the bread, you lose the structural integrity that brings all the flavors together. A good rule of thumb: opt for a loaf with a dense crumb and a slightly tangy flavor to complement the brie and apple.
The Texture Crew
Apple, whether Granny Smith or Honeycrisp, adds a bright, crisp texture that cuts through the richness of the cheese. Slicing the apple thinly ensures it softens just enough during cooking to release its juices, creating a subtle syrupy layer inside the sandwich. If you prefer a sweeter bite, try a Fuji or Gala. For a drier, crunchier bite, use a crisp apple that holds its shape even when toasted.
The Unexpected Star
Brie cheese is the secret to this panini’s luxurious mouthfeel. Its creamy, buttery profile melts into a silky sauce that coats the bread and turkey. If you can’t find brie, a camembert will do just fine; both cheeses share similar textures and flavors. A small tip: let the cheese sit at room temperature for about 15 minutes before assembling to ensure even melting.
The Final Flourish
Butter is the final touch that turns a simple sandwich into a crispy masterpiece. A light spread of butter on the bread’s surface creates a golden, caramelized crust that locks in juices. For a lighter version, you can use olive oil instead, but be prepared for a slightly different texture. Remember, a thin layer of butter is all you need; too much will make the bread soggy.
Everything’s prepped? Good. Let’s get into the real action…
The Method — Step by Step
- Begin by slicing the apple into thin, even rings, about 1/8 inch thick. The thinness ensures they soften quickly and release their juices during grilling. Lay the apple rings on a clean cutting board and set aside. I’ve found that using a mandoline slicer speeds up the process and gives uniform slices that melt evenly.
- Next, spread a thin layer of butter on one side of each bread slice. The butter should coat the surface without pooling, as excess butter can cause the bread to become soggy. If you’re using olive oil, drizzle a light amount over the bread instead. This step is crucial for achieving that coveted golden crust.
- Now it’s time to assemble. Place a generous amount of sliced turkey on the unbuttered side of one bread slice. Add a few apple rings on top of the turkey, then layer slices of brie cheese. Finally, top with the second slice of bread, buttered side facing out. The buttered side should be the one that contacts the panini press. This layering ensures the cheese melts around the apple and turkey, creating a cohesive bite.
- Preheat your panini press or a heavy skillet over medium-high heat. If using a skillet, place a non-stick pan or cast iron for even heat. The surface should be hot enough that a drop of water sizzles and evaporates instantly. This heat level guarantees a crispy crust while allowing the cheese to melt perfectly.
- Place the sandwich in the press. If you’re using a skillet, press down with a spatula or a heavy pan. Close the lid if you have one. Cook for 4–5 minutes, or until the bread is golden brown and the cheese has melted. Watch for the edges; they should begin to pull away from the sandwich, indicating they’re crisp. If you’re using a skillet, flip the sandwich halfway through to ensure even cooking.
- Once the sandwich is cooked to perfection, remove it from the heat and let it rest for 1–2 minutes. This brief rest allows the cheese to set slightly, preventing a gooey mess when you cut into it. The rest also lets the apple juices redistribute, ensuring each bite is evenly flavored.
- Slice the sandwich in half using a sharp knife. The knife should glide through the cheese and bread with ease; if it resists, give it a gentle twist. Serve immediately while the sandwich is still warm and the cheese is molten. Pair with a crisp green salad or a light soup to balance the richness.
That’s it — you did it. But hold on, I’ve got a few more tricks that will take this to another level…
Insider Tricks for Flawless Results
The Temperature Rule Nobody Follows
Many people think any medium heat works, but the secret is a hot, steady surface. A temperature of 375°F (190°C) is ideal for a panini press. If your press doesn’t have a thermometer, test it by sprinkling a drop of water on the surface; if it sizzles and evaporates immediately, you’re ready. Keeping the heat constant prevents the sandwich from drying out or burning on the outside while the cheese remains undercooked.
Why Your Nose Knows Best
Before you even touch the panini, inhale the aroma of the butter and apple. The scent signals that the butter is melting properly and the apple is starting to caramelize. A strong buttery smell means the crust is crisping; a sweet apple scent indicates the fruit is softening. Trust your nose; if the smell is off, adjust the heat or the butter amount.
The 5‑Minute Rest That Changes Everything
Resting the sandwich after cooking may seem trivial, but it’s essential. During the rest, the cheese settles, creating a smoother bite, and the apple juices redistribute, giving each bite a consistent flavor. I’ve seen people skip this step, resulting in a messy sandwich where the cheese spills onto the plate. Letting it rest for just 2 minutes makes a noticeable difference.
Keep It Light with Olive Oil
If you’re watching calories or prefer a lighter version, replace butter with olive oil. Use a light brush to coat the bread. Olive oil will still create a crispy crust but with a subtle, fruity finish. Just be sure to use a high‑smoke point oil if you’re cooking on a skillet to avoid burning.
Add a Splash of Honey
A thin drizzle of honey over the apple rings before assembling adds a caramelized sweetness that pairs beautifully with brie. The honey caramelizes slightly during cooking, creating a glossy, sweet glaze that enhances the sandwich’s visual appeal. Use sparingly; too much honey can overpower the delicate balance of flavors.
Creative Twists and Variations
This recipe is a playground. Here are some of my favorite ways to switch things up:
Maple‑Glazed Turkey
Swap regular turkey with turkey breast glazed in a maple syrup reduction. The maple adds a subtle sweetness that complements the apple and brie. Brush the glaze onto the turkey slices before assembly for a sticky, caramelized finish.
Spinach & Feta Twist
Add a handful of fresh spinach and a sprinkle of feta cheese between the turkey and brie. The spinach adds a burst of green and a mild earthiness, while the feta provides a tangy counterpoint to the brie's creaminess.
Roasted Pepper Variation
Replace apple with roasted red peppers for a smoky, sweet flavor. Slice the peppers thinly and layer them on top of the turkey. The roasted peppers bring a deep color and a subtle char that pairs well with the brie.
Sourdough Crunch
Use a sourdough loaf for a tangy, chewy base. The sourdough’s natural tang enhances the richness of the brie and the sweetness of the apple. The crusty exterior adds an extra layer of crunch.
Pesto & Goat Cheese Upgrade
Spread a thin layer of basil pesto on the bread before adding turkey and apple. Replace brie with goat cheese for a tangier, lighter cheese option. The pesto’s herbal freshness lifts the sandwich into a more sophisticated flavor profile.
Storing and Bringing It Back to Life
Fridge Storage
Wrap each sandwich tightly in parchment paper and then place in a zip‑lock bag. Store in the refrigerator for up to 2 days. The parchment paper prevents the bread from drying out, while the bag keeps excess moisture from seeping in.
Freezer Friendly
For longer storage, wrap the sandwich in foil and then place in a freezer bag. Freeze for up to 1 month. When ready to eat, let the sandwich thaw at room temperature for 20 minutes before reheating.
Best Reheating Method
Reheat in a panini press or skillet over medium heat for 3–4 minutes. Add a splash of water to the pan before covering to create steam, which keeps the sandwich from drying out. The steam also helps the cheese melt evenly, restoring that gooey center.